Recently, Whatsapp pushed their new privacy policy where they announced to share more data with Facebook, causing an exodus to other platforms, where Signal is one of the more popular ones, among Telegram. Both are great alternatives, but I prefer Signal due to the open-source part, end to end encryption, and last but not least: their business model (living on donations instead of selling your data).
Typically, Zabbix is sending notifications to whatever medium you’ve chosen if a problem is detected. We all know the Email messages, the various webhook integrations with Slack/MS Teams/ Jira, etc, perhaps even some text message integrations and such. Now, if we’re migrating to Signal, we suddenly have access to the Signal API and can utilize it to receive Zabbix notifications. Nice!
There is only one drawback. You need a separate phone number to register against Signal. Don’t use your own phone number – unless you want to lose the ability to use Signal ;(
There are various ways to get a phone number for this purpose:
- Use the phone number of your current SMS gateway
- Use the company phone number (a lot of cloud PBX are providing the option to receive the verification email)
- Purchase a prepaid phone number.
- Use a service like Twilio
You just need to receive one text message, the rest of the communications will go via the internet
Time to get rid of Whatsapp and move to Signal! But… How to use Signal to get your notifications?
Signal-cli
Although we could built everything from scratch, talking to the API of Signal, there is a nice implementation available in order to talk to Signal within a few minutes: Signal-cli
Although this github page is very comprehensive in order to get Signal-cli installed, but of course it is not doing anything with Zabbix.
Configuration tasks
For this guide, we’re using:
- Centos 8
- Zabbix 5.2
signal-cli installation
First, lets install the Signal-cli utility, and in order to do so we need to resolve the dependency of Java by installing the openjdk application:
dnf -y install java-11-openjdk-devel.x86_64
After this installation, we should be good to continue with the installation of signal-cli. According to their installation guide, this should be sufficient:
export VERSION="0.7.3"
wget https://github.com/AsamK/signal-cli/releases/download/v"${VERSION}"/signal-cli-"${VERSION}".tar.gz
sudo tar xf signal-cli-"${VERSION}".tar.gz -C /opt
sudo ln -sf /opt/signal-cli-"${VERSION}"/bin/signal-cli /usr/local/bin/
At the time of writing, the most recent version is 0.7.3, and that’s what we’re installing here. If in the future a new version is released, of course you should install that!
If everything went as expected, we should be able to register ourself to Signal.
signal-cli registration
Since we want to execute these commands by Zabbix, we must make sure the registration is done with the correct user on the Zabbix server, otherwise you will get the following error message:
(ERROR App – User +19293771253 is not registered.)
In order to prevent this error, lets do the authentication against Signal as Zabbix user:
Important: The USERNAME (your phone number) must include the country calling code, i.e. the number must start with a “+” sign and you must replace everything between the < > in the following examples with your own values
runuser -l zabbix -c 'signal-cli -u <NUMBER> register'
Now, check for incoming test messages on this phone number. Within seconds you should receive a 6 digit code in the following format: xxx-xxx
Once you’ve received the text, it’s time to complete the registration:
runuser -l zabbix -c 'signal-cli -u <NUMBER> verify <CODE>'
Since we’re running these commands as a different user, we won’t see the output of them. Let’s just test!
Sending messages from the command line is straight forward:
runuser -l zabbix -c 'signal-cli -u <NUMBER> send -m <MESSAGE> <RECEIVER NUMBER>'
You will see the message id as output. Simply ignore it, since it’s not relevant at this point.
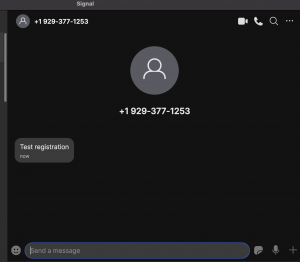
Within seconds:
It works! Great.
So now we’ve got this part covered, time to get the AlertScript set up, before heading to the frontend.
Zabbix AlertScript setup
Ok, so now we’ve got the registration done, we need to make sure Zabbix can utilise it. In order to do so, we use a very old method. Although it would’ve made more sense to use the webhook option, that means I had to built the communication with Signal from scratch.
So AlertScripts it is. In your terminal/SSH session with the Zabbix server open a new file with this command: vi /usr/lib/zabbix/alertscripts/signal.sh and insert the following contents:
#!/bin/bash
signal-cli -u '+19293771253' send -m "$1" $2
That’s right. just 2 lines. After saving the file, change the owner and set the permissions:
chown zabbix:zabbix /usr/lib/zabbix/alertscripts/signal.sh
chmod 7000 /usr/lib/zabbix/alertscripts/signal.sh
and it’s time to move to our frontend.
Zabbix mediatype configuration
In the frontend, go to Administration -> Mediatypes and create a new mediatype:
Name: Signal
Type: Script
Script name: signal.sh
Script parameters:
    {ALERT.MESSAGE}
    {ALERT.SENDTO}
don’t forget to configure some Message templates as well (second tab in the Mediatype configuration). You can just use the defaults if you click on ‘add’
Zabbix media configuration
Next step. Navigate to Administration -> Users (or just open your own user profile) and create a new media:
Type: Signal
Sendto: <your number>
When active / severity as per needs
Important: The USERNAME (your phone number) must include the country calling code, i.e. the number must start with a “+” sign
We’re almost there, just some configuration on the actions
Zabbix action configuration
This step is only needed if you are sending notifications right now via a specific mediatype. If you configured the ‘send only to’ option to ‘- All -‘ there is nothing to change, and it will work straight away!
Otherwise, navigate to Configuration -> Actions and find the action you want to change, and in the Operations, Recovery operations and Update operations change the ‘send only to’ option to ‘Signal’
Save your action and it’s time to test – Generate some problem to confirm the implementation actually works.
Wrap up
That’s it. By now you should have a working implementation where Zabbix is sending notifications to Signal. The setup was extremely straight forward and easy to configure. Nevertheless, if you need help getting this going, we (Opensource ICT Solutions) offer consultancy services as well, and are more than happy to help you out!


 Prev Post


Below error is occurring please help me

We have it in place since a week now and I should admit, it works perfectly
If you have failed to load local user list. You need to create directory /home/zabbix and add set it as a home directory for “zabbix” user.
Can anyone help with this error?
Problem solved. Selinux was the reason.
Hi,
when I try to register my phone number
runuser -l zabbix -c ‘signal-cli -u +yyxxxxxxxxx register’
i get this message:
This account is currently not available.
Anyone can explain?
Zabbix 6.2.2 on CentOS 9 Stream
This is because the zabbix user on your system has /bin/nologin as the default shell. Change this with
And now you can run this command again.
Super How-to Brian!
Waarvoor dank 🙂
Hi,
please I met wit the trouble during the signal-cli -u <NUMBER> register command, I get the this error>
Request verify error: javax.net.ssl.SSLHandshakeException: PKIX path building failed: sun.security.provider.certpath.SunCertPathBuilderException: unable to find valid certification path to requested target
It mean that it is missing the certificate ? How can I solve it
Thank you for help