


Zabbix proxies allow you to monitor a remote location, a DMZ, and even use cases as using proxies to ‘convert’ passive checks into active or move some load from your Zabbix server towards the proxies is a common solution.
Typically, the situation looks like this:
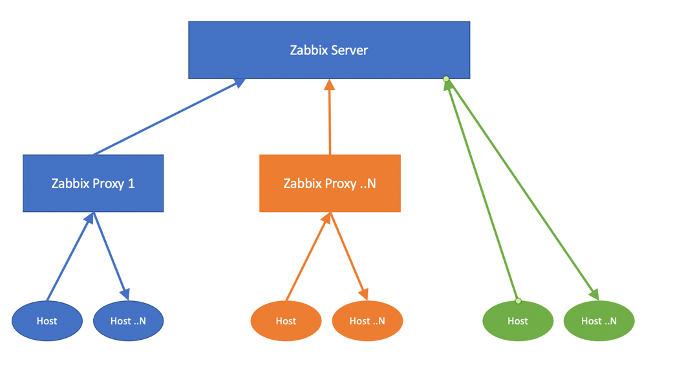
We’ve got multiple proxies, all responsible for their own set of hosts, and combined some hosts are monitored by the Zabbix server directly. In this setup, there is no redundancy at all. It is possible to build a HA cluster for the Zabbix server making use of the Linux utilities specially made for it.
Cluster for proxies
If we are using Linux for the proxies, HA can be realized using the same utilities as for the Zabbix server and build clusters for the proxies. While not impossible, it is making the configuration complex. We need static IPs, floating IPs, extra packages, more firewall rules and SELinux policies, et cetera.
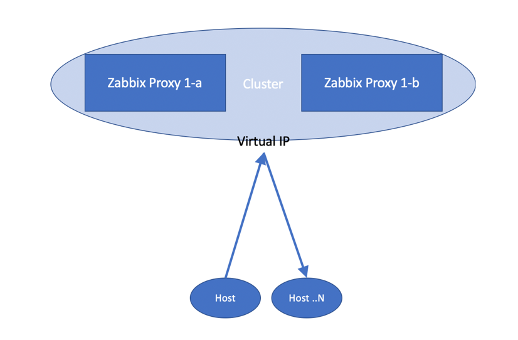
This way, the redundant proxies are ‘transparent’ for the agents since they are talking to the Virtual IP address. In the Zabbix server, everything is transparent as well since the communication from the proxies will be done using the VIP.
However, the configuration is not the easiest one, and we never know if the proxy that is not the proxy in use, will start in case of a problem. The cluster configuration will start the proxy daemon the moment there is a failover.
Redundant proxies without cluster configuration
If we don’t want to work with clusters for our proxies, we need to find another solution to facilitate a failover in case it’s needed.
Let’s make the drawing:
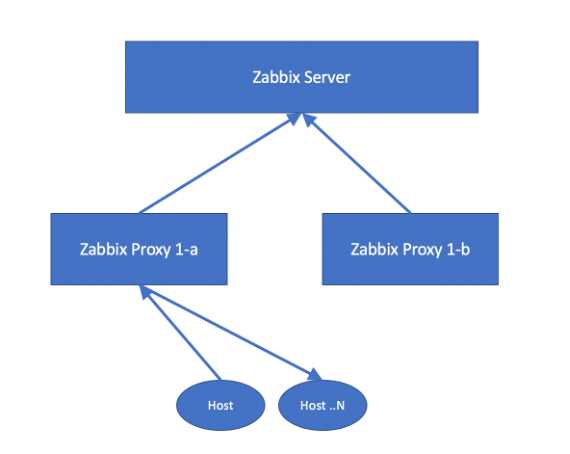
This way, we’ve got two proxies, operating completely independent of each other, and both proxy daemons are always running and reporting to the Zabbix server, so we know they are working as expected.
If Proxy 1-a stops working, for whatever reason, we need to switch over to Proxy 1-b. This proxy is in the ‘Server=’ and ‘ServerActive=’ parameter of the agents added, so there is no problem, and the agent will continue to work:
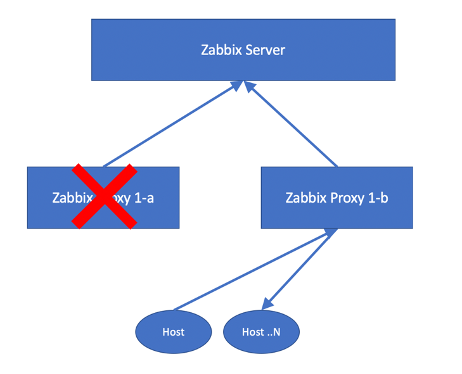
However, as you might be aware, our proxies are sending in their retrieved values every second by default to the Zabbix server (DataSenderFrequency=1 in the Proxy config) but they ask the Zabbix server just once per hour for the Configdata (ConfigFrequency=3600 in the Proxy config). Of course, we can adjust this value to once per second so that the failover from proxy 1-a to 1-b will be smooth. When talking about performance, this is highly undesirable. So, we must find a fix for this.
The next problem is that one Host in the Zabbix server frontend can be linked to one Proxy and not multiple. This means that even if we manage to get the Proxy config updated within one second, we still must move every Host from Proxy 1-a to Proxy 1-b somehow, in order to get the monitoring going.
Workflow and configuration
If we create a different way of moving the hosts from Proxy 1-a to Proxy 1-b, it must be done using API calls against our Zabbix server. Typically, you are doing these calls using some sort of scripting language (Python, Bash, Perl, etc). There are a few steps to define, in order to get the flow correct:
- Login to the Zabbix server to execute API calls
- Get the HostID of Proxy 1-a
- Get the HostID of Proxy 1-b
- Move all hosts from Proxy 1-a to Proxy 1-b
- Make sure the Zabbix Server config is updated
- Make sure the Zabbix Proxy config is updated
Of course, getting the HostID of Proxy 1-a and 1-b (step 2 and 3) can be done entirely static, i.e. providing the names in the script. This way, this approach will only work for 2 proxies, and if there are more proxies, you will have to create more scripts with different names: not what you want.
In order to make this flexible, we have to work on our Zabbix configuration to facilitate this.
Zabbix Configuration
Assumptions
We assume here that there are hosts within Zabbix, representing the Proxies, which are monitored through the proxies themselves:

When is a proxy ‘dead’?
First, we have to find out when a proxy is not responding anymore. With the default configuration applied on the proxy, it will follow the next rules to communicate to the Zabbix server:
- If there is data to be sent, do it every second.
- If there is no data to be sent, send a heartbeat once per minute to let the Zabbix server know everything is fine.
Using these rules in our favour, we are able to create items monitoring the last moment our Proxy reported:
With this internal item, we are monitoring when the proxy did report for the last time.
For flexibility, it is recommended to create these items and triggers on a template instead of directly on the hosts.
Making use of the Fuzzytime trigger function alerting on a difference in time is possible:

With a setup like this, we will see a problem raised if Proxy1-a went down (in this example).
For later use, it is required to start the trigger name with the name of our proxy. It must be an identical match.
At the same time, we must define which proxy (name) is the counterpart of Proxy1-a:

Of course, using actions we can send a message in order to get some attention to this problem, but we already decided to let a script do the automatic failover.
Action configuration
In the actions section we will create a new action:
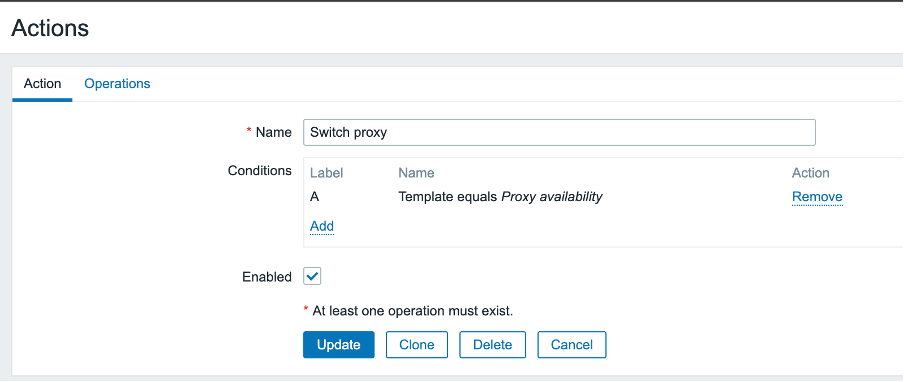
In the condition, we are just pointing to everything that happens on triggers coming from a specific template so that we don’t have to think about matching specific triggers or names.
In the operation, we are calling the script and passing the proxy name to the script. That way, we know which proxy went down.
At the same moment, we must push the name of the counterpart proxy to the script:
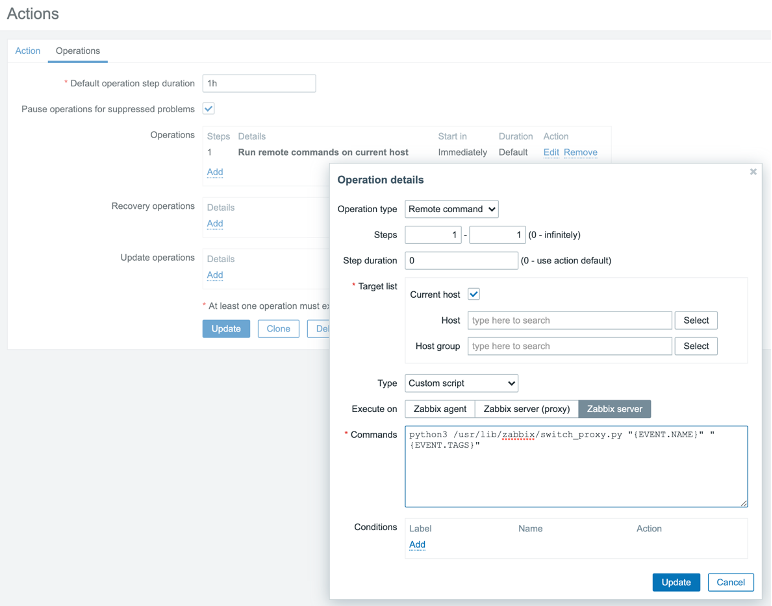
Note: this is a oneliner, there are no enters in the command.
At this point, we’ve passed all the necessary information to the script to get the failover going.
For later use, we will create one additional piece of configuration in our Zabbix frontend:
Frontendscript
This frontend script will force the Zabbix proxy to reload its configuration cache upon execution. That’s one of the ways of keeping the parameter mentioned above ‘ConfigFrequency=3600’ in the Proxy config default or even slower.
To get this working, we must enable RemoteCommands on the proxy. (EnableRemoteCommands=1)

Script logic
Step 1: Log in to the Zabbix server to execute API calls
Making use of the user.login method we will get a SessionID to use in the further steps.
Please make sure the user that is used to login got sufficient permissions (super admin) otherwise we will hit some limitations.
Step 2: Get the HostID of the failing proxy
Making use of the {EVENT.NAME} and some parsing, we should be able to get the name of the proxy out of the problem name. Using that name and the method proxy.get we are able to retrieve the ID of the Proxy.
Step 3: Get the HostID of the counterpart proxy
Making use of the {EVENT.TAGS} and some parsing, we should be able to get the name of the counter proxy out of the tags that are sent as 2nd parameter to the script. Using that name and the method proxy.get we are able to retrieve the ID of the Proxy that is the counterpart of our failing proxy.
Step 4: Move all hosts from the failing proxy to the counterpart proxy
Once we know the proxy id from step 2, we should do a few steps within step 4:
- Get the hostID of the proxy itself
Using the function host.get and filtering on the proxy name, we will get back the HostID of the proxy.
- Get all the hosts that are monitored by the failing proxy in an array
Using the function host.get and filtering on the proxyID we retrieved in step2, we will get a list of all hosts that are monitored by that proxy, including the proxy host itself
- Remove the hostID from the array.
Its time to remove the hosted from step4.1 from our array build in step 4.2 so that the list is clean.
After all these steps, we will end up with an array consisting out of all hosts that should be moved over to the counter proxy.
Using the host.update function, we are able to update just one field per host: proxy_hostid.
If we loop through the array from step 4.3, the result will be that all hosts are moved from the failing proxy to the working proxy.
Step 5: Make sure the Zabbix Server config is updated
In step 4 we’ve moved all hosts from one proxy to the other one, but now we have to wait up to 1 minute (default parameter in the Zabbix Server config: CacheUpdateFrequency=60 ) before our Zabbix server is aware of the configuration change.
This can be forced using the command “/usr/sbin/zabbix_server -R config_cache_reload” on the Zabbix server. This way the config is updated immediately.
Step 6: Make sure the Zabbix Proxy config is updated
Now, due to the default setting(ConfigFrequency=3600) in the Proxy config, it’s taking up to 1 hour before the new proxy is aware that it should monitor the hosts. Of course, this is breaking the failover, causing a 1 hour downtime period.
In the script, we call yet another API action: script.get to find a script that is called “update proxy cache”. Once found, extract the ID of that script.
With the ScriptID, we are able to execute the script (API call script.execute) and providing the hostID where the script should be executed on. Of course, we’re providing the hostID of the counterproxy we retrieved in step 3.
The result will be that after we’ve made the Server aware of its new config(step 6) we’re forcing the Proxy to do the same, and query the server for it’s most up to date configuration.
Within seconds, monitoring will work once again but now from the proxy that is functioning while we’ve abandoned the failing proxy.
Are there any drawbacks?
Of course, as with every solution, there are things to keep in mind when building the solution, or new limitations introduced.
If hosts are discovered using ‘Active agent auto-registration’ and both Proxy IP’s are listed in the ‘ServerActive’ parameter in the Zabbix Agent config, it is absolutely possible that the agent is discovered by different proxies, and thus keeps jumping in the frontend, which is highly undesirable. In order to work around that problem, there are 2 solutions:
- Do not use the Active Agent Auto Registration
- Enhance step 4, with the “action.update” API call, so that the Auto registration action is updated, where the condition “Proxy equals <PROXYNAME>” is also updated, reflecting the new active proxy
Conclusion
Although it is not supported out of the box, creating a redundant and HA setup for your proxies without complex cluster configuration is absolutely possible, by making use of a small custom script, built-in features of Zabbix, and a bit of creativity.
This blog originates from a real-world use case, where a customer asked us ( Opensource ICT Solutions, the first Zabbix Premium and training partner in the BeNeLux and first official trainer in the USA), to create a redundant environment, without complex configuration on every single proxy.
Of course, we can help you as well setting up your Zabbix environment, or just implement solutions like described in this blog post, just contact us to explore the possibilities!


Good post. Looks like the script is missing – switch_proxy.py
In my case, mainly network devices are monitored via snmp. There is no need to reconfigure zabbix-agent. In earlier versions of zabbix the proxy failure was solved by checking the proxy status in the database and updating the proxy for hosts.
select lastaccess from hosts where hostid=$proxyId;
Exceeding the assumed time resulted in:
update hosts set proxy_hostid=$newProxyId where hostid=$proxyId;”
Of course, this is a simplification.
It’s great that this functionality is already natively supported.
Hi! Need a small custom script 🙂
switch_proxy.py