


Zabbix 6.4 introduced major improvements to SNMP monitoring, especially when it comes to collecting large numbers of metrics from a single device. This is done by utilizing master-dependent item logic and combining it with low-level discovery and newly introduced preprocessing rules. This blog post will cover the drawbacks of the legacy SNMP monitoring approach, the benefits of the new approach, and the steps required to deploy bulk SNMP metric collection.
Table of Contents
The legacy SNMP monitoring approach – potential pitfalls
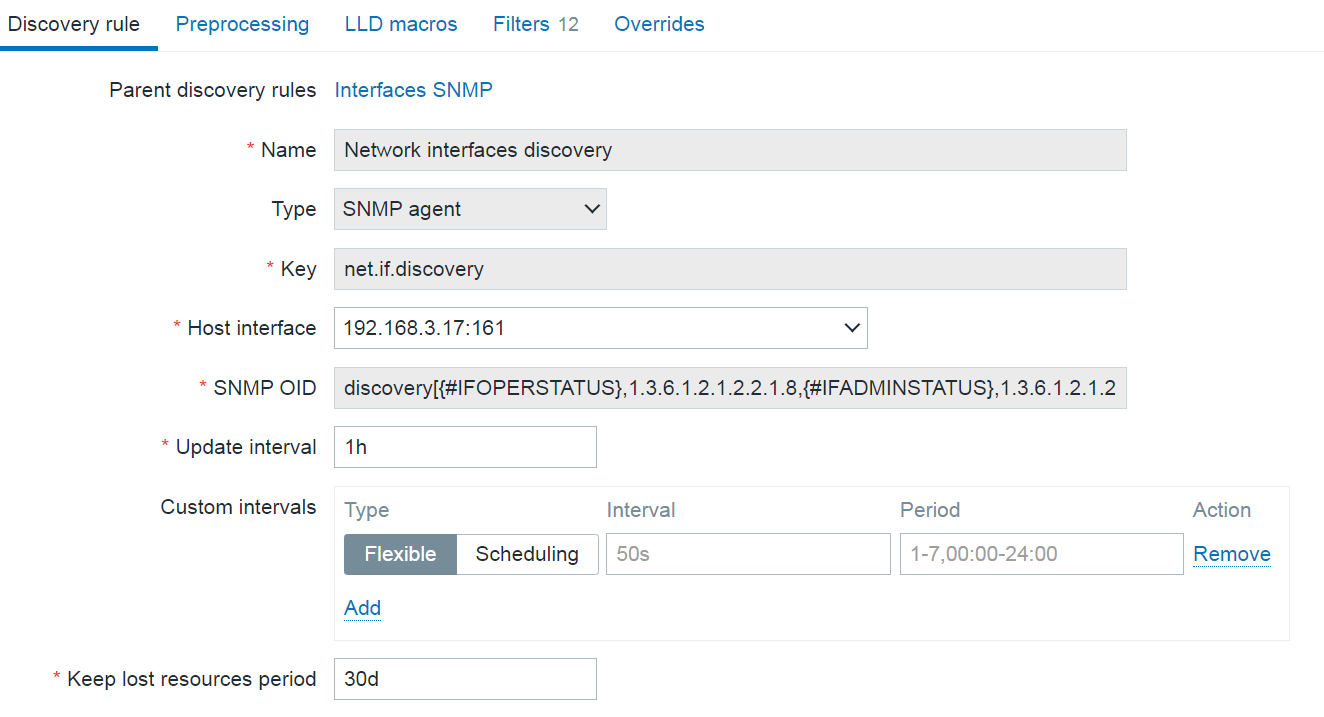
Let’s take a look at the SNMP monitoring logic that all of us are used to. For our example here, we will look at network interface discovery on a network switch.
To start off, we create a low-level discovery rule. In the discovery rule, we specify which low-level discovery macros are collected from which OIDs. This way, we create multiple low-level discovery macro and OID pairs. Zabbix then goes through the list of indexes at the end of the specified OIDs and matches the collected values to low-level discovery macros. Zabbix also collects the list of discovered indexes for the specified OIDs and automatically matches them with the {#SNMPINDEX} low-level discovery macros.
An example of regular SNMP discovery key:
discovery[{#IFOPERSTATUS},1.3.6.1.2.1.2.2.1.8,{#IFADMINSTATUS},1.3.6.1.2.1.2.2.1.7,{#IFALIAS},1.3.6.1.2.1.31.1.1.1.18,{#IFNAME},1.3.6.1.2.1.31.1.1.1.1,{#IFDESCR},1.3.6.1.2.1.2.2.1.2,{#IFTYPE},1.3.6.1.2.1.2.2.1.3]
The collected low-level discovery data will look something like this:
[
{
"{#SNMPINDEX}":"3",
"{#IFOPERSTATUS}":"2",
"{#IFADMINSTATUS}":"1",
"{#IFALIAS}":"",
"{#IFNAME}":"3",
"{#IFDESCR}":"3",
"{#IFTYPE}":"6"
},
{
"{#SNMPINDEX}":"4",
"{#IFOPERSTATUS}":"2",
"{#IFADMINSTATUS}":"1",
"{#IFALIAS}":"",
"{#IFNAME}":"4",
"{#IFDESCR}":"4",
"{#IFTYPE}":"6"
},
{
"{#SNMPINDEX}":"5",
"{#IFOPERSTATUS}":"2",
"{#IFADMINSTATUS}":"1",
"{#IFALIAS}":"",
"{#IFNAME}":"5",
"{#IFDESCR}":"5",
"{#IFTYPE}":"6"
},
{
"{#SNMPINDEX}":"6",
"{#IFOPERSTATUS}":"2",
"{#IFADMINSTATUS}":"1",
"{#IFALIAS}":"",
"{#IFNAME}":"6",
"{#IFDESCR}":"6",
"{#IFTYPE}":"6"
},
{
"{#SNMPINDEX}":"7",
"{#IFOPERSTATUS}":"2",
"{#IFADMINSTATUS}":"1",
"{#IFALIAS}":"",
"{#IFNAME}":"7",
"{#IFDESCR}":"7",
"{#IFTYPE}":"6"
}
]
Once the low-level discovery rule is created, we move on to creating item prototypes.
Items created based on this item prototype will collect metrics from the OIDs specified in the SNMP OID field and will create an item per index ( {#SNMPINDEX} macro) collected by the low-level discovery rule. Note that the item type is SNMP agent – each discovered and created item will be a regular SNMP item, polling the device and collecting metrics based on the item OID.
Now, imagine we have hundreds of interfaces and we’re polling a variety of metrics at a rapid interval for each interface. If our device has older or slower hardware, this can cause an issue where the device simply cannot process that many requests. To resolve this, a better way to collect SNMP metrics is required.
Bulk data collection with master – dependent items
Before we move on to the improved SNMP metric collection approach, we need to first take a look at how master-dependent item bulk metric collection and low-level discovery logic are implemented in Zabbix.
- First, we create a master item, which collects both the metrics and low-level discovery information in a single go.
- Next, we create a low-level discovery rule of type dependent item and point at the master item created in the previous step. At this point, we need to either ensure that the data collected by the master item is formatted in JSON or convert the data to JSON by using preprocessing.
- Once we have ensured that our data is JSON-formatted, we can use the LLD macros tab to populate our low-level discovery macro values via JSONPath. Note: Here the SNMP low-level discovery with bulk metric collection uses a DIFFERENT APPROACH, designed specifically for SNMP checks.
- Finally, we create item prototypes of type dependent item and once again point them at the master item created in the first step (Remember – our master item contains not only low-level discovery information, but also all of the required metrics). Here we use JSONPath preprocessing together with low-level discovery macros to specify which values should be collected. Remember that low-level discovery macros will be resolved to their values for each of the items created from the item prototype.
Improving SNMP monitoring performance with bulk metric collection
The SNMP bulk metric collection and discovery logic is very similar to what is discussed in the previous section, but it is more tailored to SNMP nuances.
Here, to avoid excessive polling, a new walk[] item has been introduced. The item utilizes GetBulk requests with SNMPv2 and v3 interfaces and GetNext for SNMPv1 interfaces to collect SNMP data. GetBulk requests perform much better by design. A GetBulk request retrieves values of all instances at the end of the OID tree in a single go, instead of issuing individual Get requests per each instance.
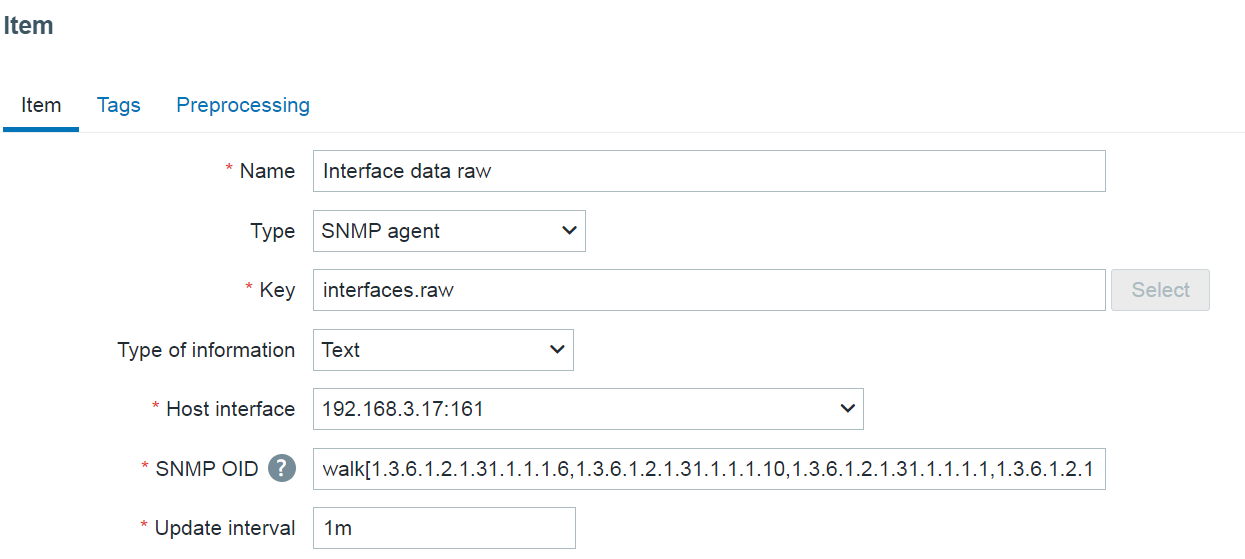
To utilize this in Zabbix, first we have to create a walk[] master item, specifying the list of OIDs from which to collect values. The retrieved values will be used in both low-level discovery (e.g.: interface names) and items created from low-level discovery item prototypes (e.g.: incoming and outgoing traffic).
Two new preprocessing steps have been introduced to facilitate SNMP bulk data collection:
- SNMP walk to JSON is used to specify the OIDs from which the low-level discovery macros will be populated with their values
- SNMP walk value is used in the item prototypes to specify the OID from which the item value will be collected
The workflow for SNMP bulk data collection can be described in the following steps:
- Create a master walk[] item containing the required OIDs
- Create a low-level discovery rule of type dependent item which depends on the walk[] master item
- Define low-level discovery macros by using the SNMP walk to JSON preprocessing step
- Create item prototypes of type dependent item which depend on the walk[] master item, and use the SNMP walk value preprocessing step to specify which OID should be used for value collection
Monitoring interface traffic with bulk SNMP data collection
Let’s take a look at a simple example which you can use as a starting point for implementing bulk SNMP metric collection for your devices. In the following example we will create a master walk[] item, a dependent low-level discovery rule to discover network interfaces, and dependent item prototypes for incoming and outgoing traffic.
Creating the master item
We will start by creating the walk[] SNMP agent master item. The name and the key of the item can be specified arbitrarily. What’s important here is the OID field, where we will specify the list of comma separated OIDs from which their instance values will be collected.
walk[1.3.6.1.2.1.31.1.1.1.6,1.3.6.1.2.1.31.1.1.1.10,1.3.6.1.2.1.31.1.1.1.1,1.3.6.1.2.1.2.2.1.2,1.3.6.1.2.1.2.2.1.3]
The walk[] item will collect values from the following OIDs:
- 1.3.6.1.2.1.31.1.1.1.6 – Incoming traffic
- 1.3.6.1.2.1.31.1.1.1.10 – Outgoing traffic
- 1.3.6.1.2.1.31.1.1.1.1 – Interface names
- 1.3.6.1.2.1.2.2.1.2 – Interface descriptions
- 1.3.6.1.2.1.2.2.1.3 – Interface types
Note: For readability, the output has been truncated and some of the interfaces have been left out.
.1.3.6.1.2.1.2.2.1.2.102 = STRING: DEFAULT_VLAN
.1.3.6.1.2.1.2.2.1.2.104 = STRING: VLAN3
.1.3.6.1.2.1.2.2.1.2.105 = STRING: VLAN4
.1.3.6.1.2.1.2.2.1.2.106 = STRING: VLAN5
.1.3.6.1.2.1.2.2.1.2.4324 = STRING: Switch loopback interface
.1.3.6.1.2.1.2.2.1.3.102 = INTEGER: 53
.1.3.6.1.2.1.2.2.1.3.104 = INTEGER: 53
.1.3.6.1.2.1.2.2.1.3.105 = INTEGER: 53
.1.3.6.1.2.1.2.2.1.3.106 = INTEGER: 53
.1.3.6.1.2.1.2.2.1.3.4324 = INTEGER: 24
.1.3.6.1.2.1.31.1.1.1.1.102 = STRING: DEFAULT_VLAN
.1.3.6.1.2.1.31.1.1.1.1.104 = STRING: VLAN3
.1.3.6.1.2.1.31.1.1.1.1.105 = STRING: VLAN4
.1.3.6.1.2.1.31.1.1.1.1.106 = STRING: VLAN5
.1.3.6.1.2.1.31.1.1.1.1.4324 = STRING: lo0
.1.3.6.1.2.1.31.1.1.1.10.102 = Counter64: 0
.1.3.6.1.2.1.31.1.1.1.10.104 = Counter64: 0
.1.3.6.1.2.1.31.1.1.1.10.105 = Counter64: 0
.1.3.6.1.2.1.31.1.1.1.10.106 = Counter64: 0
.1.3.6.1.2.1.31.1.1.1.10.4324 = Counter64: 12073
.1.3.6.1.2.1.31.1.1.1.6.102 = Counter64: 0
.1.3.6.1.2.1.31.1.1.1.6.104 = Counter64: 0
.1.3.6.1.2.1.31.1.1.1.6.105 = Counter64: 0
.1.3.6.1.2.1.31.1.1.1.6.106 = Counter64: 0
.1.3.6.1.2.1.31.1.1.1.6.4324 = Counter64: 12457
By looking at these values we can confirm that the item collects values required for both the low-level discovery rule (interface name, type, and description) and the items created from item prototypes (incoming/outgoing traffic).
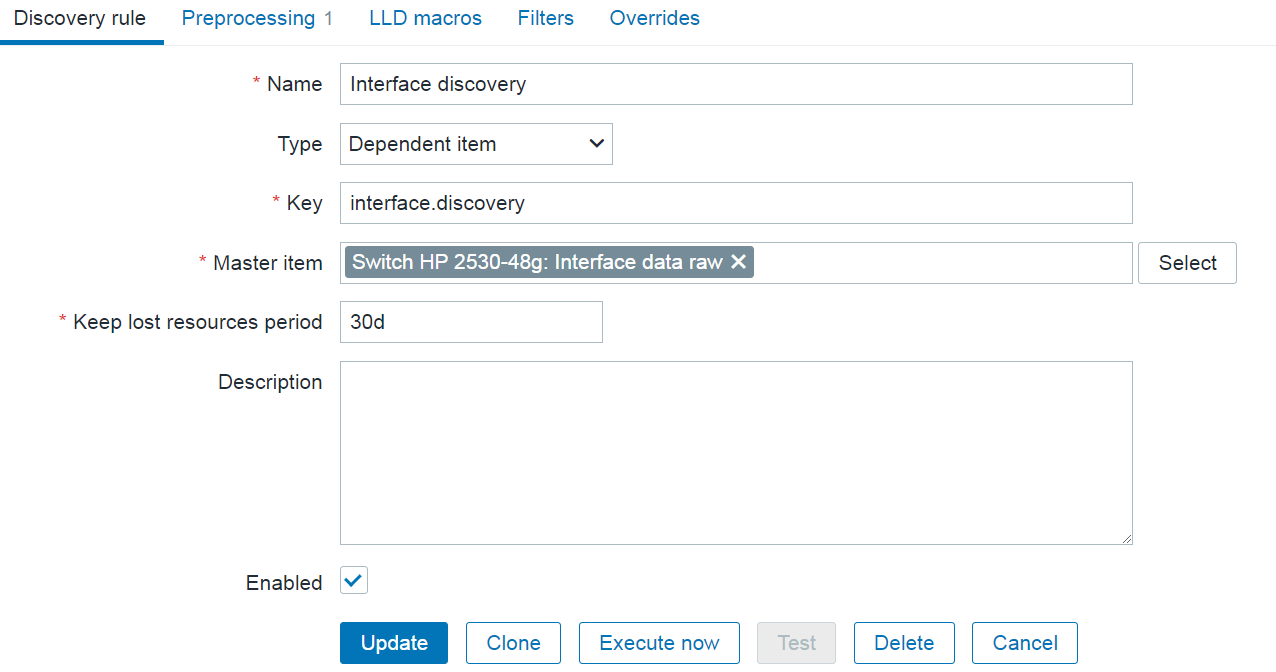
Creating the low-level discovery rule
As our next step, we will create a dependent low-level discovery rule which will discover interfaces based on the data from the master walk[] item.
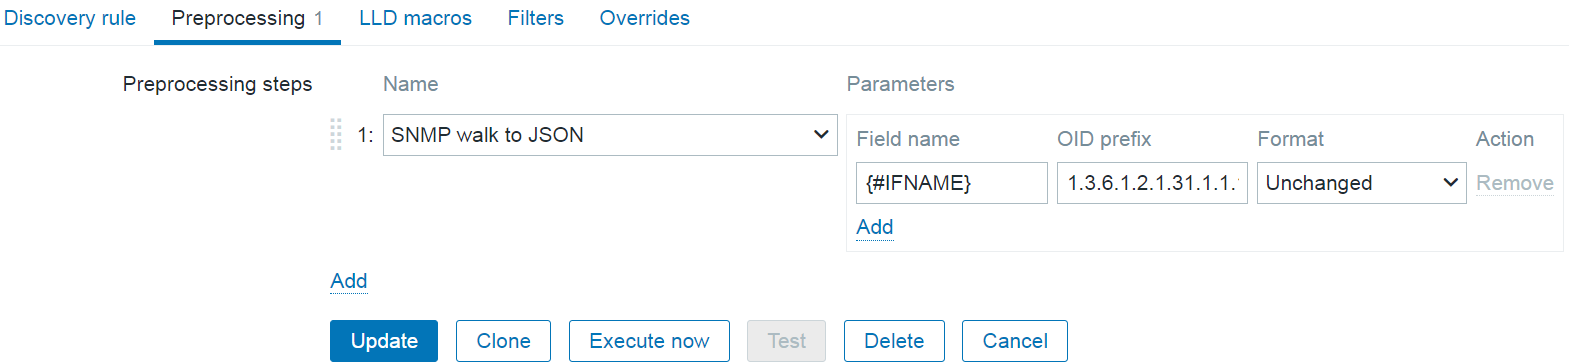
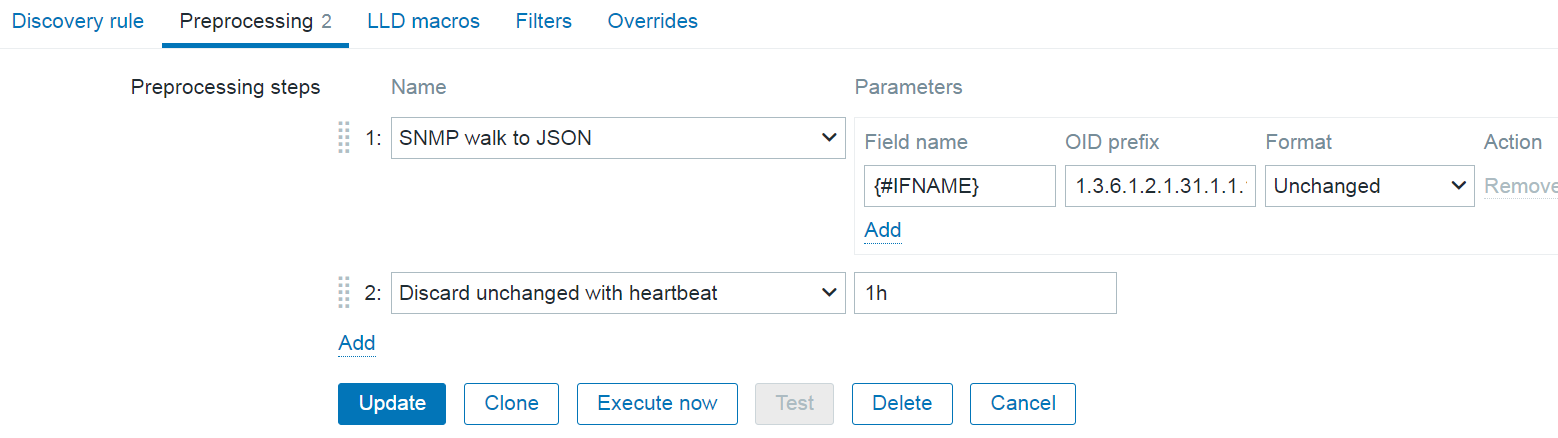
The most important part of configuring the low-level discovery rule lies in defining the SNMP walk to JSON preprocessing step. Here we can assign low-level discovery macros to OIDs. For our example, we will assign the {#IFNAME} macro to the OID containig the values of interface names:
Field name: {#IFNAME}
OID prefix: 1.3.6.1.2.1.31.1.1.1.1
The name and the key of the dependent item can be specified arbitrarily.
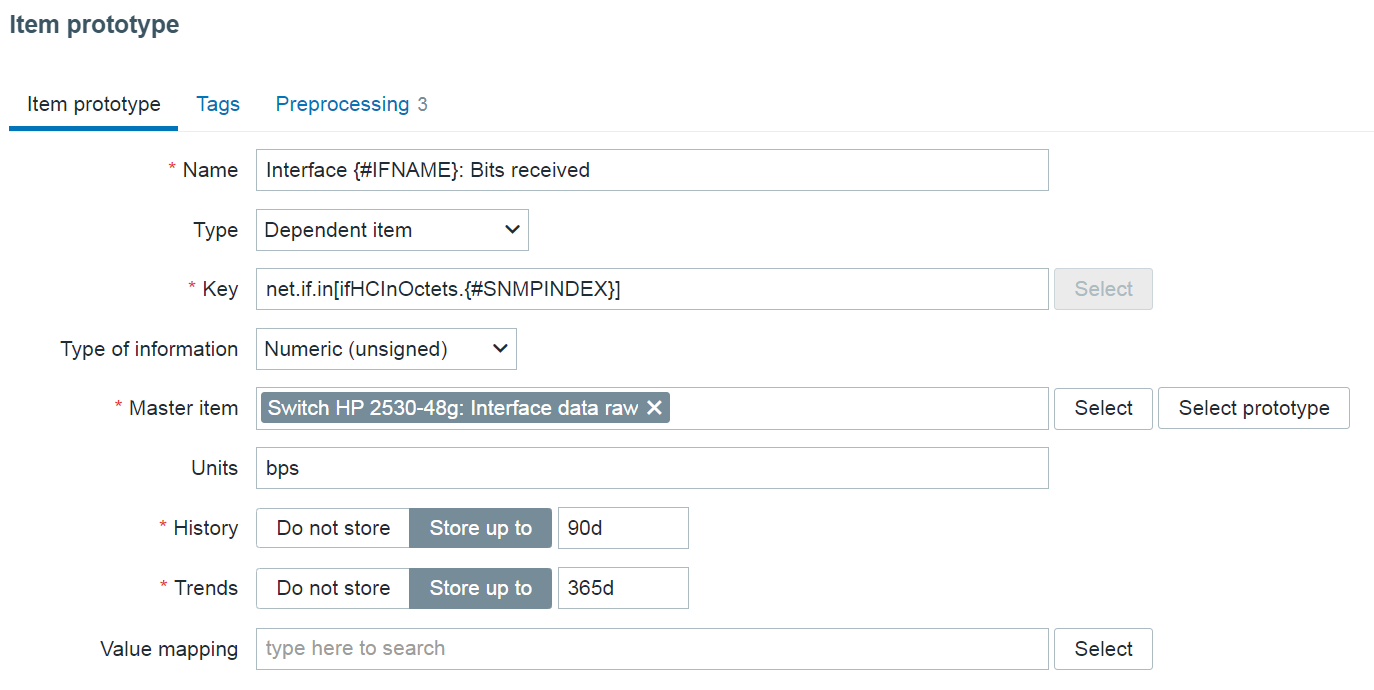
Creating item prototypes
Finally, let’s create two dependent item prototypes to collect traffic data from our master item.
Here we will provide an arbitrary name and key containing low-level discovery macros. On items created from the item prototypes, the macros will resolve as our OID values, thus giving each item a unique name and key.
Note: The {#SNMPINDEX} macro is automatically collected by the low-level discovery rule and contains the indexes from the OIDs specified in the SNMP walk to JSON preprocessing step.
The final step in creating the item prototype is using the SNMP walk value preprocessing step to define which value will be collected by the item. We will also append the {#SNMPINDEX} macro at the end of the OID. This way, each item created from the prototype will collect data from a unique OID corresponding to the correct object instance.
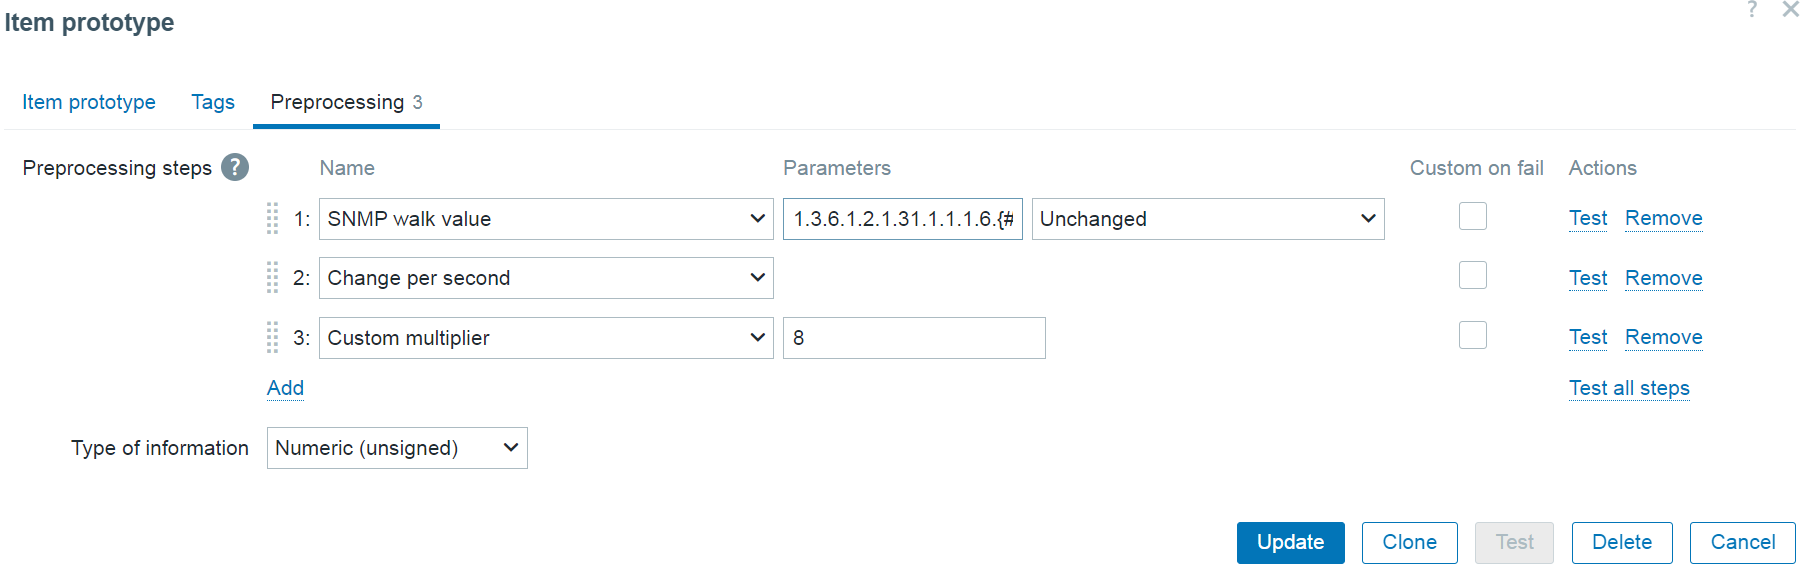
Incoming traffic item prototype preprocessing step:
SNMP walk value: 1.3.6.1.2.1.31.1.1.1.6.{#SNMPINDEX}

Outgoing traffic item prototype preprocessing step:
SNMP walk value: 1.3.6.1.2.1.31.1.1.1.10.{#SNMPINDEX}
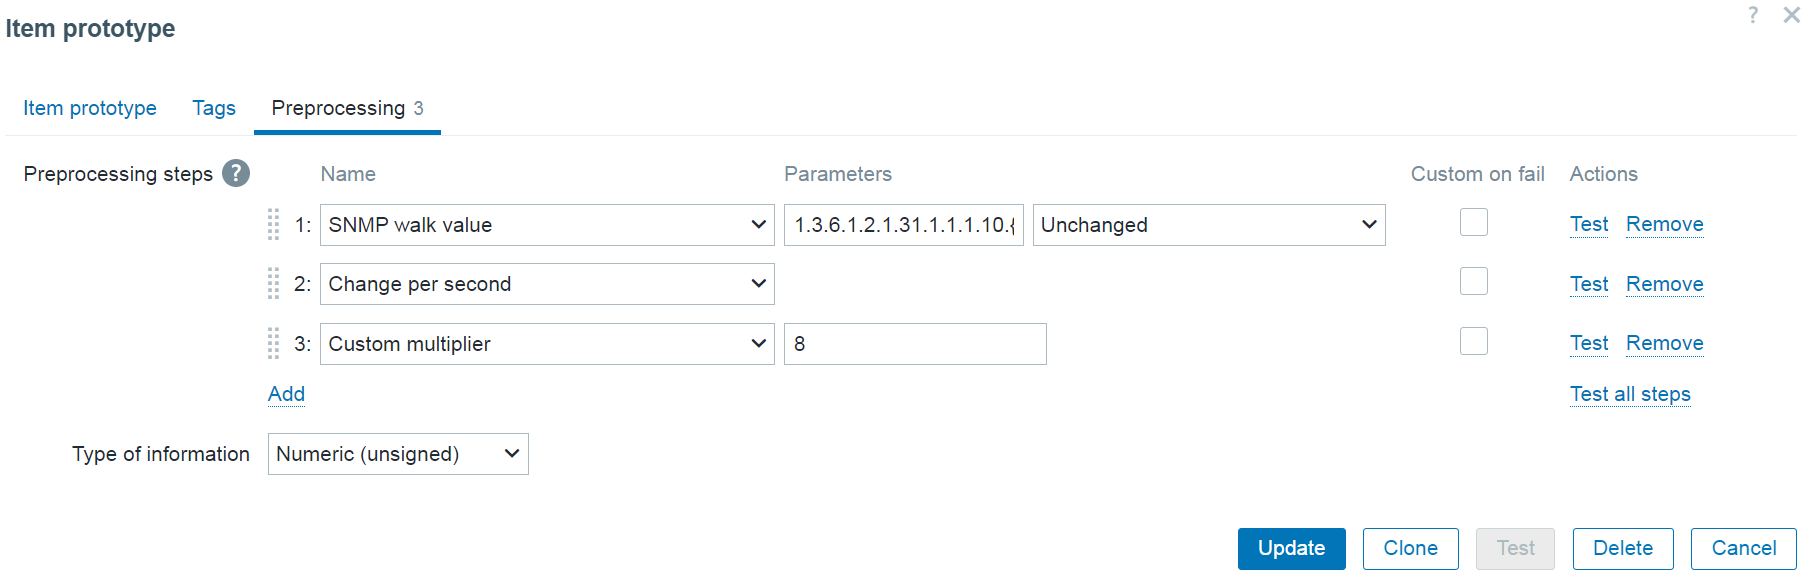
Note: Since the collected traffic values are counter values (always increasing), the Change per second preprocessing step is required to collect the traffic per second values.
Note: Since the values are collected in bytes, we will use the Custom multiplier preprocessing step to convert bytes to bits.
Final notes
And we’re done! Now all we have to do is wait until the master item update interval kicks in and we should see our items getting discovered by the low-level discovery rule.
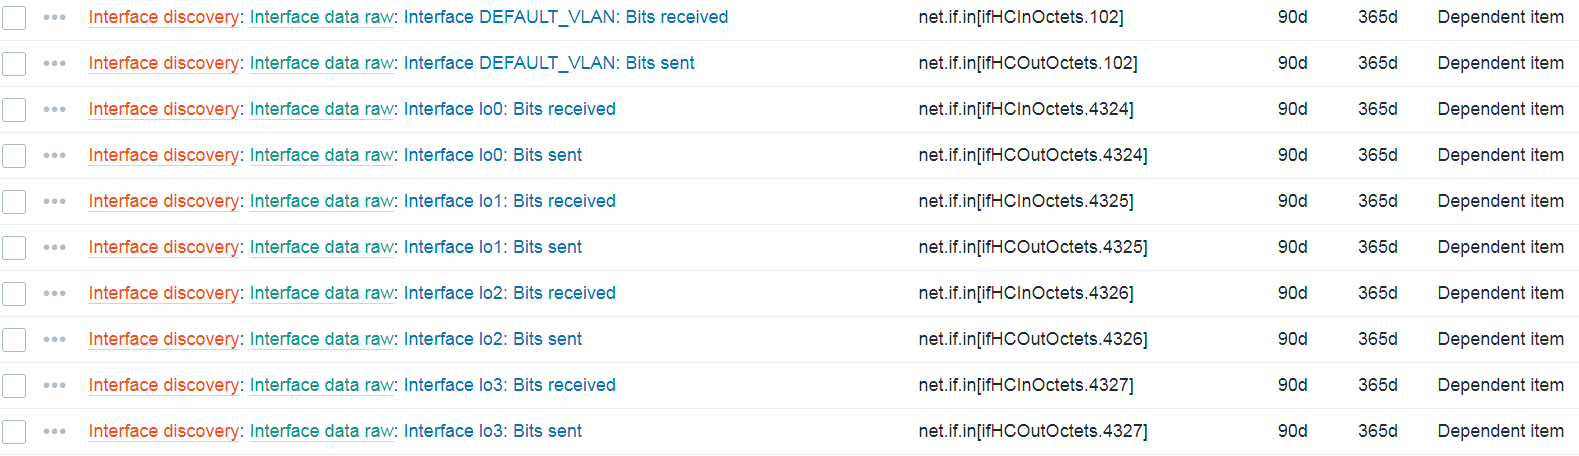
After we have confirmed that our interfaces are getting discovered and the items are collecting metrics from the master item, we should also implement the Discard unchanged with heartbeat preprocessing step on our low-level discovery rule. This way, the low-level discovery rule will not try and discover new entities in situations where we’re getting the same set of interfaces over and over again from our master item. This in turn improves the overall performance of internal low-level discovery processes.
Note that we discovered other interface parameters than just the interface name – interface description and type are also collected in the master item. To use this data, we would have to add additional fields in the low-level discovery rule SNMP walk to JSON preprocessing step and assign low-level discovery macros to the corresponding OIDs containing this information. Once that is done, we can use the new macros in the item prototype to provide additional information in item name or key, or filter the discovered interfaces based on this information (e.g.: only discover interfaces of a particular type).
If you have any questions, comments, or suggestions regarding a topic you wish to see covered next in our blog, don’t hesitate to leave a comment below!


Is it possible to get this implemented in Zabbix 6.0?
Or any alternatives are available for 6.0 that can help to get data from a lot of devices quickly.