


Do your friends, colleagues or maybe even your significant other have a nasty habit of leaving the fridge half-open causing you a frustrating evening and potentially even ruining your cherished batch of pistachio-flavored ice cream?
With the right thermometer and a little Zabbix knowledge, you can configure Zabbix to keep a watchful eye on the temperature of your fridge and alert you whenever things in your fridge are about to stop being cool.
Table of Contents
IoT
The Internet of things represents objects that are capable of autonomously transferring data over a network. The objects can be something like a temperature sensor, a smart fridge, or an electric scooter Even a garbage can and a vending equipped with proper sensors can be IoT objects.
Well, let’s go back to the thermometer that I was talking about. That thermometer is also an IoT device and it uses a specific protocol; for this specific one, we will use an aggregator: The Things Network (TTN).
But why do we need an aggregator? If you plan on monitoring a large number of sensors you will have to establish connections to each of these sensors individually. An aggregator can be used as the central point of communication, instead of directly connecting to each of the sensors.
In this blog post we will be using the following components:
- Mini hub TBMH100 (the gateway)
- Dragino LHT65 (the thermometer)
The Things Network
Now, not just any thermometer can connect to the internet. But the thermometer I used is one from The Things Network. The Things Network is open source, just like Zabbix, and works with LoRaWAN. If you do not know what LoRaWAN is just keep reading and I will explain what it is.
LoRaWAN stands for Long Range Wide Area Network and it’s a protocol that is made for long-distance communication and low power consumption. Certain nodes use this protocol and send information via radio. For Europe the frequency used for transferring data is 868MHz. This is how the thermometer sends the temperature to The Things Network.
Before we are able to see the sent values, we do have to configure a gateway and add it to The Things Network. After adding a gateway to TTN, the only thing remaining is having to add the thermometers. All of this information is also available in The Things Network console. We’re going to set up an MQTT connection via The Things Network console, and configure it so Zabbix can collect, process, and visualize your IoT data, as well as receive alerts whenever the temperature in our fridge gets too hot or too cold.
What is MQTT? In short – MQTT is a lightweight network protocol. MQTT is designed for remote locations that have devices with resources that have limited bandwidth. It has to run over a transport protocol and is characterized by: Ordered, lossless and bi-directional connections. Typically, TCP/IP connections are used for this. It also is an OASIS standard and an ISO recommendation.
TTN configuration
Let’s start by adding a gateway to The Things Network. To do that, you will have to create an account on the things stack and own a gateway. But, before we get started, check what kind of gateway you have. We will be using the gateway that is meant to be inside a building. If that is done let’s start with adding it to TTN.
Let’s start at the beginning. Open the TTN webpage and log in. Easy as that. Now when you see this screen: click on the Go to gateways button.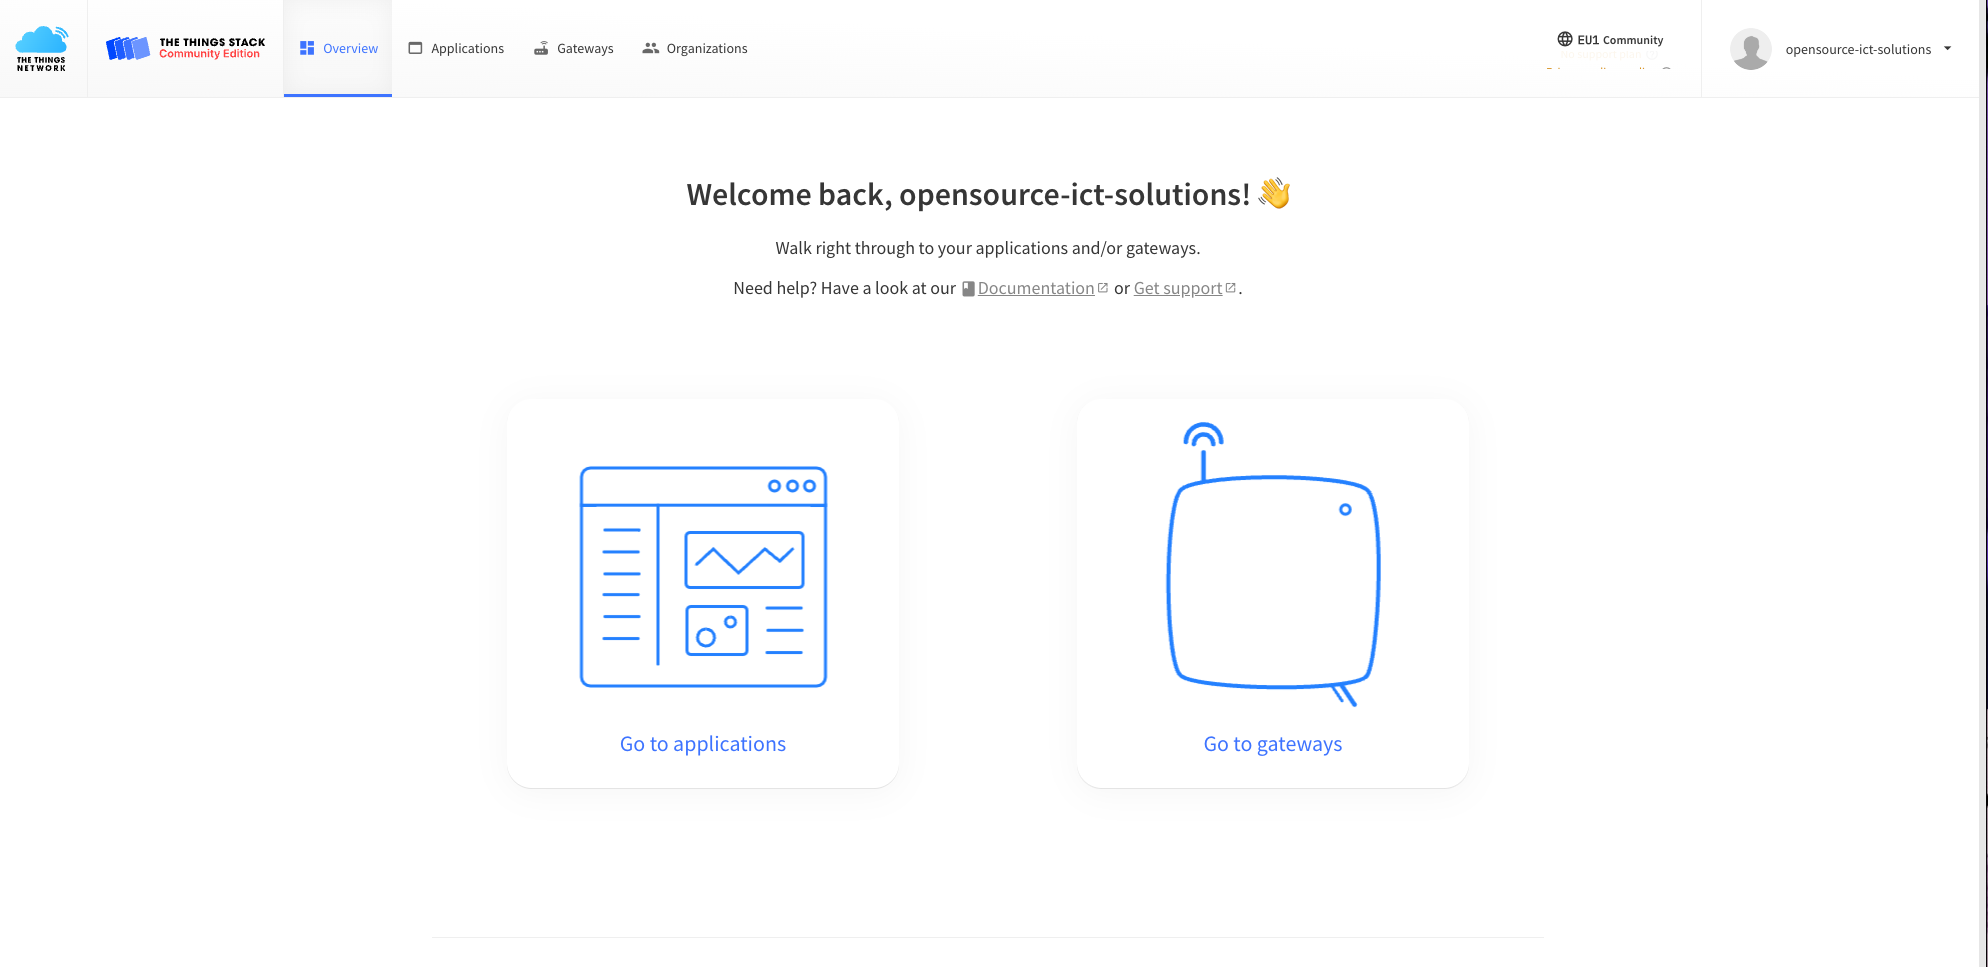
After that, you click on the white Claim gateway button. Do not confuse it with the Add gateway button – we need to press Claim gateway.
All the fields you see on the next page will have to be filled in:
As I mentioned before the frequency should be around 868MHz. For this example, I will just use the recommended frequency. After that, click on the Claim gateway button. The gateway should work after this. If you do not know what to fill in the form fields, you can find all the information you need on the backside of your gateway.
This is what it will look like when you have successfully claimed the gateway: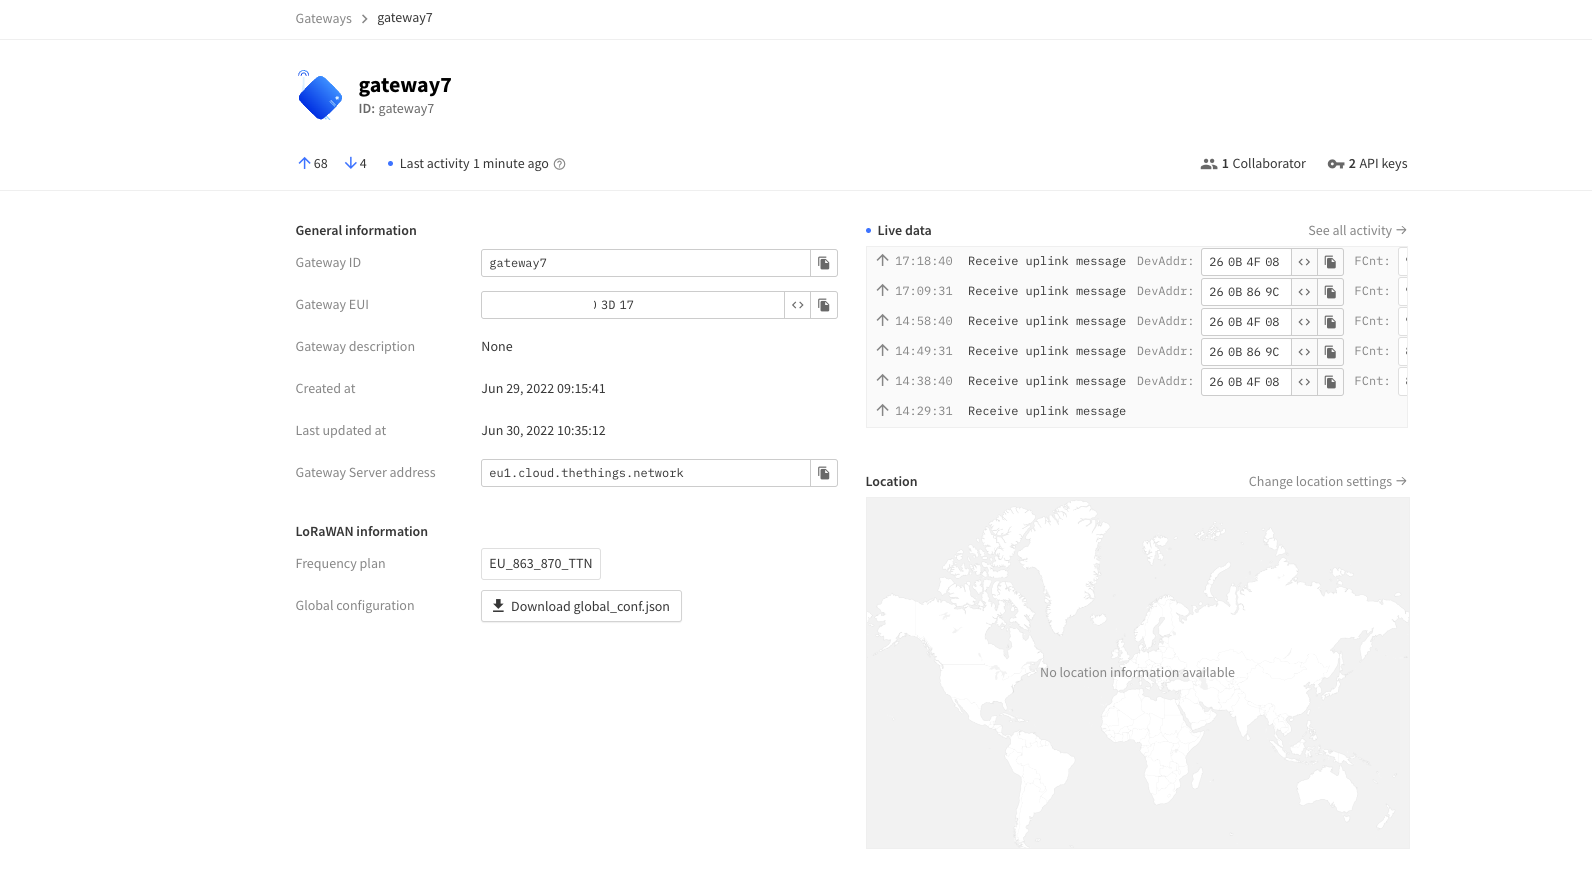
Since we now have a gateway we can add the thermometer to The Things Network. To do this, we have to go to the Application tab in the console. Once we clicked on the Application tab, it will be empty. We will have to make our own application before we can add the thermometer and we will do that by pressing the Add application button. Once clicked, you should see the following: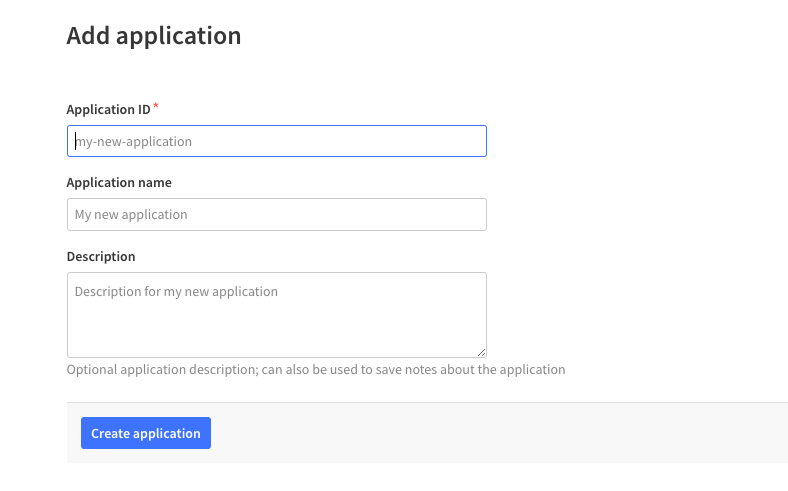
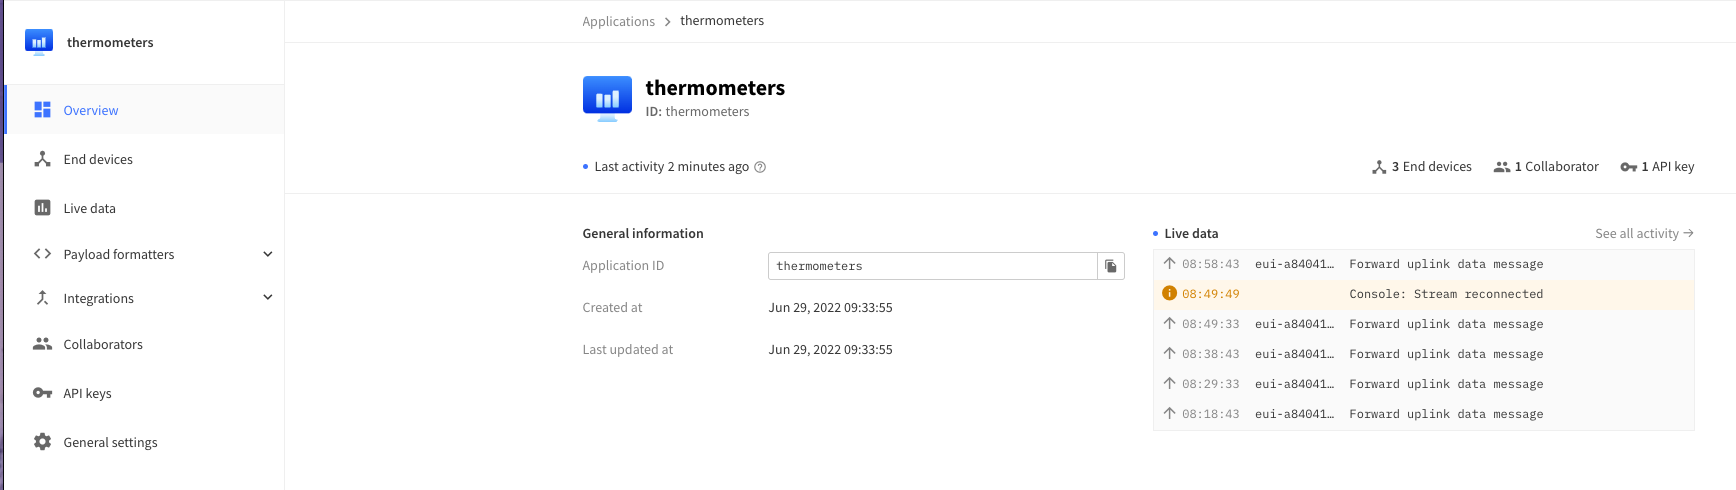
After you have created your application, click on it and you will see a screen like this:
There you will have to go to End devices and click on Add devices. It will bring you to a screen like this:
Now, you will see just one drop-down menu, but once you start filling them in, additional menus will show up. In our case, we’re using a thermometer from Dragino. After filling in the model and region, the screen should look something like this:
For step two, we had to grab the box in which the sensor was shipped. Inside the box is a sticker with all the information that you need. When you have filled in all the fields, click on the Add device button. After adding the device it will look something like this:
Now, that’s all for adding the thermometers. If everything works, we will just have to set up an MQTT connection between The Things Network and Zabbix. On the TTN side, we have to go to integrations, and then MQTT. Everything you have on that page we can just copy. Generate an API key and copy it. Save it as we will need it later.
Zabbix
After all these steps on The Things Network side, we will finally move to Zabbix. What we will do first in Zabbix is make sure that we can get the information from The Things Network. This will be done via MQTT. For that, we will need Zabbix agent 2. Now there are of course more steps than just that. So, let me explain.
Zabbix MQTT
Let’s start by downloading Zabbix agent 2 (if you already have it you can skip this step) for that we will use this command:
dnf install zabbix-agent2
Once the agent is installed, we will have to modify the config file:
vim /etc/zabbix/zabbix_agent2.conf
I am using vim, but if you want to use something else, feel free to use another text editor. Once the configuration file has been opened, we will go ahead and change the Hostname parameter. We will be changing it to this:
Hostname=TTN
Don’t forget to start (or restart, if the agent 2 has already been installed) your agent 2 service.
systemctl start zabbix-agent2
Now that we have that out of the way we can start by making a new host. It will be a regular Zabbix host. This is what mine looks like:
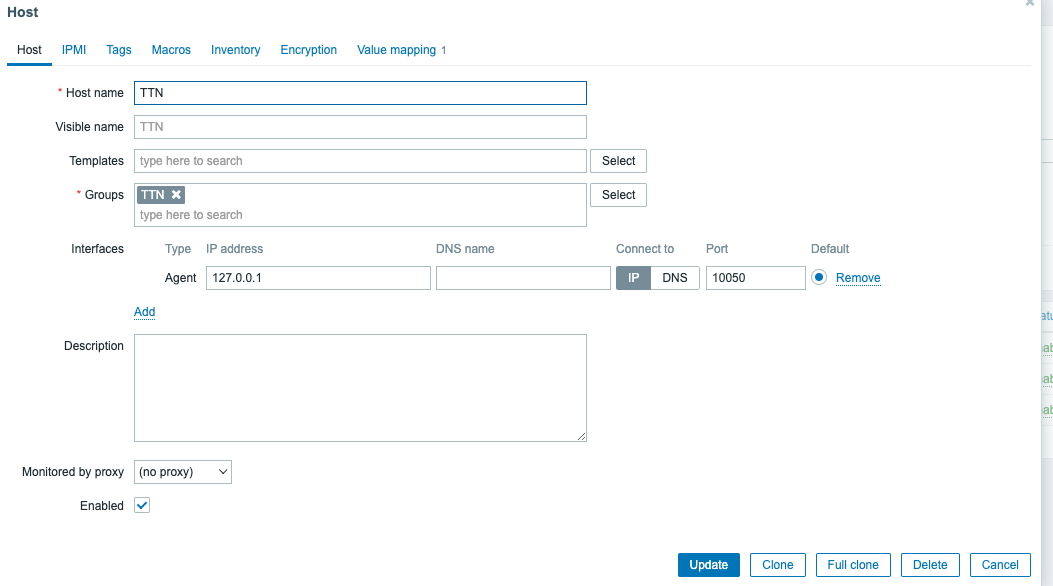
Note that the Host name here matches the Hostname parameter which we edited in the previous step. Do you recall when I said that you have to copy all the MQTT information from The Things Network? Well, we will use it here. We will have to make an item that will use the Zabbix agent (active) item type to get the information. Now, for the key, we can select the mqtt key from Zabbix but we will be missing some of the required parameters. The key will have to look something like this:
mqtt.get[broker,topic,username,password]
In the end, the item itself will look something like this: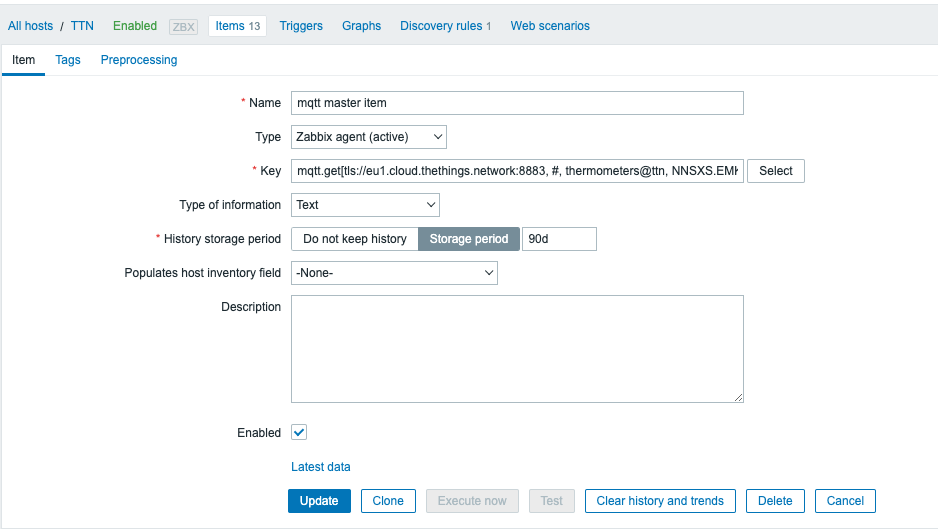
In our case, the key looks like this:
mqtt.get[tls://eu1.cloud.thethings.network:8883, #, thermometers@ttn, NNSXS.EMK3T5FLBB2YPLYWXLP7BYOG7JHFSBKEUG23BMY.IJSZ4AC475CU5JJOLRJRYLDU6MXEODWCUYIOLZSAWSXP4L32473Q].
To check if it works just navigate to Monitoring – Latest data, find our host and you should see the collected data. It should look something like this:
{"v3/thermometers@ttn/devices/eui-a84041a4e10000/up":"{\"end_device_ids\":{\"device_id\":\"eui-a84041a4e1000000\",\"application_ids\":{\"application_id\":\"thermometers\"},\"dev_eui\":\"A84041A4E10000\",\"join_eui\":\"A000000000000100\",\"dev_addr\":\"260B4F08\"},\"correlation_ids\":[\"as:up:01G7CJFS1180WT7M2GHQRWVFKA\",\"gs:conn:01G7A3RFY7CT62SGBH2BGJ7T31\",\"gs:up:host:01G7A3RG2EWWCHEW9HVBQ6KA5A\",\"gs:uplink:01G7CJFRTGY0NV6R4Y8AV9XKGG\",\"ns:uplink:01G7CJFRTHSDCK3DVR7EDGJY5V\",\"rpc:/ttn.lorawan.v3.GsNs/HandleUplink:01G7CJFRTHP5JMRVSNP8ZZR1X1\",\"rpc:/ttn.lorawan.v3.NsAs/HandleUplink:01G7CJFS10A5RAD5SE864Q99R8\"],\"received_at\":\"2022-07-07T14:54:39.137181192Z\",\"uplink_message\":{\"session_key_id\":\"AYGu5fFGW+vxth9cFIw2+g==\",\"f_port\":2,\"f_cnt\":601,\"frm_payload\":\"y/kH5QIoAX//f/8=\",\"decoded_payload\":{\"BatV\":3.065,\"Bat_status\":3,\"Ext_sensor\":\"Temperature Sensor\",\"Hum_SHT\":55.2,\"TempC_DS\":327.67,\"TempC_SHT\":20.21},\"rx_metadata\":[{\"gateway_ids\":{\"gateway_id\":\"gateway7\",\"eui\":\"58A0CBFFFE803D17\"},\"time\":\"2022-07-07T14:54:38.903268098Z\",\"timestamp\":945990219,\"rssi\":-61,\"channel_rssi\":-61,\"snr\":7.5,\"uplink_token\":\"ChYKFAoIZ2F0ZXdheTcSCFigy//+gD0XEMvUisMDGgwIrueblgYQ/fHaugMg+Omki8TiEioMCK7nm5YGEIKO264D\"}],\"settings\":{\"data_rate\":{\"lora\":{\"bandwidth\":125000,\"spreading_factor\":7}},\"coding_rate\":\"4/5\",\"frequency\":\"868500000\",\"timestamp\":945990219,\"time\":\"2022-07-07T14:54:38.903268098Z\"},\"received_at\":\"2022-07-07T14:54:38.929160377Z\",\"consumed_airtime\":\"0.061696s\",\"version_ids\":{\"brand_id\":\"dragino\",\"model_id\":\"lht65\",\"hardware_version\":\"_unknown_hw_version_\",\"firmware_version\":\"1.8\",\"band_id\":\"EU_863_870\"},\"network_ids\":{\"net_id\":\"000013\",\"tenant_id\":\"ttn\",\"cluster_id\":\"eu1\",\"cluster_address\":\"eu1.cloud.thethings.network\"}}}"}
Zabbix LLD with Dependent items
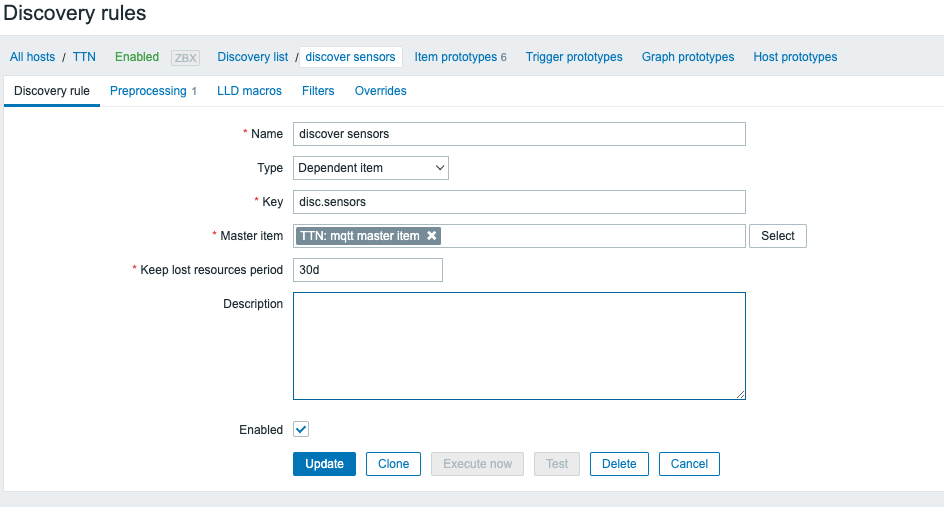
Now, after seeing all the data you want to be able to read it normally. Well, for that we will use Low-Level Discovery. It will also help add the thermometer to Zabbix.
To achieve our goal we will start by navigating to the Configuration – Hosts page. Select the host that you created earlier. Once there, select Discovery rules at the top. Now we are going to create a new Low-level discovery rule. It will be a dependent item. The master item is the item we made in the previous step. Once you have done that, it should look like so:
But we have not finished yet. We will also need to add a pre-processing step. For the pre-processing step, we need to provide a javascript script. The data that has been sent is not ‘native’ Zabbix LLD data, so we need to make it suitable for Zabbix.
We will use a script like this to format our data:
var lld = [];
var regexp = /@ttn\/devices\/([\w-]+)/g;
var lines = value.split("\n");
var lines_num = lines.length;
for (i = 0; i < lines_num; i++)
{
var match = regexp.exec(lines);
var row = {};
row["{#SENSOR}"] = match[1];
lld.push(row);
}
return JSON.stringify(lld);
In the script above we are transforming the data into a format that Zabbix can use it. Let’s drill it down line by line:
Line 1: Declare a new array with name lld
Line 2: Declare a regex with a specific value
Line 3: Let’s split the received value into an array of substrings. Splitting happens on the value “\n” which represents a newline
Line 4: Count the number of lines
Line 5: A For loop to populate the array that is declared in line 1.
Line 7: Match the regex in the lines.
Line 8: Declare an object with the name ‘row’
Line 9: Add the text {#SENSOR} with the 1st value of the variable ‘match’
Line 10: Push the row object into the lld array
Line 12: Convert the lld array into a JSON string
After Line 12, you will get something like this returned:
[{"{#SENSOR}":"eui-a84041a4exxxxxxx"},{"{#SENSOR}":"eui-a84041a4eyyyyyyy"}]
Now the data is formatted into the Zabbix LLD format, ready to be parsed.
Once the preprocessing step is added, the rule should be complete. This means that Zabbix will start discovering the thermometers, but no items are created by just adding the LLD rule like we have done so far. We also need to add the item prototypes.
I will use temperature for the internal sensor as an example here. So, let’s start at the beginning and go to Item prototypes. We will add a new item prototype. In the name and key fields, we will use the Low-level discovery macro: {#SENSOR}. The key is arbitrary – we ill put our LLD macro as a parameter, to make each item created from the prototypes unique. For units, we will use C because it stands for temperature in Celsius. When finished, it should look like this:
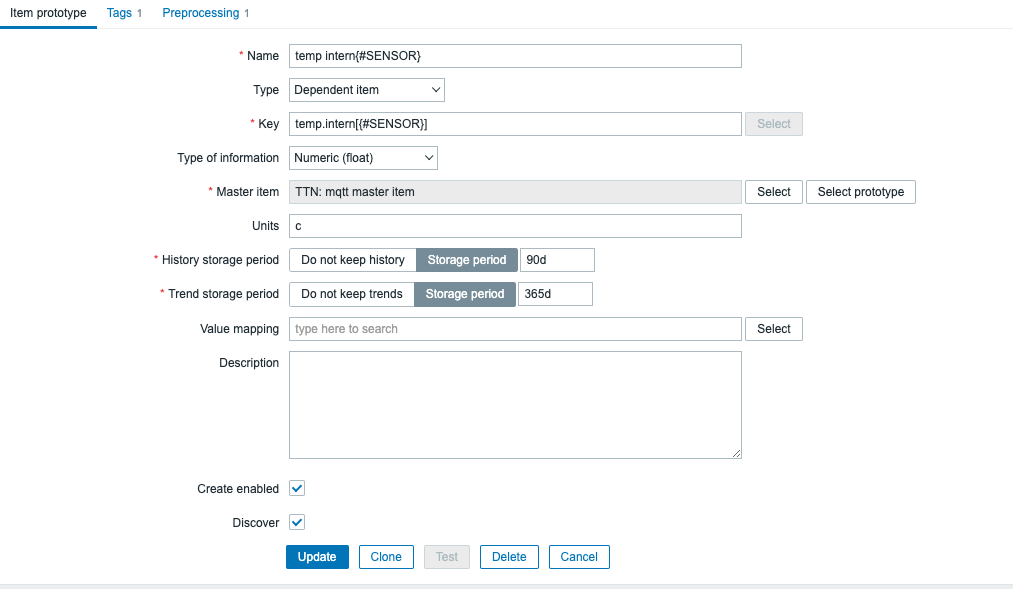
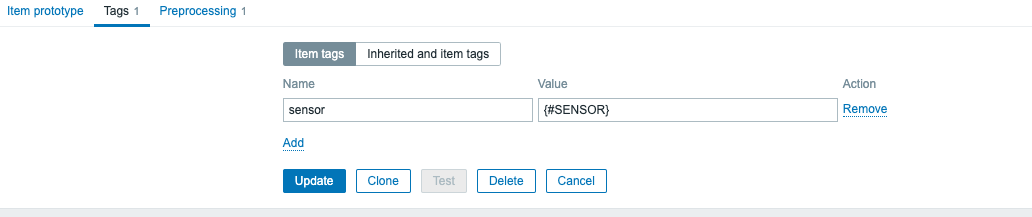
Now, if you look closely at the screenshot I also have a tag and preprocessing step. You can see the tag configuration in the image below. The tag will be used for filtering and providing additional information – the sensor ID.
As for the item prototype preprocessing step – it is a little bit harder. Do you remember the data that you got from the first item we made? Well, if you take that and throw in a regex, you can make the preprocessing step. What I did was go to https://regex101.com and paste the complete string we received from the master item and start matching the temperatures.
Once the regex is done, go to the Preprocessing tab in Zabbix. Add one step, and choose Regular Expression as the Name. Now the parameters will be (in case of this thermometer):
TempC_SHT\\":(\d+.\d+)}
and in the output field we will use the first capture group – \1. It should look like this:

If we take a careful look at the data provided by the Master item, there is a “decoded payload”:
decoded_payload\":{\"BatV\":3.056,\"Bat_status\":3,\"Ext_sensor\":\"Temperature Sensor\",\"Hum_SHT\":50.8,\"TempC_DS\":21.75,\"TempC_SHT\":21.95}
From that payload, we are cherry-picking the TempC_SHT value. There are more values to collect here, like battery status, voltage, humidity, etc. This highly depends on the sensors used, of course.
In the Low-Level Discovery rule, we can keep on adding more item prototypes to parse all of these metrics and let the LLD automatically create the items from the prototypes.
After adding the low-level discovery rule and the preprocessing step you will see something like this:
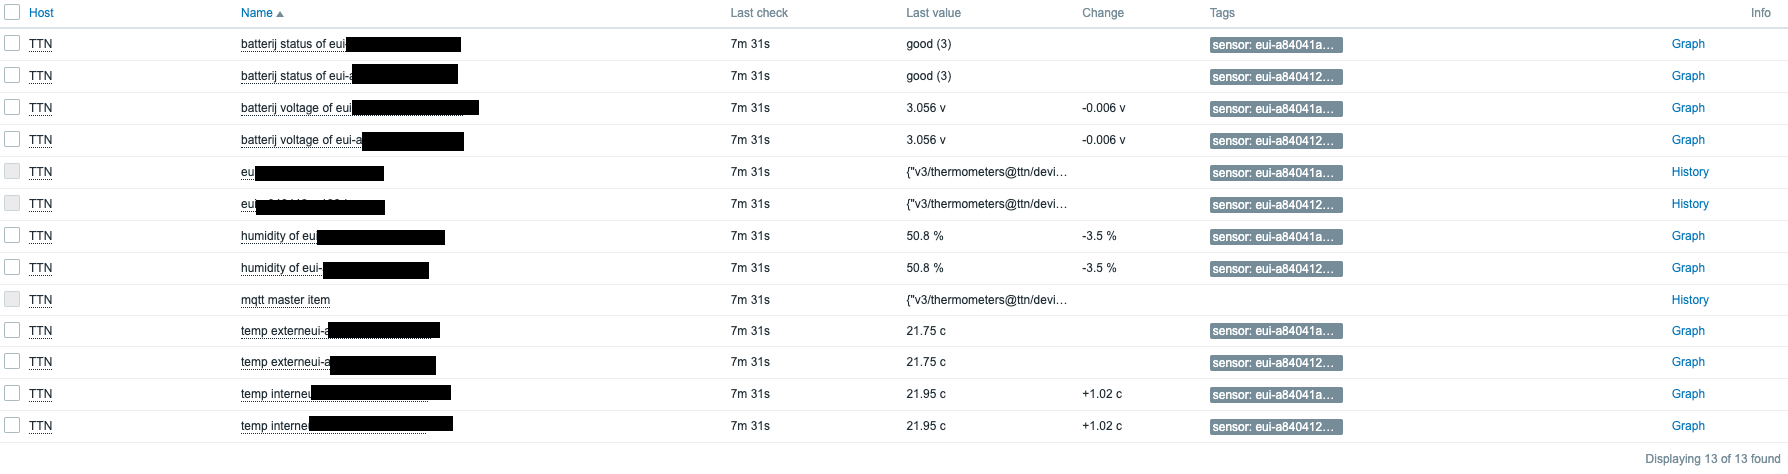
Now, as you can see, Multiple items have been created from our prototypes. If you look closely, you will also notice that I get two of everything. This is because the Low-Level Discovery discovered two thermometers.
Conclusion
Now that everything has been configured, we can finally track the temperature of our IoT thermometers. The next time somebody leaves your fridge open, you can find out in time. Cool, right? Well, that’s just one of many IoT examples that we can start to monitor – the potential for discovering and monitoring IoT devices is unlimited. If you wish to check out the template used for this example, feel free to visit our github page
I hope you enjoyed reading this blog post. You maybe even want to configure it yourself. Well if you need help with that you do not need to be shy. Just contact me and my colleagues at Opensource ICT Solutions.
![]()


Hi!
Thank you very much for a detailed article.
Some comments, however, regarding a Zabbix part.
1) The screenshots display a two thermometers, but the example of JSON for LLD contains a single one only. So, it’s unclear, for example, why it’s needed to split the source value by the “\n” character in preprocessing script.
2) JavaScript for LLD preprocessing again. Script contains a loop for processing an array elements, but really processes an entire array in every iteration:
Probably, it should process a current line (i.e. a single array element) only?
Is it just a mistype?
3) Preprocessing for item prototype contains the following regular expression:
However, this regular expression will always get only the first value from this JSON.
If it contains really several thermometers, it is necessary to use a more complex regular expression (or, better, JSONPath preprocessing step) to extract the value for a specific thermometer; for example – something like:
@ttn\/devices\/{#SENSOR}/.*?TempC_SHT\\":(\d+.\d+)}—
Sincerely yours,
Constantin Oshmyan
Hi Constantin,
Thank you for reading the blog! That’s really appreciated.
The concept here is a bit strange, and normally i would’ve agreed on your remarks, however…. each sensor independently pushes it’s values to mqtt and thus Zabbix. So the Javascript can safely go over the full aray as there will be only one element(one sensor) in it. The same goes for the preprocessing using a regular expression: we can safely tell Zabbix to match on the first occurance as there will -never- be a second one. Each sensor is pushing only it’s own values.
So, the concept as laid down in the blogpost works for multiple sensors without any trouble 😉