


Cloud-based service platforms are becoming increasingly popular, and one of the most widely adopted is Amazon Web Services (AWS). Like many cloud services, AWS charges a user fee, which has led many users to look for a breakdown of which specific services they are being charged for. Fortunately, Zabbix has an AWS Cost Explorer over HTTP template that’s ready to run right out of the box and provides a list of daily and monthly maintenance costs.
Table of Contents
Why monitor AWS costs?
While AWS cost data is stored for 12 months, Zabbix allows data to be stored for up to 25 years (see Keep lost resources period). The Keep lost resources period is a vital parameter for storing data longer than 12 months since the cost data removed from AWS will result in the discovered items becoming lost. Therefore, if we want to keep our cost data for a period longer than 12 months, Keep lost resources period parameter needs to be adjusted accordingly.
In addition, Zabbix can show fees charged for unavailable services, such as test deployments for a cluster in the us-east-1 region.
Preparing to monitor in a few easy steps
I recommend visiting zabbix.com/integrations/aws for any sources referred to in this tutorial. You can also find a link to all Zabbix templates there. For the most part, we will follow the steps outlined in the readme.
The AWS Cost Explorer by HTTP template can use key-based and role-based authorization. Set the following macros {$AWS.AUTH_TYPE}, possible values: role_base, access_key (using by default).
If you are using access key-based authorization, be sure set the following macros {$AWS.ACCESS.KEY.ID}, {$AWS.SECRET.ACCESS.KEY}.
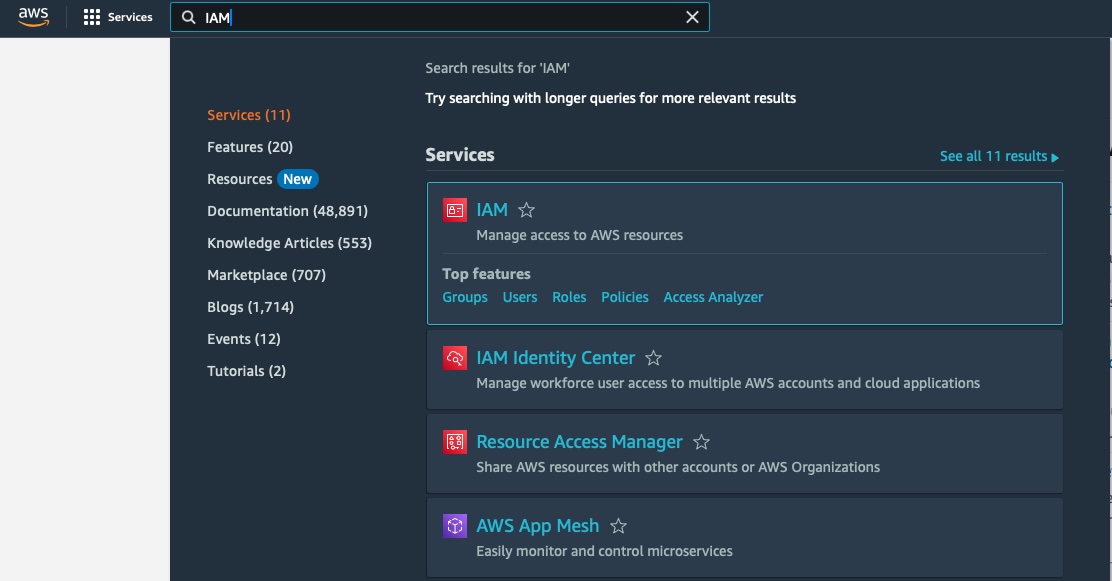
Create or use an existing access key, which you can get from Identity and Access Management (IAM).
Accessing the IAM Console:
- Log in to your AWS Management Console.Navigate to the IAM service.
- Next, go to the Users tab and select the required user.
Creating a access key for monitoring:
- After that, go to the Security credentials tab.
- Select Create access key.

Add the following required permissions to your Zabbix IAM policy in order to collect metrics.
Defining Permissions through IAM Policies:
- Access the “Policies” section within IAM.
- Click on “Create Policy”.
- Select the JSON tab to define policy permissions.
- Provide a meaningful name and description for the policy.
- Structure the policy document based on the permissions needed for the AWS Cost Explorer by HTTP template.
{ "Version": "2012-10-17", "Statement": [ { "Action": [ "ce:GetDimensionValues", "ce:GetCostAndUsage" ], "Effect": "Allow", "Resource": "*" } ] }

Attaching Policies to the User:
- Go back to the “Users” section within IAM.
- Click on “Add Permissions”.

– Search for and select the policy created in the previous step.

– Review the attached policies to ensure they align with the intended permissions for the user.
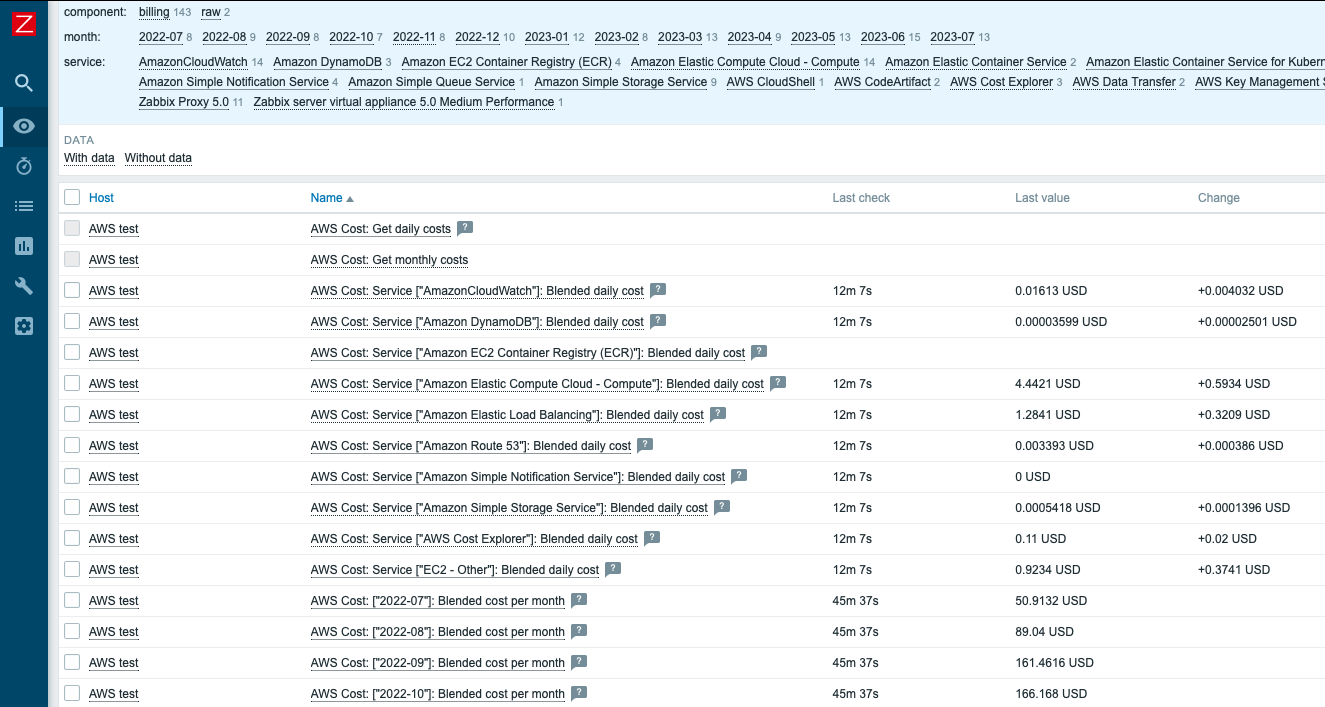
Creating a host in Zabbix
Now, let’s create a host that will represent the metrics available via the Cost Explorer API:
- Create a Host Group in which to put hosts related to AWS. For this example, let’s create one that we’ll call AWS Cloud.
- Head to the host page under Configuration and click Create host. Give this host the name AWS Cost. We’ll also assign this host to the AWS Cloud group we created and attach the AWS Cost Explorer template by HTTP.
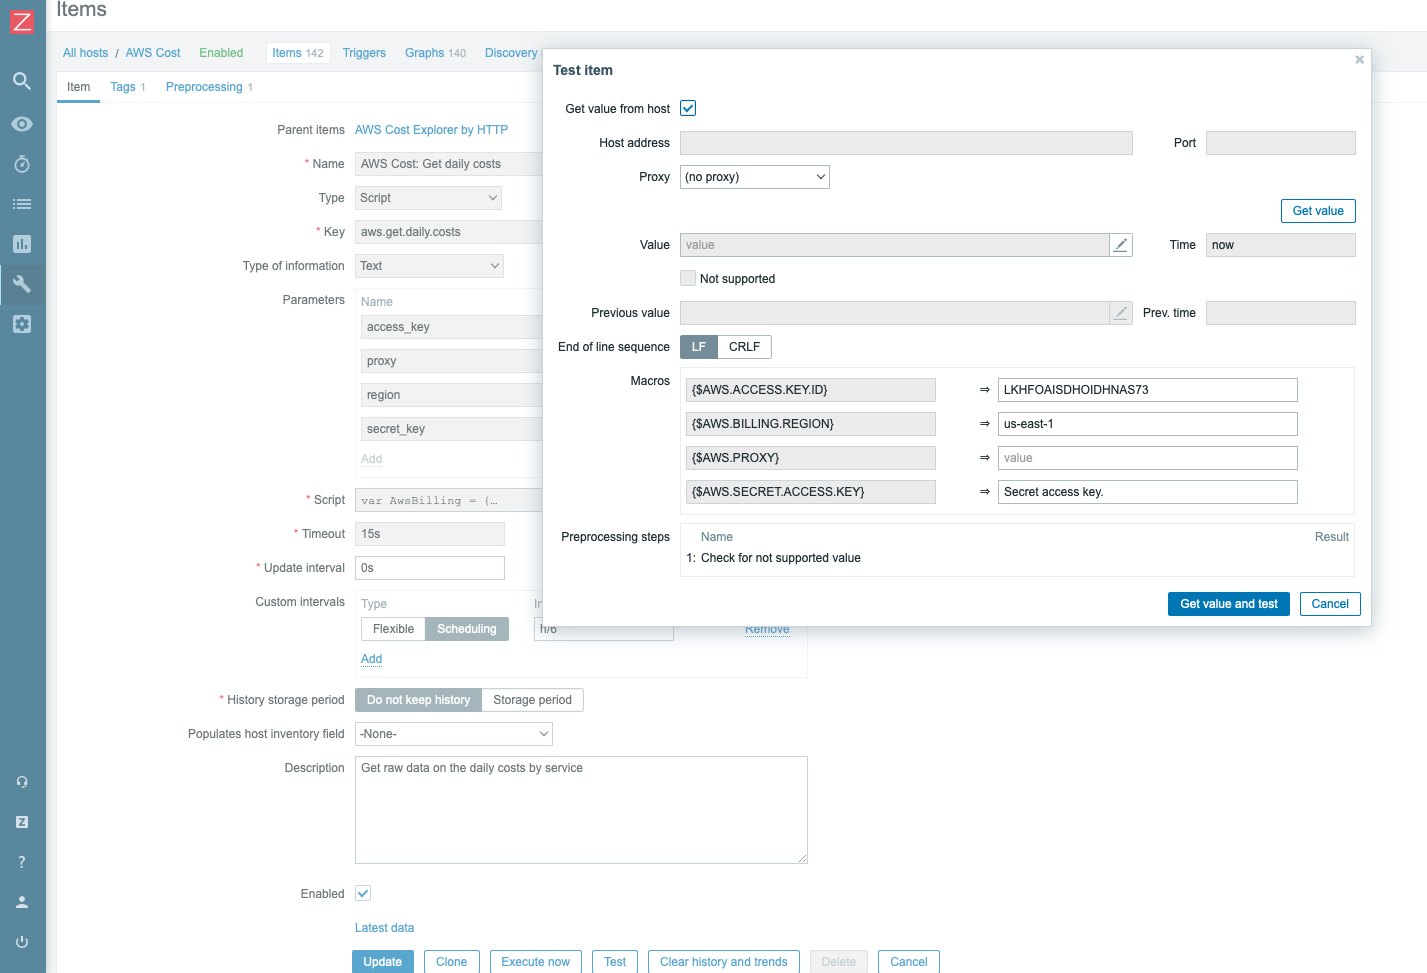
- Click the Macros tab and select Inherited and host macros. In this case, we need to change the first two macros. The first, {$AWS.ACCESS.KEY.ID}, should be set to the received access key ID. For the second, {$AWS.SECRET.ACCESS.KEY}, the secret access key should be set to the previously retrieved value from the Security credentials tab.

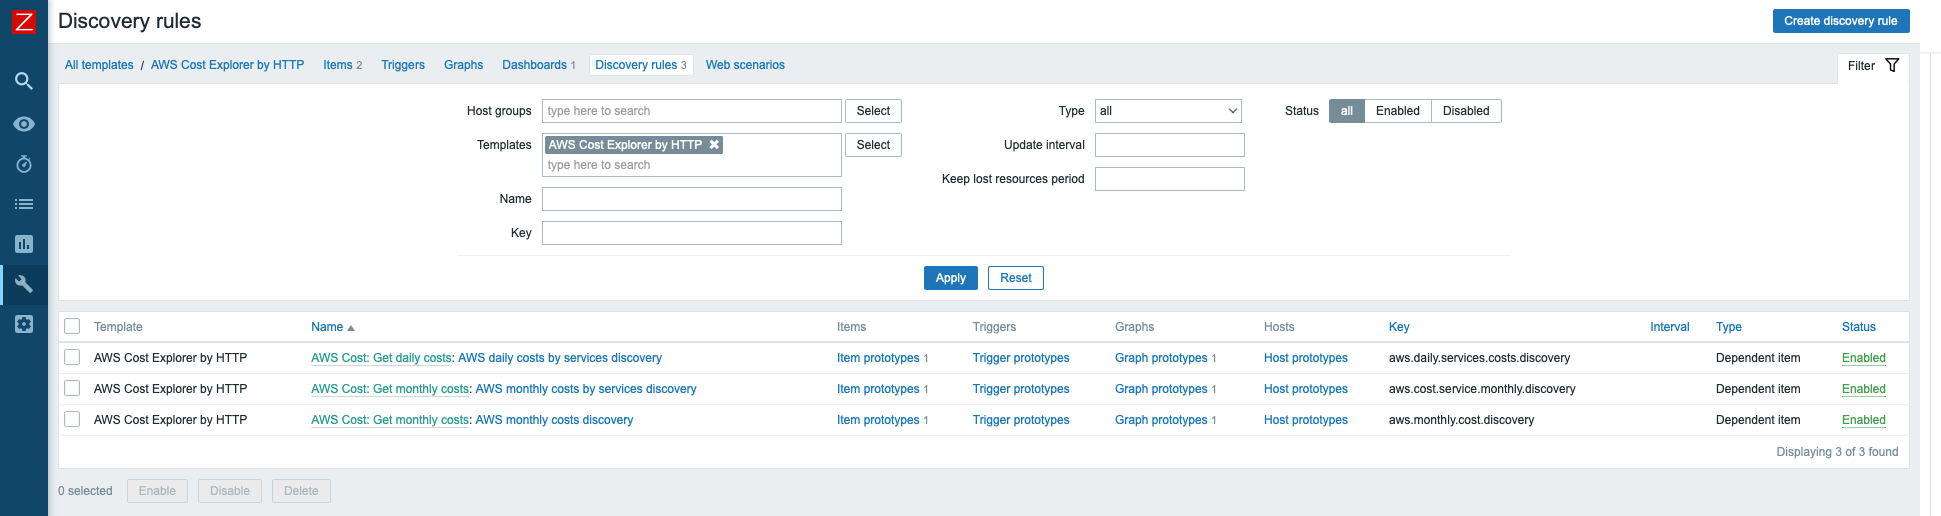
- Click Add. The AWS Cost Explorer template has three low-level discovery rules that use master items. The low-level discovery rules will start discovering resources only after the master item has collected the required data.

The best practice is to always test such items for data. Don’t forget to fill in the required macros!

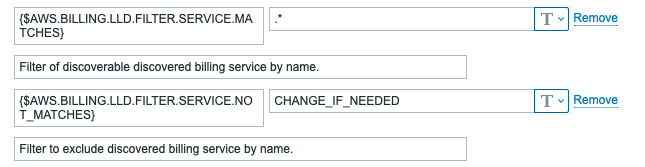
In AWS daily costs by services and AWS monthly costs by services discovery you can filter by service, which can be specified in macros.
- Let’s execute the master items to collect the required data on-demand. Choose both items to get data and click Execute now.


In a few minutes, you should receive cost metrics by services for 12 months plus the current month, as well as by day. If you want the information to be stored longer, remember to change the Keep lost resources period in the LLD rule, as it’s set to 30 days by default.


Good luck!

Hi Evgenii
Thanks for your post.
But i try to repeat on Zabbix 7.04 and not working how I don’t try.
Maybe you can help?
Hi Oduwan,
Thank you for your comment. It is very difficult to understand what your problem is, for example, what error occurs when testing items for get data like ‘Get daily costs’.
The most important thing is that you must have read access to cost-and-usage data set up. Ease way to check it use AWS CLI.
example:
Hi Evgenii
Thanks for the quick answer
If I try to use AWS CLI all good, they return me the right numbers.
But then I try to configure it with a template in Zabbix, on the latest date – nothing
In items – 0
Then try to execute now – Request sent successfully
Maybe something changed after the update, I see this template tested on the 6.4 version, but nothing says about 7
I found some problems with the AWS template, after re-loading the template all started working fine.
But not cost, you test the configuration on 6.4 version?
Found 1 error
Get value
{“error”:”Error: cannot get URL: Couldn’t resolve host name.”}
Something like this find
Request on forum
But all resources by AWS by HTTP I see easy
Hi Oduwan,
I tested on Zabbix 7.0.4 with latest AWS by HTTP template, work fine.
BTW master items use custom intervals, if you need to get metrics more often, change it (don’t forget about AWS Cost Explorer pricing).
Interesting…
I use the latest version and the EC2, and S3 etc templates returned right
But Cost Explorer nothing
And I see in my AWS discovery only these services
Are you add Cost Explorer template or they work fine without them and work fine only from AWS template?
Or maybe you can share you template version?
There is a link to the template in the comments above, branch 7.0. Pls check it.
‘Are you add Cost Explorer template’ – yes, u need attach it in your host.
see section Creating a host in Zabbix
Well
I try to reload the template. Re-create host but he did not work… all other services he returned but not cost. By CLI all work fine.
Thanks for the help… maybe waiting to update the original template for 7 version
Everything works great! thank you Evgenii! Best template ever ❤️
Would be great to use it through an IAM role with the desired permission, to avoid using Access keys!
Hi rfrozza,
Pls. check authorization method in template.
Possible values:
access_key,assume_role(ZBXNEXT-9341),role_base.