


In this post, a new approach with Zabbix in High Availability is explained, as well as discussed challenges when implementing Zabbix using Docker Swarm with CI / CD and such technologies as Containers, Docker Swarm, Gitlab, and CI/CD.
Contents
I. Zabbix project requirements (0:33)
II. New approach (3:06)
III. Compose file and Deploy (8:08)
IV. Notes (16:32)
V. Gitlab CI/CD (20:34)
VI. Benefits of the architecture (24:57)
VII. Questions & Answers (25:53)
Zabbix project requirements
The first time using Docker was a challenge. The Zabbix environment needed to meet the following requirements:
- to monitor more than 3,000 NVPS;
- to be fault-tolerant;
- to be resilient;
- to scale the environment horizontally.
There are five ways to install Zabbix — using packages, compiling, Docker, cloud, or appliance.
We used virtual machines or physical servers to install Zabbix directly on the operation system. In this scenario, it is necessary to install the operating system and update it to improve performance. Then you need to install Zabbix, configure the backup of the configuration files and the database.
However, with such an installation, when the services are unavailable as Zabbix Server or Zabbix frontend is down, the usual solution is a human intervention to restart the service or the server, create a new instance, or restore the backup.
Still, we don’t need to assign a specialist to manually solve such issues. The services must be able to restore themselves.
To create a more intelligent environment, we can use some standard solutions — Corosync and Pacemaker. However, there are better solutions for High Availability.
New approach
Zabbix can be deployed using advanced technologies, such as:
- Docker,
- Docker Swarm,
- Reverse Proxy,
- GIT,
- CI/CD.
Initially, the instance was divided into various components.
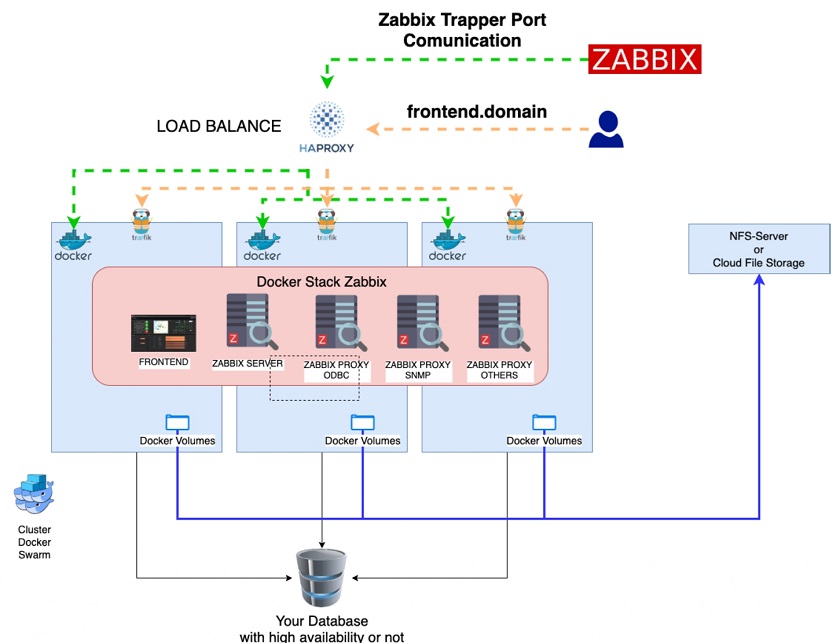
Initial architecture
HAProxy
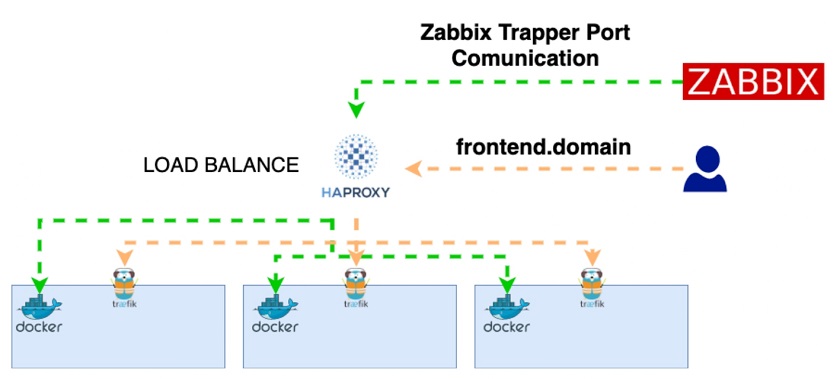
HAProxy is responsible for receiving incoming connections and directing them to the nodes of the Docker Swarm cluster. So, with each attempt to access the Zabbix frontend, the request is sent to the HAProxy. And it will detect where there is the service listening to HAProxy and redirect the request.
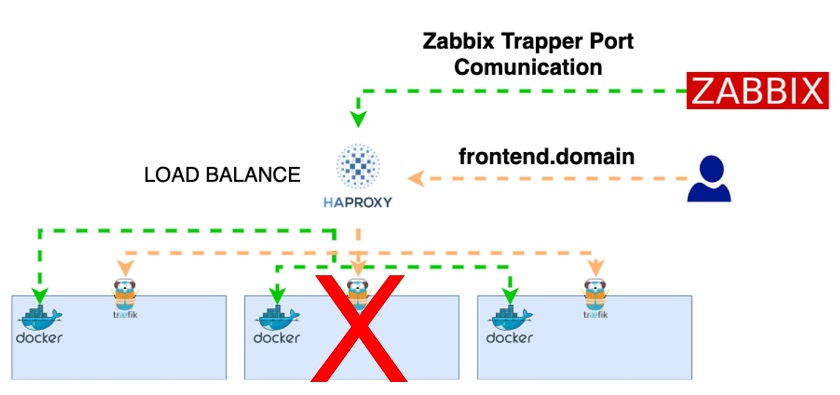
Accessing the frontend.domain
We are sending the request to the HAProxy address to check which nodes are available. If a node is unavailable, the HAProxy will not send the requests to these nodes anymore.
HAProxy configuration file (haproxy.cfg)
When you configure load balancing using HAProxy, two types of nodes need to be defined: frontend and backend. Here, the traefik service is used as an example.
— HAProxy listens for connections by the frontend node. In the frontend, we configure the port to receive communications and associate the backend to it.
frontend traefik
mode http
bind 0.0.0.0:80
option forwardfor
monitor-uri /health
default_backend backend_traefik
— HAProxy can forward requests by the backend nodes. In the backend we define, which services are using the traefik service, the check mode, the servers running the application, and the port to listen to.
backend backend_traefik
mode http
cookie Zabbix prefix
server DOCKERHOST1 10.250.6.52:8080 cookie DOCKERHOST1 check
server DOCKERHOST2 10.250.6.53:8080 cookie DOCKERHOST2 check
server DOCKERHOST3 10.250.6.54:8080 cookie DOCKERHOST3 check
stats admin if TRUE
option tcp-check
We also can define where the Zabbix Server can run. Here, we have only one Zabbix Server container running.
frontend zabbix_server
mode tcp
bind 0.0.0.0:10051
default_backend backend_zabbix_server
backend backend_zabbix_server
mode tcp
server DOCKERHOST1 10.250.6.52:10051 check
server DOCKERHOST2 10.250.6.53:10051 check
server DOCKERHOST3 10.250.6.54:10051 check
stats admin if TRUE
option tcp-check
NFS Server
NFS Server is responsible for storing the mapped files in the containers.

NFS Server
After installing the packages, you need to run the following commands to configure the NFS Server and NFS Client:
NFS Server
mkdir /data/data-docker
vim /etc/exports
/data/data-docker/ *(rw,sync,no_root_squash,no_subtree_check)
NFS Client
vim /etc/fstab :/data/data-docker /mnt/data-docker nfs defaults 0 0
Hosts Docker and Docker Swarm
Hosts Docker and Docker Swarm are responsible for running and orchestrating the containers.
Swarm consists of one or more nodes. The cluster can be of two types:
- Managers that are responsible for managing the cluster and can perform workloads.
- Workers that are responsible for performing the services or the loads.
Reverse Proxy
Reverse Proxy, another essential component of this architecture, is responsible for receiving an HTTP and HTTPS connections, identifying destinations, and redirecting to the responsible containers.
Reverse Proxy can be executed using nginx and traefik.
In this example, we have three containers running traefik. After receiving the connection from HAProxy, it will search for a destination container and send the package to it.
Compose file and Deploy
The Compose file — ./docker-compose.yml — a YAML file defining services, networks, and volumes. In this file, we determine what image of Zabbix Server is used, what network the container is going to connect to, what are the service names, and other necessary service settings.
Reverse Proxy
Here is the example of configuring Reverse Proxy using traefik.
traefik:
image: traefik:v2.2.8
deploy:
placement:
constraints:
- node.role == manager
replicas: 1
restart_policy:
condition: on-failure
labels:
# Dashboard traefik
- "traefik.enable=true"
- "traefik.http.services.justAdummyService.loadbalancer.server.port=1337"
- "traefik.http.routers.traefik.tls=true"
- "traefik.http.routers.traefik.rule=Host(`zabbix-traefik.mydomain`)"
- "traefik.http.routers.traefik.service=api@internal"
where:
traefik: — the name of the service (in the first line).
image: — here, we can define which image we can use.
deploy: — rules for creating the deploy.
constraints: — a place of deployment.
replicas: — how many replicas we can create for this service.
restart_policy: — which policy to use if the service has a problem.
labels: — defining labels for traefik, including the rules for calling the service.
Then we can define how to configure authentication for the dashboard and how to redirect all HTTP connections to HTTPS.
# Auth Dashboard - "traefik.http.routers.traefik.middlewares=traefik-auth" - "traefik.http.middlewares.traefik-auth.basicauth.users=admin:"
# Redirect all HTTP to HTTPS permanently - "traefik.http.routers.http_catchall.rule=HostRegexp(`{any:.+}`)" - "traefik.http.routers.http_catchall.entrypoints=web" - "traefik.http.routers.http_catchall.middlewares=https_redirect" - "traefik.http.middlewares.https_redirect.redirectscheme.scheme=https" - "traefik.http.middlewares.https_redirect.redirectscheme.permanent=true"
Finally, we define the command to be executed after the container is started.
command:
- "--api=true"
- "--log.level=INFO"
- "--providers.docker.endpoint=unix:///var/run/docker.sock"
- "--providers.docker.swarmMode=true"
- "--providers.docker.exposedbydefault=false"
- "--providers.file.directory=/etc/traefik/dynamic"
- "--entrypoints.web.address=:80"
- "--entrypoints.websecure.address=:443"
Zabbix Server
Zabbix Server configuration can be defined in this environment — the name of the Zabbix Server, image, OS, etc.
zabbix-server:
image: zabbix/zabbix-server-mysql:centos-5.0-latest
env_file:
- ./envs/zabbix-server/common.env
networks:
- "monitoring-network"
volumes:
- /mnt/data-docker/zabbix-server/externalscripts:/usr/lib/zabbix/externalscripts:ro
- /mnt/data-docker/zabbix-server/alertscripts:/usr/lib/zabbix/alertscripts:ro
ports:
- "10051:10051"
deploy:
<<: *template-deploy
labels:
- "traefik.enable=false"
In this case, we can use environment 5.0. Here, we can define, for instance, database address, database username, number of pollers we will start, the path for external and alert scripts, and other options.
In this example, we use two volumes — for external scripts and for alert scripts that must be stored in the NFS Server.
For this Zabbix, Server traefik is not enabled.
Frontend
For the frontend, we have another option, for instance, using the Zabbix image.
zabbix-frontend:
image: zabbix/zabbix-web-nginx-mysql:alpine-5.0.1
env_file:
- ./envs/zabbix-frontend/common.env
networks:
- "monitoring-network"
deploy:
<<: *template-deploy
replicas: 5
labels:
- "traefik.enable=true"
- "traefik.http.routers.zabbix-frontend.tls=true"
- "traefik.http.routers.zabbix-frontend.rule=Host(`frontend.domain`)"
- "traefik.http.routers.zabbix-frontend.entrypoints=web"
- "traefik.http.routers.zabbix-frontend.entrypoints=websecure"
- "traefik.http.services.zabbix-frontend.loadbalancer.server.port=8080"
Here, 5 replicas mean that we can start 5 Zabbix frontends. This can be used for more extensive environments, which also means that we have 5 containers and 5 connections.
Here, to access the frontend, we can use the ‘frontend.domain‘ name. If we use a different name, access to the frontend will not be available.
The load balancer server port defines to which port the container is listening and where the official Zabbix frontend image is stored.
Deploy
Up to now, deployment has been done manually. You needed to connect to one of the services with the Docker Swarm Manager function, enter the NFS directory, and deploy the service:
# docker stack deploy -c docker-compose.yaml zabbix
where -c defines the compose file’s name and ‘zabbix‘ — the name of the stack.
Notes
Docker Image
Typically, Docker official images from Zabbix are used. However, for the Zabbix Server and Zabbix Proxy is not enough. In production environments, additional patches are needed — scripts, ODBC drivers to monitor the database. You should learn to work with Docker and to create custom images.
Networks
When creating environments using Docker, you should be careful. The Docker environment has some internal networks, which can be in conflict with the physical network. So, it is necessary to change the default networks — Docker network overlay and Docker bridge.
Custom image
Example of customizing the Zabbix image to install ODBC drive.
ARG ZABBIX_BASE=centos
ARG ZABBIX_VERSION=5.0.3
FROM zabbix/zabbix-proxy-sqlite3:${ZABBIX_BASE}-${ZABBIX_VERSION}
ENV ORACLE_HOME=/usr/lib/oracle/12.2/client64
ENV LD_LIBRARY_PATH=$LD_LIBRARY_PATH:/usr/lib/oracle/12.2/client64/lib
ENV PATH=$PATH:/usr/lib/oracle/12.2/client64/lib
Then we install ODBC drivers. This script allows for using ODBC drivers for Oracle, MySQL, etc.
# Install ODBC
COPY ./drivers-oracle-12.2.0.1.0 /root/
COPY odbc.sh /root
RUN chmod +x /root/odbc.sh && \
/root/odbc.sh
Then we install Python packages.
# Install Python3
COPY requirements.txt /requirements.txt
WORKDIR /
RUN yum install -y epel-release && \
yum search python3 && \
yum install -y python36 python36-pip && \
python3 -m pip install -r requirements.txt
# Install SNMP
RUN yum install -y net-snmp-utils net-snmp wget vim telnet traceroute
With this image, we can monitor databases, network devices, HTTP connections, etc.
To complete the image customization, we need to:
- build the image,
- push to the registry,
- deploy the services.
This process is performed manually and should be automated.
Gitlab CI/CD
With CI/CD, you don’t need to run the process manually to create the image and deploy the services.
1. Create a repository for each component.
- Zabbix Server
- Frontend
- Zabbix Proxy
2. Enable pipelines.
3. Create .gitlab-ci.yml.
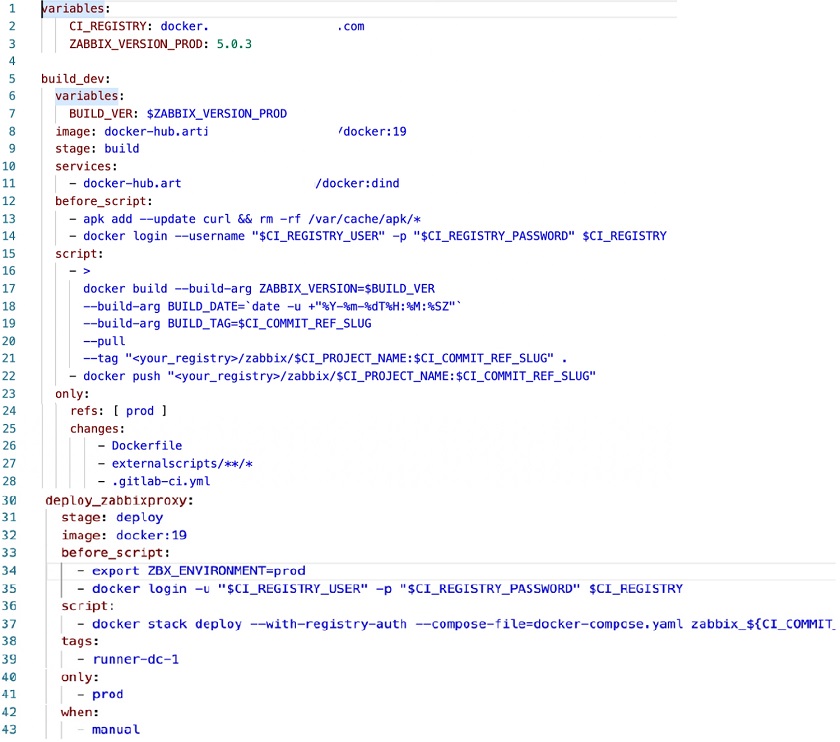
Creating .gitlab-ci.yml file
Benefits of the architecture
- If any Zabbix component stops, Docker Swarm will automatically start a new service/container.
- We don’t need to connect to the terminal to start the environment.
- Simple deployment.
- Simple administration.
Questions & Answers
Question. Can such a Docker approach be used in extremely large environments?
Answer. Docker Swarm is already used to monitor extremely large environments with over 90,000 and over 50 proxies.
Question. Do you think it’s possible to set up a similar environment with Kubernetes?
Answer. I think it is possible, though scaling Zabbix with Kubernetes is more complex than with Docker Swarm.


Hi,
Great post.
I am a bit confused about using HAProxy AND Traefik at the same time.
Couldn’t Haproxy handle everything instead of handing it over to traefik?
Many thanks!
Alex