


How to install Zabbix from Docker containers.
Watch the video now.
Contents
- Introduction (01:20)
- Cloning GitHub repository and installing Docker and Docker Compose files (07:28)
- Starting Zabbix container (12:32)
- Useful commands (28:30)
- Conclusion (38:35)
Introduction
In our previous videos we discussed the installation of Zabbix (server and proxy) from RPM packages on a clean CentOS 7.6 machine without a firewall or an SELinux. I believe it is one of the most popular ways how Zabbix users install Zabbix in their environments for testing purposes or for production monitoring reasons. Many viewers, however, have commented that packages are no longer used as much as before and that it is time for containers.
Today we will look into the installation of Zabbix components from Docker containers. We will cover official Zabbix Docker images, but skip Docker functionality, logic, and architecture. We will talk only about the stuff that is related to Zabbix.
Before we continue with the actual installation of Zabbix components, let’s have a look at some useful resources.
Docker Documentation
On my screen I have Docker Documentation. If you are already familiar with Docker, most likely, you will not have to read it. If you have only heard but never had a hands-on with Docker, then I really suggest that you read the documentation. It will help you understand what we will be talking about.
The documentation is pretty easy to read and also has some examples in the background. You can use them to write your own Docker files, create your own image, or start your own service for training purposes.
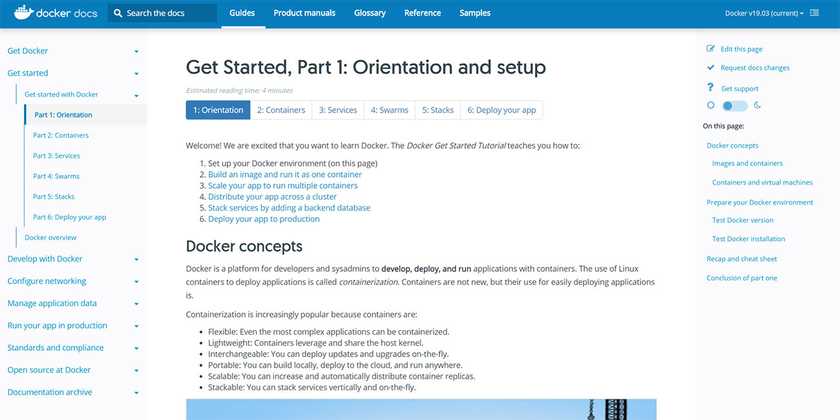
Docker Documentation. Get Started page
Zabbix GitHub Repository
Zabbix also maintains the GitHub repository of Zabbix Docker images.
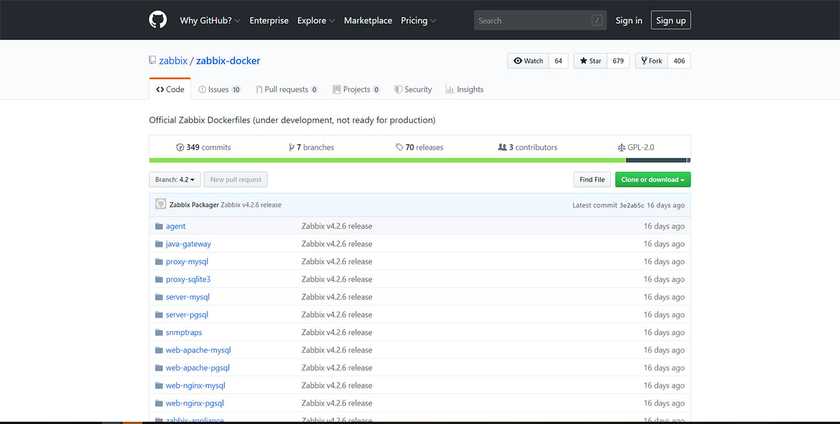
Zabbix GitHub Repository
Here you can find all Docker files for the three operating systems that we currently support: Alpine, CentOS and Ubuntu. As for the database backend, we support MySQL and PostgreSQL.
You will also find Docker Compose files which are basically just an instruction on what we want to do, which containers we want to run, etc. Each of these Docker Compose files contains commands to start Zabbix server. You can choose MySQL or Postgres operating system, then a proxy with SQLite database support, a proxy with MySQL database support, Apache running on default port 80 and Nginx running on port 8080. There is also Zabbix Java gateway and SNMP Traps.
In the end, you can have a full stack of Zabbix components up and running which will be a lot easier for testing and could even be used in production.
We choose Docker because it is easier. Installation from packages takes around five minutes, if you do not comment on the steps, excluding the installation of the virtual machine itself. With Docker, installation will take just a couple of seconds, although if it is the first time you are planning to start it, it will, first of all, download the required resources. Depending on your Internet connection, it may take some time. The second time when you already have those images stored locally it will be just a couple of seconds.
Zabbix Documentation 4.0
There is also the official user manual for Zabbix software, version 4.0. Chapter 4.5 contains instructions on how to get Zabbix running using containers.
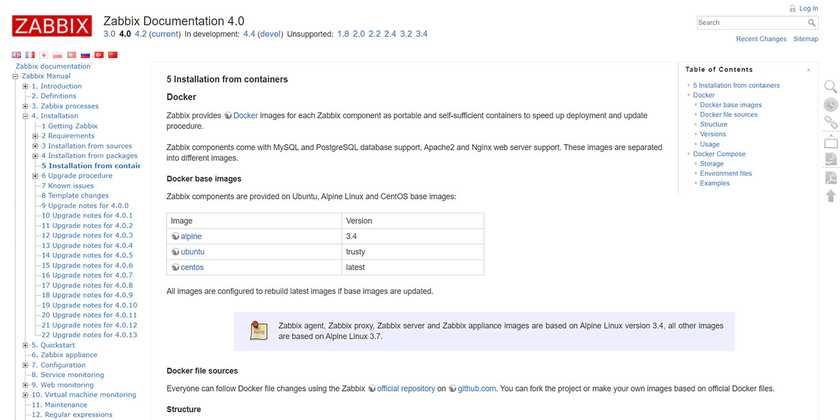
Zabbix Documentation 4.0. Installation from containers page
On this page you will find the explanation of all Docker-related stuff in terms of Zabbix usage. You will need this because you will have to change different parameters, especially for production use and also for the development environment, such as environment files and the variables. Those would be, basically, the parameters in Zabbix server or agent configuration files. For example:

You will also see that a bit later in the actual CLI.
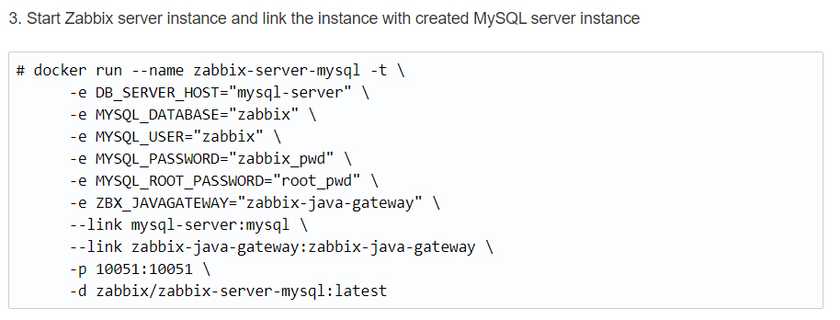
Also, there are example commands to run the containers. Below there is an example for Zabbix server with MySQL support, with details on the server host, database, user, password, Java gateway, links and exposed ports to which your Zabbix server will be listening:
Another example command is for Zabbix web installation with Nginx support.
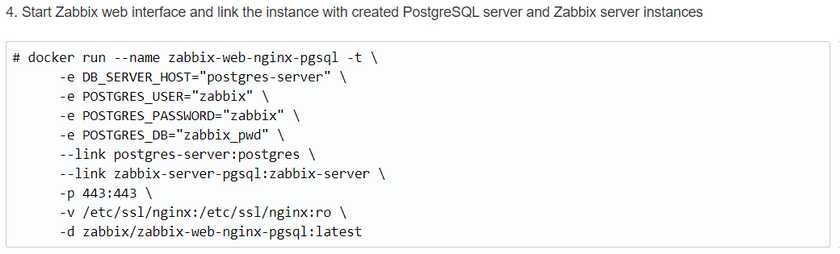
For Zabbix installations from packages, we have Apache support available in our official RPMs. But if you want to configure Nginx, you need to install it separately and do all the configuration with PHP-FPM. It does take some time. Instead, you can simply type the commands above, specify the required database parameters and the ports that you want to expose—and that is that, you now have Nginx front end up and running.
In Chapter 4.5 you will also find information about Docker Compose.
Docker Compose is instructions on what to do with our containers and what we will get in the result.

Docker Compose section
Cloning GitHub repository and installing Docker and Docker Compose files
Note. The commands below are for CentOS. If you have another OS, go to Docker Documentation to search how to install Docker on your distribution and change the commands accordingly.
We need basically four commands to install Docker CE—the Docker engine itself.
##DOCKER##
sudo yum install -y yum-utils device-mapper-persistent-data lvm2
sudo yum-config-manager --add-repo https://download.docker.com/linux/centos/docker-ce.repo
sudo yum install −y docker-ce
sudo systemctl start docker

##DOCKER COMPOSE##
sudo curl -L "https://github.com/docker/compose/releases/download/1.24.1/docker-compose-$(uname -s)-$(uname -m)" -o /usr/local/bin/docker-compose

yum install git

git clone https://github.com/zabbix/zabbix-docker.git

##git reset --hard
- Install yum-utils:
sudo yum install -y yum-utils device-mapper-persistent-data lvm2
Add a custom repository of Docker, because the Docker package itself will not be fine in the CentOS repository.
sudo yum-config-manager --add-repo https://download.docker.com/linux/centos/docker-ce.repo
- Get Docker Compose:
sudo curl -L "https://github.com/docker/compose/releases/download/1.23.2/docker-compose-$(uname -s)-$(uname -m)" -o /usr/local/bin/docker-compose
Docker Compose is not even a package. It is a very small executable file that you can run with just one command. Do not forget to apply executable permissions after the download.
- Install git (add this command if not available by default):
yum install git
- Clone the official Zabbix Docker GitHub repository:
git clone https://github.com/zabbix/zabbix-docker.git
In the end, in your CLI you will have an additional folder called zabbix-docker.

Zabbix-docker folder
If you type ls and go inside the folder, you will see a lot of files and a couple of directories.
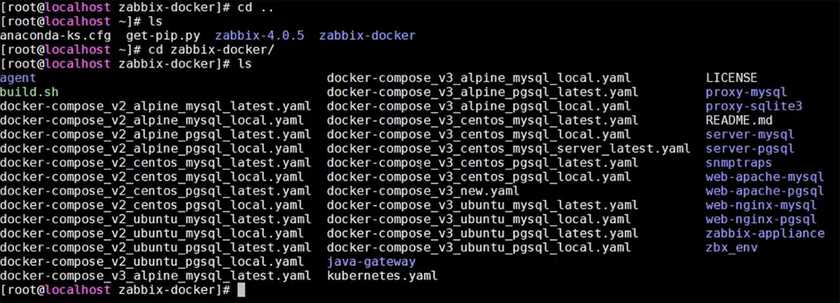
Inside zabbix-docker folder
What are those files about?
Files ‘docker-compose-v2’ on the left are for an older Docker Compose version. Normally, if you have a fresh installation, you will not need them.
We will be using Docker Compose v3. What is the difference between those files with docker-compose-v3 in their name?
- First of all, there is a choice of operating systems: Alpine, CentOS or Ubuntu — three choices of distribution on which to run the container.

- Then, there is a choice of databases which could be MySQL or Postgres. For each distribution you have a choice of database engines.

- Last of all, there are two types — local and latest. The difference between those two is pretty simple.
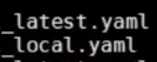
Local means that we will be building an image locally from our local Docker files.
Latest means that we will be pulling it from the repository.
The directories are highlighted in blue:
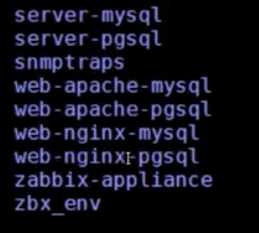
All of those are, basically, an explanation of our Zabbix component containers.
Inside server-mysql, you will find a choice of distributions.

If we select CentOS, inside there will be a docker-entrypoint.sh script.
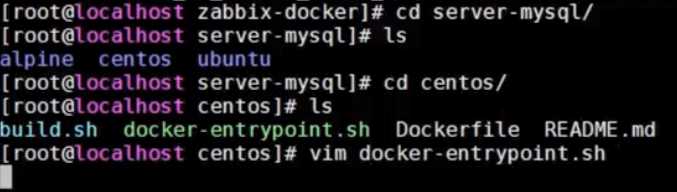
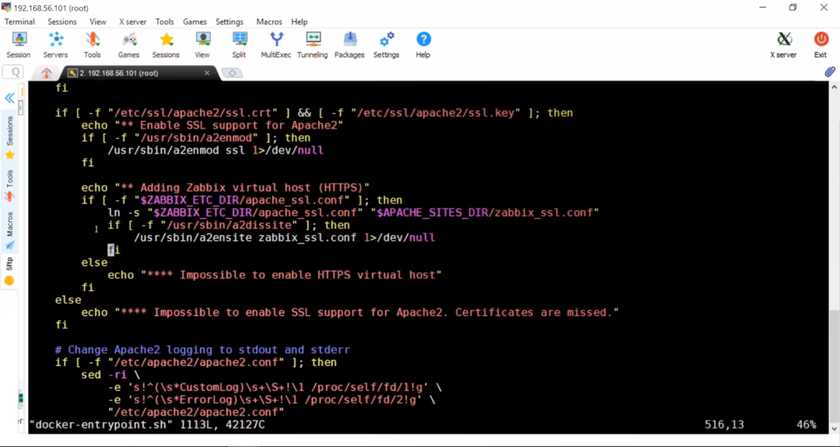
docker-entrypoint.sh script
This script has all of the steps: download sources, create a database, configure the database, grant a privilege to a user, copy a schema, import it, or change the mandatory parameters. Basically, there are most of the steps that we did in our previous videos when we installed Zabbix from RPMs, except all this will be done automatically, for example, the preparation of the system.
Inside there is Dockerfile which is directly related to the Docker itself. There is also README.md, but nothing much that we will need for this article. Let’s go back to CLI.
Starting Zabbix container
Running version 4.0
If you type docker ps at this point, you will see that nothing is running yet. Let’s try to start our first Zabbix container with Docker Compose.
- Execute:
git checkout 4.0
docker-compose −f docker-compose_v3_alpine_mysql_latest.yaml up −d
![]()
Note. It is easy to install Zabbix, but it is also easy to get different versions of Zabbix running. Right now we will be doing 4.0, which is the latest release at the time of filming.
The yaml file that we execute has all the instructions that we are going to do. Do not forget to add up to start the container and −d to detach. Click Enter.
On the screen you will see the services starting the container.
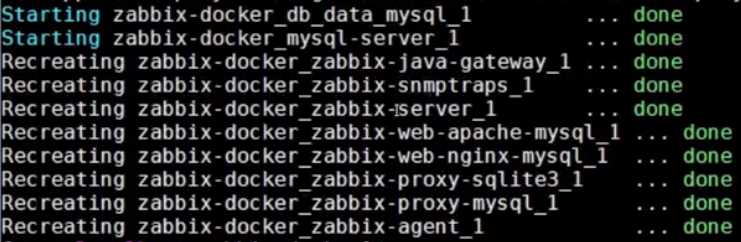
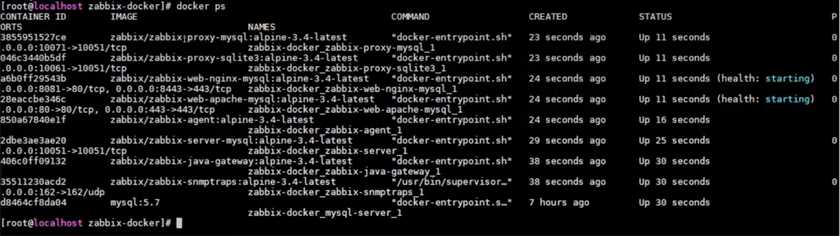
You can see Zabbix Java gateway, SNMP Traps, Zabbix server, Web Apache MySQL, Web Nginx MySQL, proxy SQLite, proxy MySQL and Zabbix agent. All of these services have been started, and we can verify that by typing docker ps.
- Type docker ps.
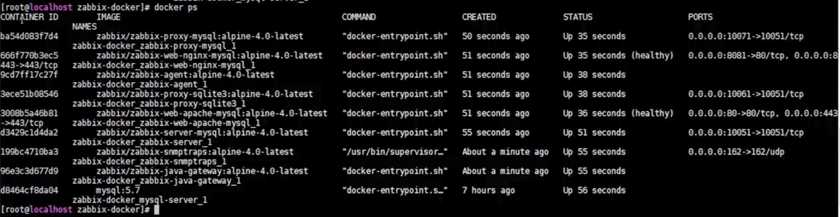
After docker ps is executed
In docker ps, you will see the following columns:
- Container ID
- Image Names
- Command
- Created
- Status
- Ports
The most important thing that we see is that the containers are healthy. The health checks are for the web engines based on curl to localhost.
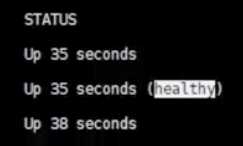
Status column in docker ps
We can also see the ports exposed. For example, Nginx is exposed on 8081 and forwards to the common HTTP port, and Apache uses basic port 80.
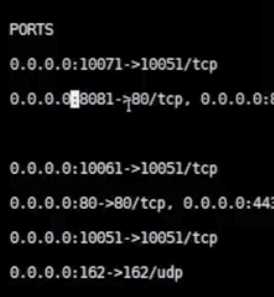
Ports column in docker ps
- Go to browser and enter your virtual machine IP address. You now have fully functional Zabbix 4.0.5 (the latest release at the time of filming), with the front end.
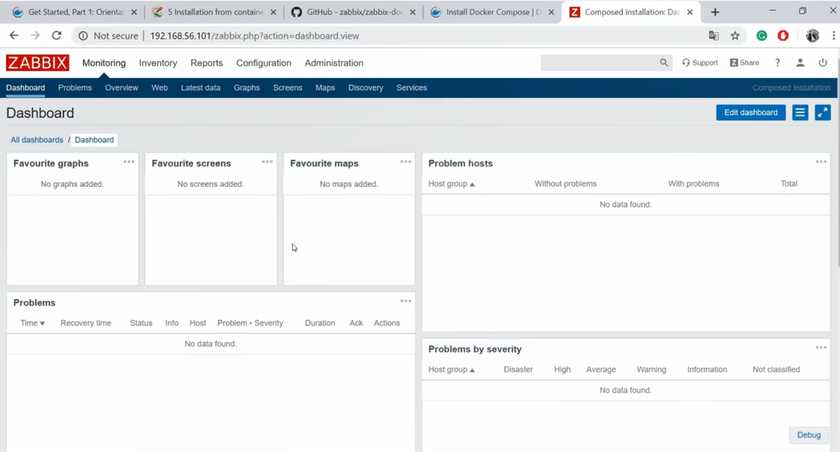
Note. Do not panic if you see broken page layout. After changing major versions, for example, from 3.0 to 3.4 or 4.0, you need to clean the browser cache after the first login (Ctrl+F5 in Google Chrome).
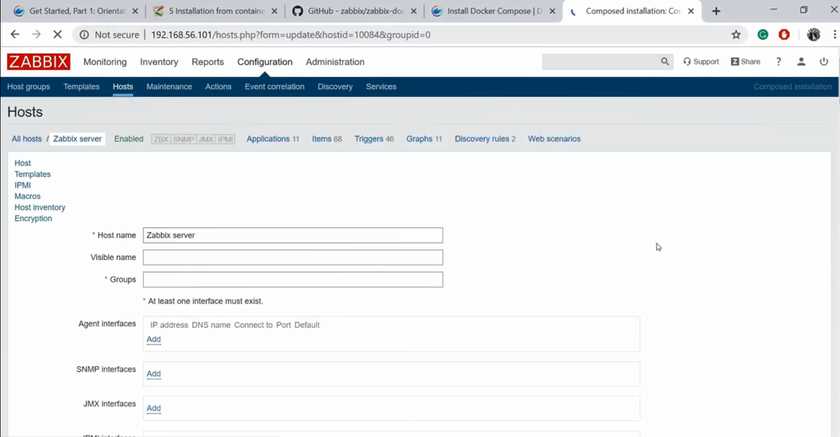
We have an agent, Zabbix server which is disabled. Let’s enable it by changing the status from Disabled to Enabled. Click OK in the pop-up window.
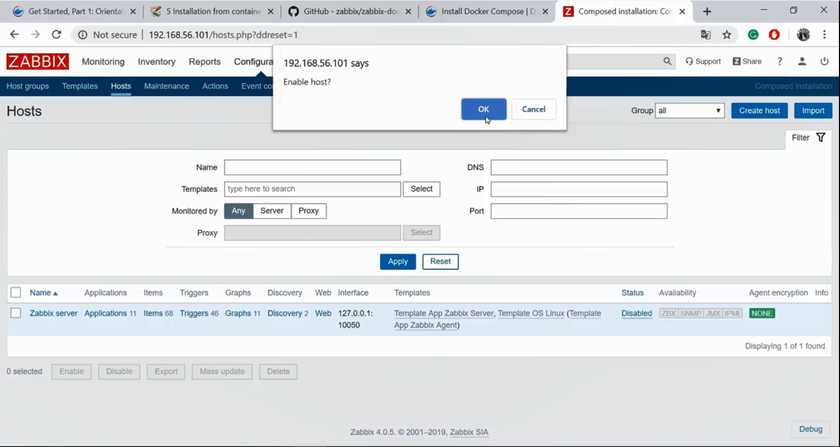
Enabling Zabbix server
But, even if we do that now, the server would become not supported after a minute or so. This is because our agent is pointed to the localhost from Zabbix server. That is not true, we do not have Zabbix agent there.
Looking for Zabbix agent IP address
Let’s go back to CLI to find our agent zabbix-agent:alpine-4.0-latest.

Agent ID
- Copy the container ID.
- Type docker inspect and insert the container ID.
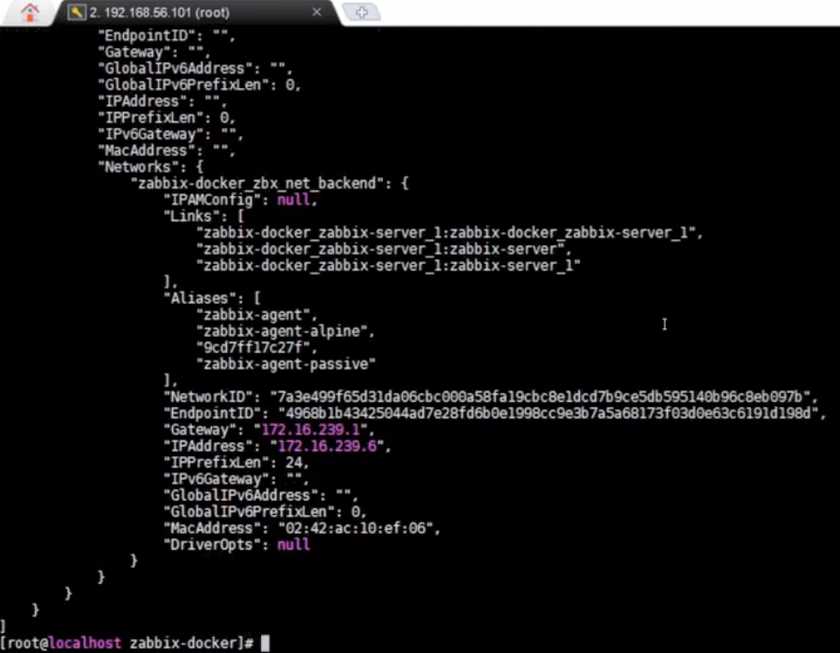
Output
Right at the end of the output you will see the gateway and the IP address. The latter is the actual IP address of our agent.
- Copy and paste the IP address to the front end at All hosts / Zabbix server / Agent interfaces / IP address.
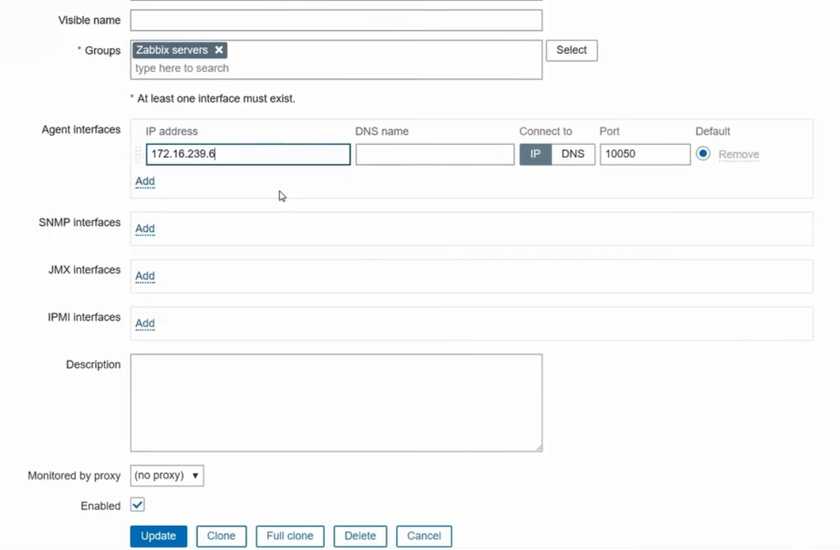
- Click Update.
Now we need to update the configuration сache if we want to save up a spare minute.
Updating configuration cache
Simply running zabbix server −R config_cache_reload will not work, because I am running it locally, but do not have a Zabbix server running locally. It runs inside a container instead.

- Again, type docker ps.
- Find Zabbix server container zabbix-server-mysql:alpine-4.0-latest.
- Copy the container ID.
- Type docker exec −it container ID zabbix_server −R config_cache_reload.

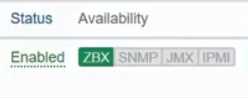
We can see now that the command was sent successfully.
If you go back to the front end and refresh the page, you can see that availability is highlighted with green.
Availability indicator
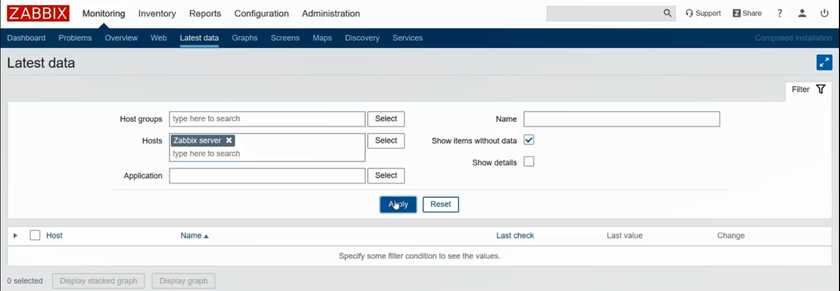
If you go to Monitoring / Latest data, you can see some of the latest data collected by the Zabbix agent which is stored inside the container.
To see the latest data:
- Add Zabbix server to Hosts.
- Apply.
Configuring hosts
In the window that opens, you can see the metrics.
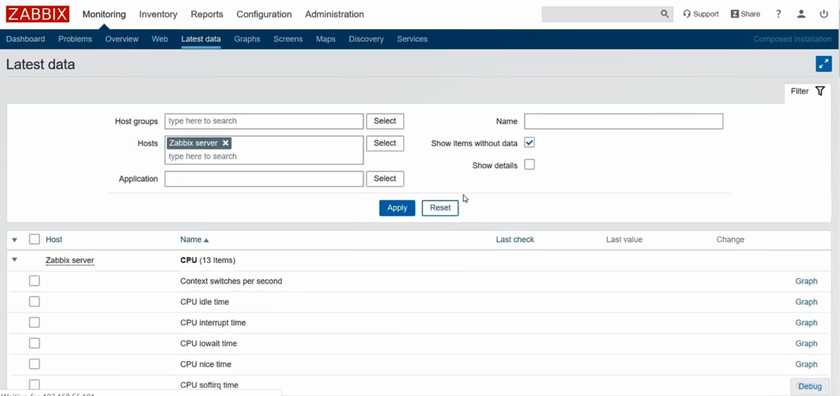
Latest data page
This was version 4.0.5. Let’s see whether it is difficult to start, for example, version 3.4.
Running version 3.4
- Go back to CLI.
- Scroll up to Docker Compose command.
- Delete up −d.
- Type kill.
It takes a few seconds to kill all the containers. Once it is done, if we type docker ps, there will not be any containers running. If we go back to the front end and refresh the page, the page will no longer be accessible because no web engine is running on this IP address.
If we tried running version 3.4 with RPMs, we would have to delete the database or create a new one, install new binaries with new configuration files, fill in the configuration files, import the schema, create a user. It takes some time. But with Docker, it is easier.
- Type git checkout 3.4.
You will see ‘Switched to branch 3.4’.

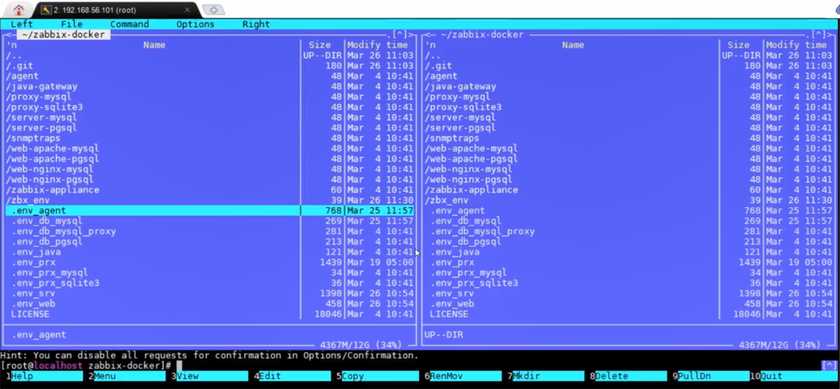
For the following actions I will use Midnight Commander, or mc, but you can choose any other utility.
- Type mc.
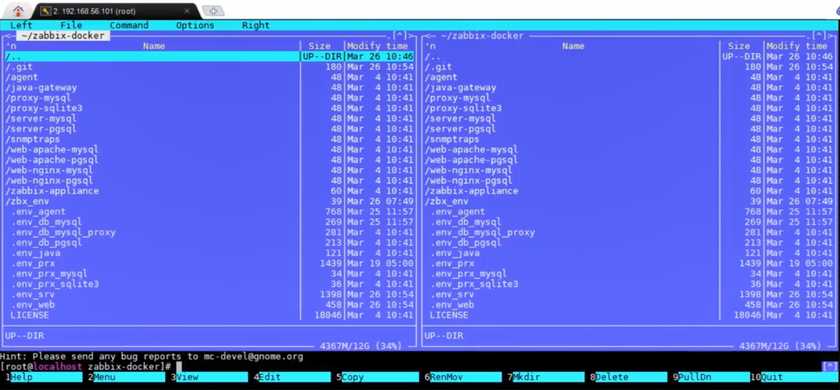
Midnight Commander window
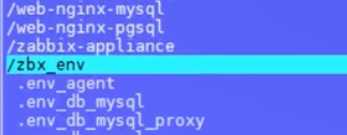
Look for zbx_env folder. This is the folder where all things described in Docker files are mapped locally, like the database.
The database data directory is not inside the container, because this would contradict the logic of the containers as those must be as small as possible.
The database data directory is mapped to our local CentOS 7.6 machine. Right now I have data for my 4.0 installation, but that will not work for 3.4. The Docker itself will not delete it automatically.
To update the data manually:
- Move the selector to zbx_env.
- Press F8. You will be prompted with ‘Delete directory?’

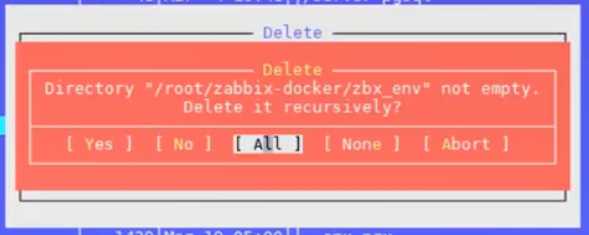
- Select ‘Yes’ and delete ‘All’.
- Exit Midnight Commander.
We have already checked out version 3.4, and nothing has changed. We do not need to change any configuration files. Instead just scroll up again to your Docker Compose command, but instead of kill typeup −d, just like we did the first time when we installed version 4.0.5.

You will see how the components are being started. The first start will take minutes more than normally, because it is required to create a database from scratch and import a schema.
If we run docker ps again, we can see a lot of containers up and running.
Let’s try to open the browser again.
Note. If you see message ‘Database error. The front end does not match Zabbix database’ or ‘Unable to select configuration’, it means the database is currently being created in the background. Click Refresh. It might take some time for the database to be created.
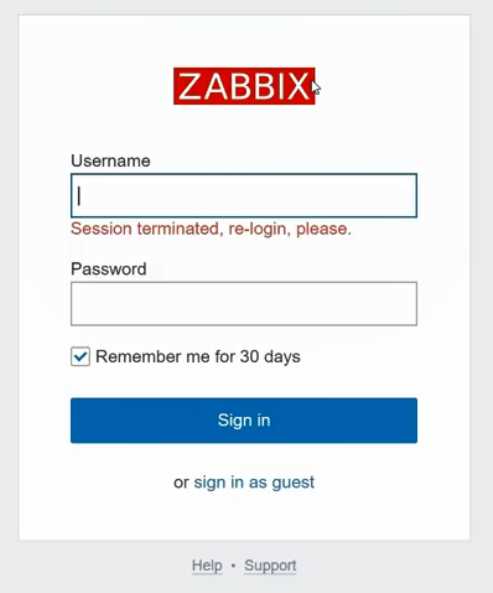
Enter the default username and password
Do not forget to clean the cache (Ctrl+F5). Now log in with the default credentials to access the dashboard:
Username: Admin
Password: zabbix
Note. The server host is still disabled, being connected to the localhost. To enable it, repeat the steps above for version 4.0.
At the bottom of the page you can check the version. It is currently 3.4.15.

Running specific versions
What if we want to run a release which is not the latest? For example, I have a customer who is having issues with 3.4.10 which is not the oldest, but also not the latest release. I want to test it out, but I do not want to install it either from packages or from sources, because I will need it only for testing purposes for 20-30 minutes. How can I switch versions?
First of all, let’s check which Docker Compose file we are running. It is docker-compose_v3_apline_mysql_latest.yaml.

To run version 3.4.10:
- Go to Midnight Commander.
- Search for the same file.

- Open the file and scroll up to see which image we are using for this container.
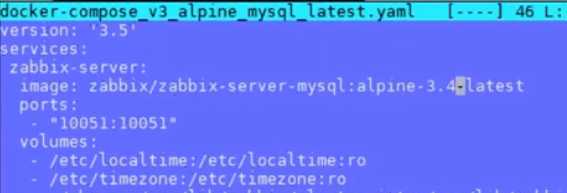
The latest part means that it will be the latest release from 3.4 branch. If we want to start 3.4.10, we need to replace -latest with .10.
- Replace -latest with .10.

- Click OK.
- Replace all matches (there should be 8 in all).
- Check for any matches that were not replaced and replace them manually.
- Save changes.
- Exit.
After we have done that, we do not need to run git checkout 3.4.10. We just need to start docker-compose −f docker-compose_v3_alpine_mysql_latest.yaml up −d.
In the browser, clean the cache (Ctrl+F5) and log in using the default credentials. We now have a clean Zabbix installation, with no hosts, except the Zabbix server which is disabled.
At the bottom of the page you can see that the version is 3.4.10. Thus, it is still 3. branch, but it is not the latest minor release, it is 3.4.10 instead.

You can change these minor and major versions on the fly. If you want to do something else, run not up −d, but kill. Do git checkout for the branch that you want to start (3.0, 3.2, 3.4 or 4.0). It is also possible to select the trunk, branch and the nightly build of Zabbix.
Useful commands
Getting the logs
Let’s say we configured something and the Zabbix server is not running. We want to check the logs.
However, you will not find anything in the usual location of our logs. Even though it is a virtual machine, Zabbix is spinning in the container right now.
To get the logs:
- Type docker ps to get the container ID.
- Type docker logs with the container ID for which you want to check the logs.
 Logs
Logs
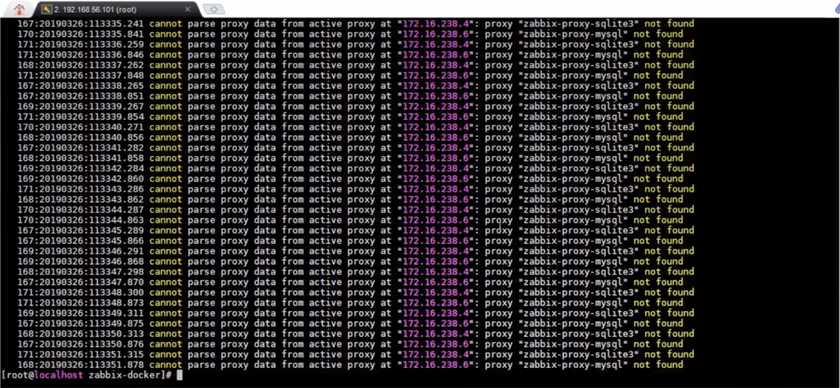
This result is due to the fact that we have two proxies. We have a proxy with MySQL and a proxy with SQLite. We are unable to process it because we have a clean database, and the front-end admin Proxies page is empty.
Reloading the configuration cache with /bin/bash
Earlier I showed you how to reload the configuration cache by typing docker exec −it with the container and the actual command. We can also run /bin/bash instead of the command.

We are inside the container right now. I can see just a couple of directories because, following the container logic, everything must be as small and light as possible. Here you will find only things that were used by Zabbix.
From here you can run −R config_cache_reload.
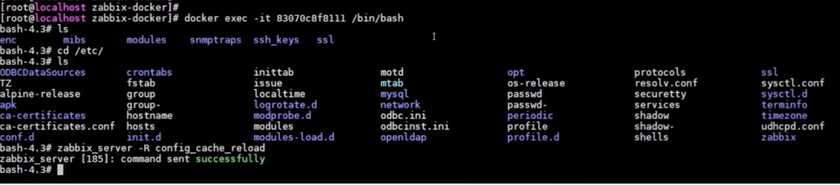
Type exit to exit the container.
Changing the variables
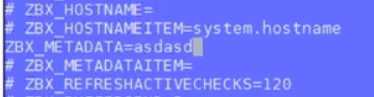
We can also edit the environment files in Midnight Commander. We could call them variables, I guess. Those are files that start with a dot. For example, let’s take .env_agent.
If you open it, inside you will see a lot of data. All of those are the configuration parameters from the regular Zabbix agent config file. The only thing different is the naming.
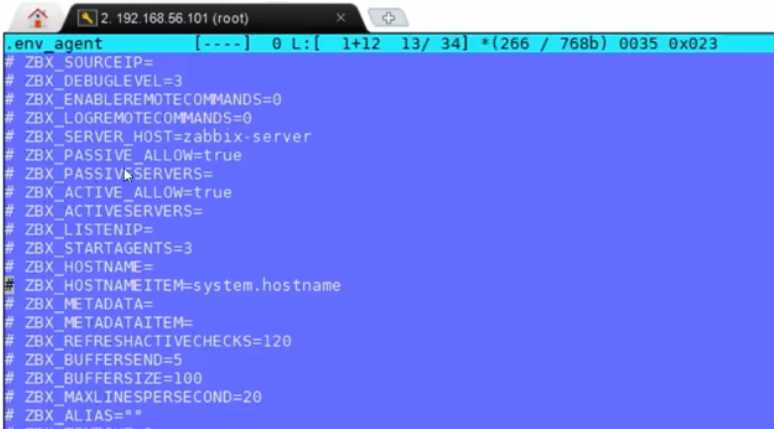
Let’s say, I want to use metadata because my Docker container agent will be performing outer registration to my server with the proxy.
To change the variables:
- Delete #, or uncomment.
- Add the actual metadata.
- Save changes.
- Reload the container.
The same can be done for the server and the proxies. If you need to change something, uncomment the value and change the parameter. Do not forget to reload the container itself.
Deleting containers
Sometimes users ask Zabbix to provide Docker Compose files tailored to more real-life scenarios. Currently our Docker Compose files include two front ends listening on two ports, two proxies, a MySQL database, a PostgreSQL database, Zabbix server and Zabbix agent.
Sometimes users do not need all of those. For example, I need just a server, a MySQL database, a front end and an agent—just the typical Zabbix installation.
You can delete unnecessary containers on your own, it is pretty easy.
![]()

- Type vim to open the Docker Compose file with the text editor.
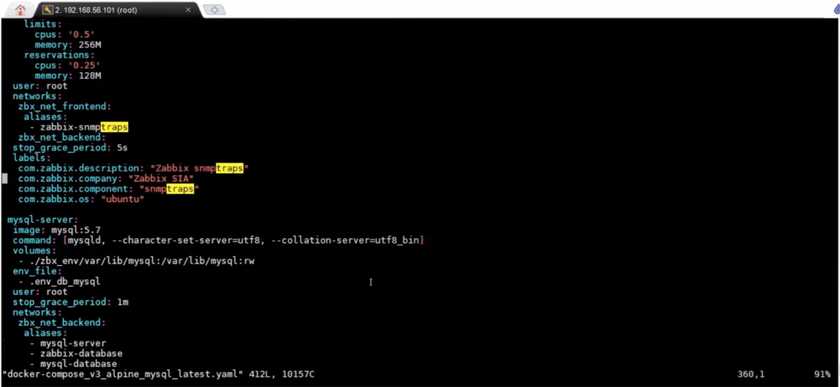
Vim
Let’s focus on the services. In the text editor you can see this part which is responsible for Zabbix server: how it will be started, what resources it has (CPU, memory), the environment file, users, etc.
Zabbix server parameters
In the yaml file you will also find information about Zabbix proxy SQLite, proxy MySQL, etc.
If you do not need something, you can simply delete that part from the yaml file. Check which containers you are running with docker ps.

New yaml file with fewer containers
Changing database versions
By default, there is MySQL 5.7, but the latest release (at the time of filming) is MySQL 8.0. You can easily change the default version to a newer one in the text editor.
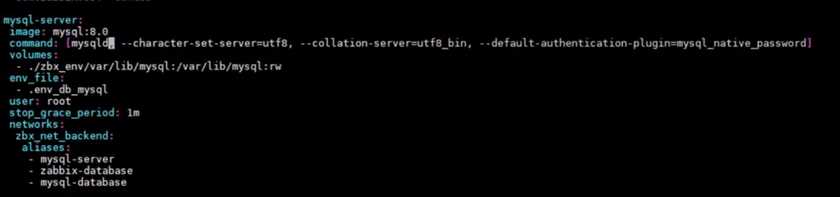
Default MySQL version changed to 8.0
Note. MySQL 8.0 changed the default authentication plugin usage which is not a native password anymore. So, in addition to changing the version number, you also need to add –default-authentication-plugin-mysql-native-password. Otherwise, you will not be able to import the schema from Zabbix server container.
If you change database versions, however, remember to delete the environment file. See Running version 3.4 for instructions.
You can check your database version using docker exec −it MySQL 8.0 container ID /bin/bash. Log in with the default username (zabbix) and password (zabbix).
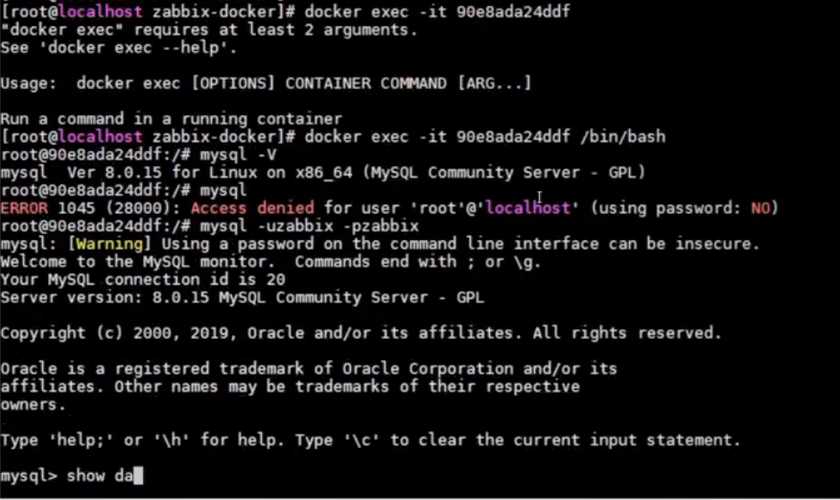
Database details
Conclusion
Compared to our previous videos in the series, Zabbix Docker Containers is longer as it has more information and its topic is more complicated than, for example, simple installation from packages. We also skipped a lot and touched only a little bit of the Docker philosophy and how it works in terms of Zabbix. Here we looked into the installation of Zabbix from Docker containers, the recommended resources and some useful commands.
Be sure to check out other videos in the Zabbix series. See you later!


Hello, I have a problem with the zabbix server container, it stops a few days after installing it.
After seeing the trigger:
More than 75% used in the configuration cache, Consider increasing CacheSize in the zabbix_server.conf configuration file.
In the container configure the values:
CacheSize = 3G
HistoryIndexCacheSize = 1024M
ValueCacheSize = 3G.
But it keeps happening. Any ideas ?
Hie Dmitry
May I get your assistance on installation and configuring Zabbix. I can’t find zabbix.conf in /etc/httpd/conf.d/, can you assist on this?
I migrated my current zabbix installation to the docker format using your official docker compose yaml. My zabbix server started to work 5 times slower! on the same equipment, is there any way to make it more efficient? Graphs are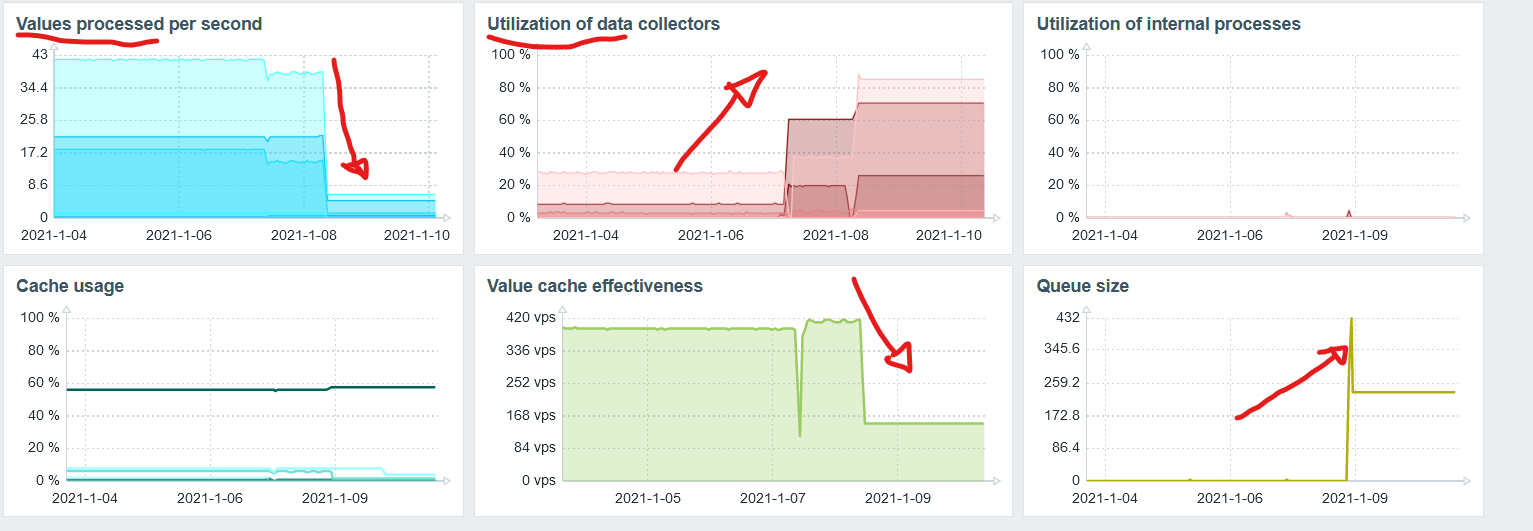 attached