Network discovery is a good feature to simplify your daily routine on maintaining rapidly changing environment. Active registration is good, but it is limited only to hosts with Zabbix agent, while network discovery does not have any limitations.
Watch the video now.
Contents
I. Introduction (0:14)
II. Why network discovery? (0:26)
III. How to (1:39)
IV. Conclusion (14:24)
Introduction
In this post, I am going to demonstrate network discovery setup in Zabbix with Zabbix 4.4 and CentOS7.
Why network discovery?
Zabbix network discovery functionality allows for simplifying and speeding up Zabbix deployment, simplifying administration when using Zabbix in rapidly changing environments.
Network discovery works on all types of devices that you can monitor with Zabbix, irrespective of an agent, — Windows, Linux, network boxes, services, applications, or even web pages could be discovered.
How to
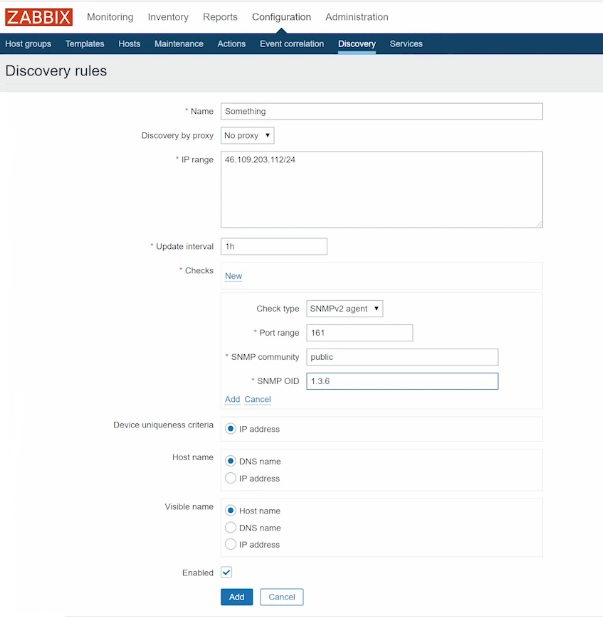
First of all, only at least Zabbix administrators can configure network discovery. To configure network discovery rules, you need to go to Configuration > Discovery. By default, there is one local network that we can simply delete for our example.
Creating rules
Each time you plan to configure discovery, you need to create a new rule.
1. Choose any name that you will remember.
2. Keep in mind that network discovery can be processed by Zabbix server or Zabbix proxy, not by the agent. So if you want to run discovery through one of your existing proxies, just select one from the list in Discovery by proxy field.
3. IP range is the IP range that will be scanned by Zabbix server and Zabbix proxy for the Checks. Here we can specify the IP addresses or subnet masks.
You can specify the IP range as ‘192.168.0.1-254,ip1,ip2,ip3‘ or ‘192.168.56.105/24‘ (with subnet mask). For our demonstration, we’ll use my public IP address and add the mask, and this will be the IP address range that we’ll be scanning.
4. Update interval by default is set to 1 hour. Usually, you don’t need to specify a lesser interval or you even might increase it up to 24 hours or so, as normally you do not expect that a lot of changes will happen that often. For example, you don’t expect that every 5 minutes some new devices will connect to your network and acquire IP address from this range or disconnect from it.
5. The most important part — Checks. These checks will be used in actions and the conditions to decide what do we want to do with discovered hosts (if something is discovered).
Here we can check for the services, for example, FTP, HTTP, HTTPS, ICMP ping, etc. These services will usually respond only with ‘Yes‘ or ‘No‘ and will give no information as to what the device is, if there is a network, if Windows or Linux or something else is installed, etc.
SNMP gives a better view, so we will use it in our example. Here you provide SNMP OID as system description and SNMP community that you may have in your company (we’ll leave it ‘public‘).
 Setting discovery rules
Then click Add.
Now our network discovery rule will be scanning each IP address in the specified range and check for SNMPv2 check.
We can also add any other services to Checks. To do that, in Configuration > Discovery > Checks select the needed service and press Add.
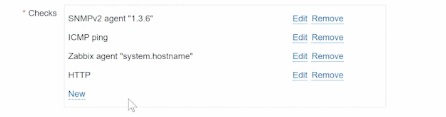 Network discovery checks
For example, if inside the discovered IP address or the discovered device there is a Zabbix agent installed which can report to this server or this proxy we can also use Zabbix agent keys.
 Zabbix agent key
6. There might be duplicate responses or the same values with the same IP addresses for DNS names, so we must specify Device uniqueness criteria for the discovered hosts or devices. This criterion might be IP address, SNMP check value, the value of the system.hostname, etc. For the sake of our demonstration, I’ll check Zabbix agent.
 Device uniqueness criteria
7. We need to acquire the Host name of the discovered host in the front-end. It will be DNS name if we check the specified IP address and Zabbix resolves it to DNS name of the virtual machine.
8. Click Add to create this new discovery rule.
Creating actions
Discovery events can be the basis of actions, which can be configured with respect to the device type, IP, status. etc.:
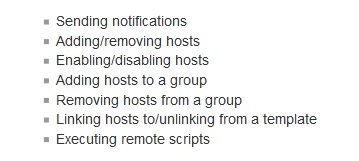 Types of actions
So, to be able to add hosts, we need to add a new action.
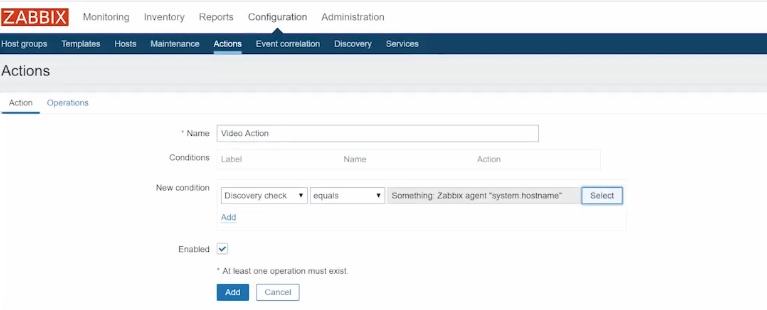
1. In Configuration > Actions, change Event source to ‘Discovery‘.
You may delete the default action and press Create action.
2. Here you need to create New condition. You may select, for example, Host IP which was discovered, or Discovery check that is running,
 Action condition
or Discovery object that can be ‘Device‘ or ‘Service‘.
So, in one IP address, there will be one device, which can contain multiple services, which can also be discovered.
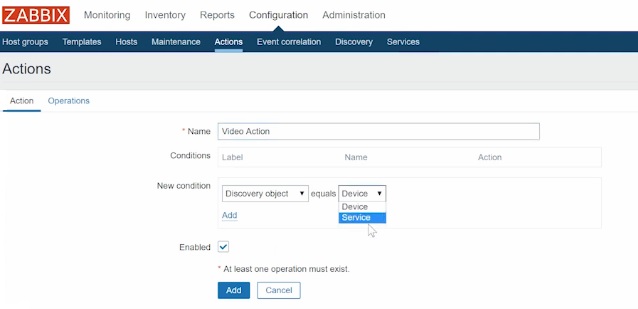 Discovery object
For our example, I’ll select Discovery check equals Zabbix agent “system.hostname“, and then add Received value equals Windows.
I will also add Uptime/Downtime as New condition. It is usually recommended to set Uptime/Downtime. If our discovery rule is running and somebody plugs in the network we don’t want to add this device immediately. So we usually use Uptime/Downtime before actually executing some operations.
 Adding conditions
3. In Actions > Operations you need to define Operations details. You can select ‘Send messages‘ or execute ‘Remote commands‘ on the discovered device as an Operation type.
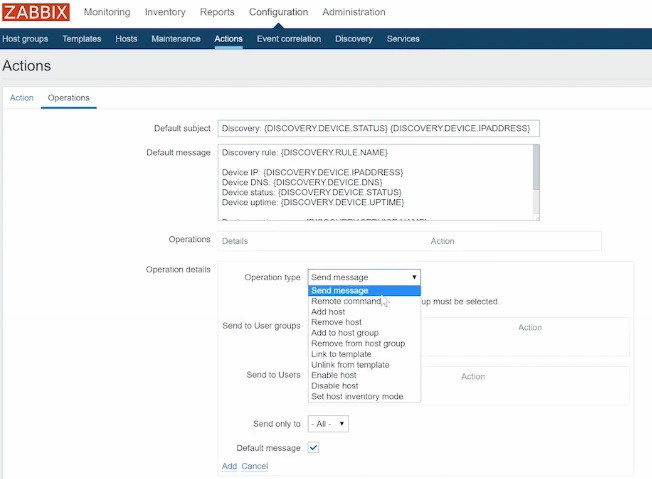 Operations type
Here we’ll create a new host, add it to host group, link to the template, and click Add.
 Adding new host
4. In Configuration > Actions, we can see that we have a network discovery action and a discovery rule enabled,
 Network discovery action added
and in Configuration > Actions, — the discovery rule enabled.
 Discovery rule enabled
We can check the results in the CLI to make sure that discovery is performed.
![]() Checking discovery performed
Checking discovery performed
We can also verify that discovery is performed in Monitoring > Discovery where newly discovered devices are displayed.
 Discovery status
NOTE. Since our example conditions that were added for demonstration do not match because Received value is not ‘Windows‘ and ‘system.hostname‘ check is not successful as we can see in Configuration > Actions, I’ll leave only ‘Service type equals ICMP ping‘ condition.
So in Monitoring > Discovery, there are new devices with IP address as Host name.
 New hosts discovered
Discovery process
The process of network discovery is quite slow. The network discovery rules are processed with the help of discoverer process:
/usr/sbin/zabbix_server: discoverer #
You can change amount of processes in the Zabbix server configuration file in the CLI:
vim /etc/zabbix/zabbix_server.conf
The default value of StartDiscoverers is 1.
 StartDiscoverer default value
The best practice is not to specify a huge IP range inside one discovery rule because it will run for a very long time. If you need to scan multiple subnets then create multiple network discovery rules in Configuration > Discovery.
It is also recommended to start as many discovery processes as many network discovery rules you have.
Conclusion
So, within your internal network, the Checks in Discovery rules in Configuration > Discovery provide for discovery of some Windows or Linux boxes with an agent installed or some SNMP devices that you can query. There is no limit as to the number of checks.
In addition, in Configuration > Actions with ‘Discovery‘ as Event source, the conditions you define are of importance.
That’s the way how you can add hosts automatically to be monitored and automatically notify Zabbix administrator that a new host is discovered, added to the template and monitored. In this case, the administrator can decide to monitor this host or to delete it.