


User macros with context can be used to accomplish more flexible thresholds in trigger expressions. Different thresholds may be defined on user macro level and then used in trigger constants depending on the discovered context. In this post we are going to check simple example, how to configure it in real life scenario.
Watch the video now.
Contents
Introduction
Today I am going to talk about context macro support inside Zabbix. It is not as complicated as it sounds. It is a really cool feature, and as soon as you understand how it works and what results you can get with it, you will start using it in all of your templates. Still, for some reason, this is not the most used Zabbix feature, and a lot of people don’t know about its existence.
Today I will work with Zabbix 4.0 front end. If I am not wrong, context macro was introduced in Zabbix 3.0, so it will be supported in your front end if you have at least Zabbix 3.0.
User macros
Before we actually get to the context macro, we need to understand what a macro is.
Macro levels
There are three levels on which you can specify user macros inside the Zabbix front end, and they are working in the upstream. We have the host, template, and global levels.
A user macro looks like {$MACRO}. You can assign a value to it, e. g. {$MACRO} = 10. This macro syntax is exactly the same on the three levels. For example:
HOST {$MACRO} = 10
TEMPLATE {$MACRO} = 20
GLOBAL {$MACRO} = 30
Note. Curly brackets and a dollar sign indicate that it’s a user macro. If there is #, it’s a low-level discovery macro.
If a macro name is exactly the same on all three levels, the host level macro will be checked first, then comes the template, and, finally, the global level. In the example above, the value of the host macro will be taken into account. If we didn’t have the host macro, then the template value would be used, and so on.
Common use cases
Macros can be used in trigger expressions. Your trigger expression might look like {host…:item_key.last()} > 20, or it might include a macro, e. g. {host…:item_key.last()} > {$VALUE}
We specify this value in one of the levels. It will apply to all upstream hosts and triggers.
The same works, for example, with SSH items. To create a new item, go to Configuration > Hosts > Windows Host > Items > Create a new item and set Type to ‘SSH agent’.
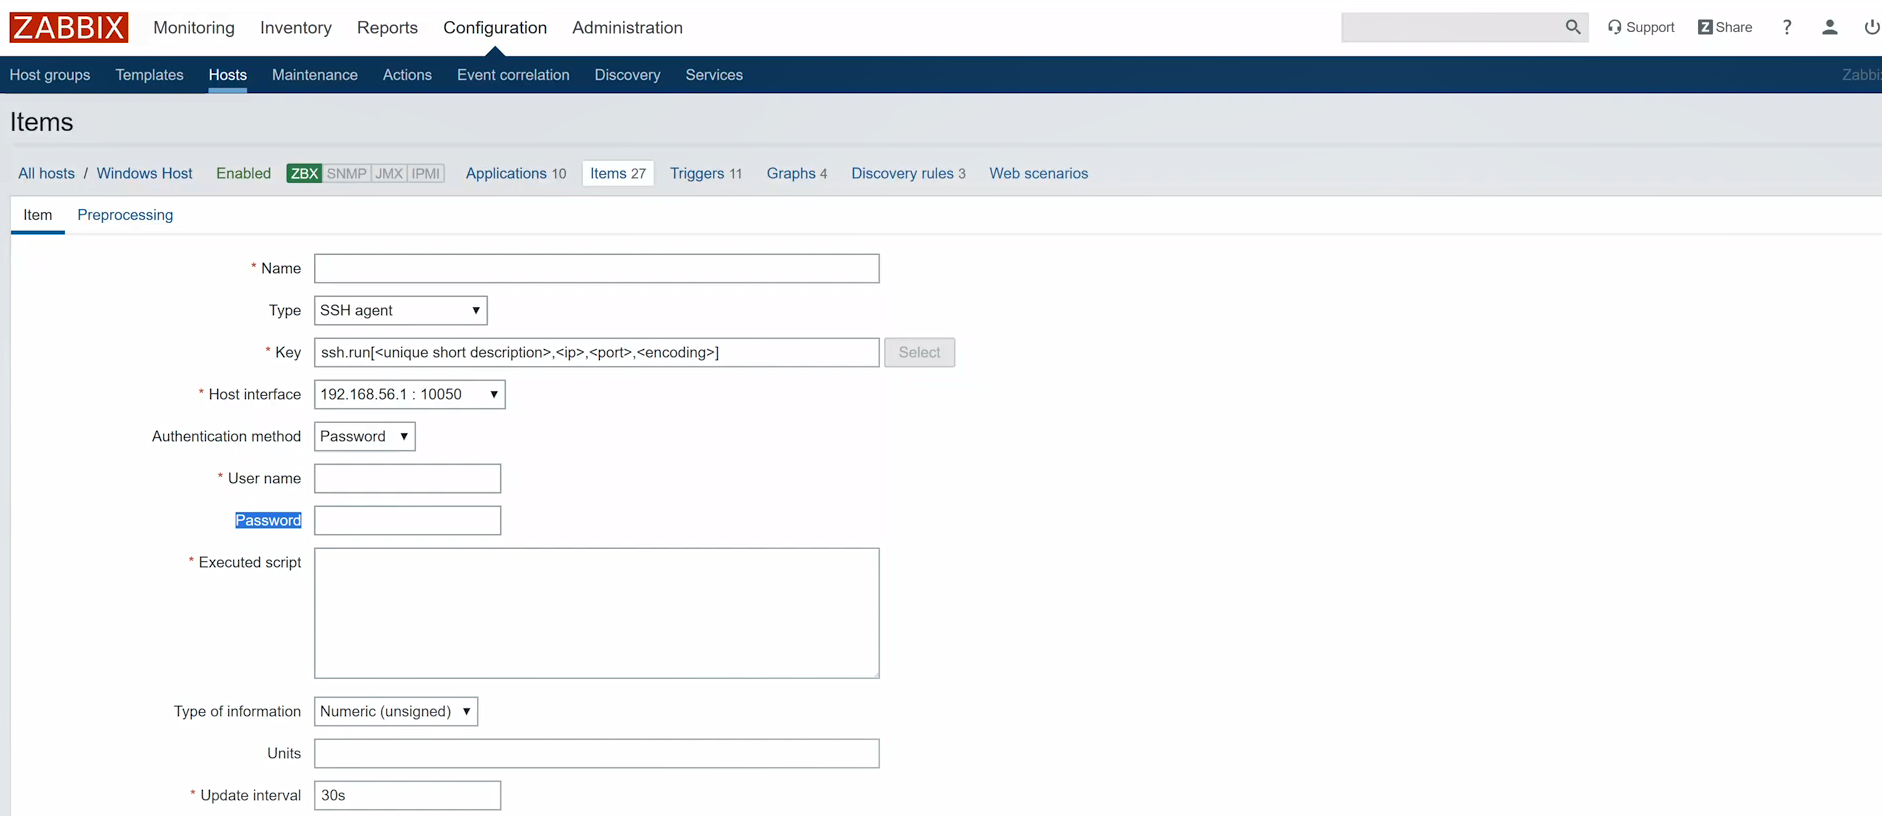
SSH agent item
Here we have User name and Password. Let’s say you don’t want to display this information. You can go to Administration > General > Macros. Add two macros with Macro name as {$USERNAME} and {$PASSWORD} and Value as ‘root’ and ‘qwerty’ respectively, and click Update.
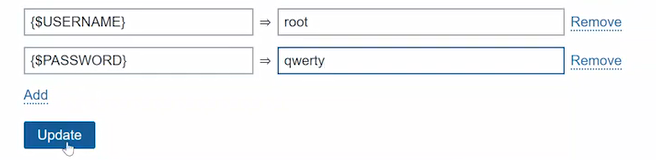
Now, if you go to Configuration > Hosts > Windows Host > Items and create an item, you simply need to specify {$USER} for User name and {$PASSWORD} for Password. And the values from the global level will take place here. So now you know at least the basics about user macros.
Context macros
Context macros are used only in low-level discovery. Do not confuse it with network discovery.
I installed an agent on my Windows machine, not the virtual machine, to deploy an agent and actually monitor some data.
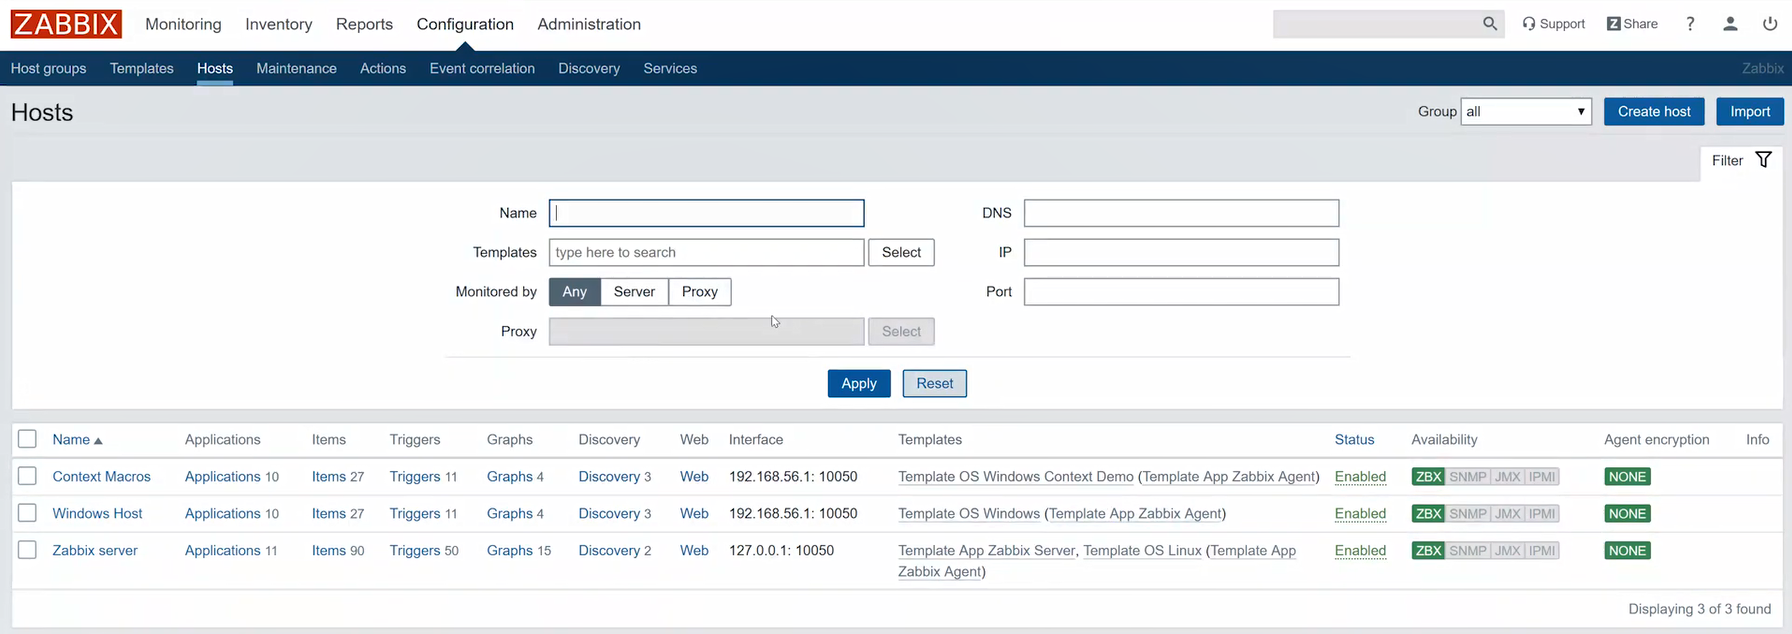
Hosts
Default LLD elements
These are the default low-level discovery elements: filesystem discovery, network interface discovery and Windows service discovery.
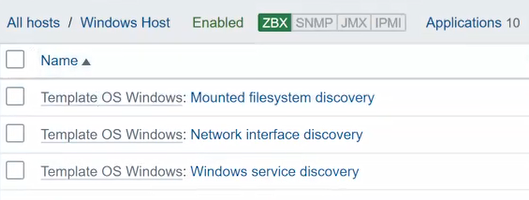
Low-level discovery elements
What else can be used as low-level discovery from the box? There is also the discovery of databases and SNMP stuff.
Low-level discovery and prototypes
What is low-level discovery? Let’s take the simplest case, mounted filesystem discovery.
We want to monitor hard drives. On my computer, I have disks C and D. In companies and big offices with a lot of computers and servers, no one will run through the computers, check what disks they have and manually add in new items. Instead, we have low-level discovery with Key ‘vfs.fs.discovery’.
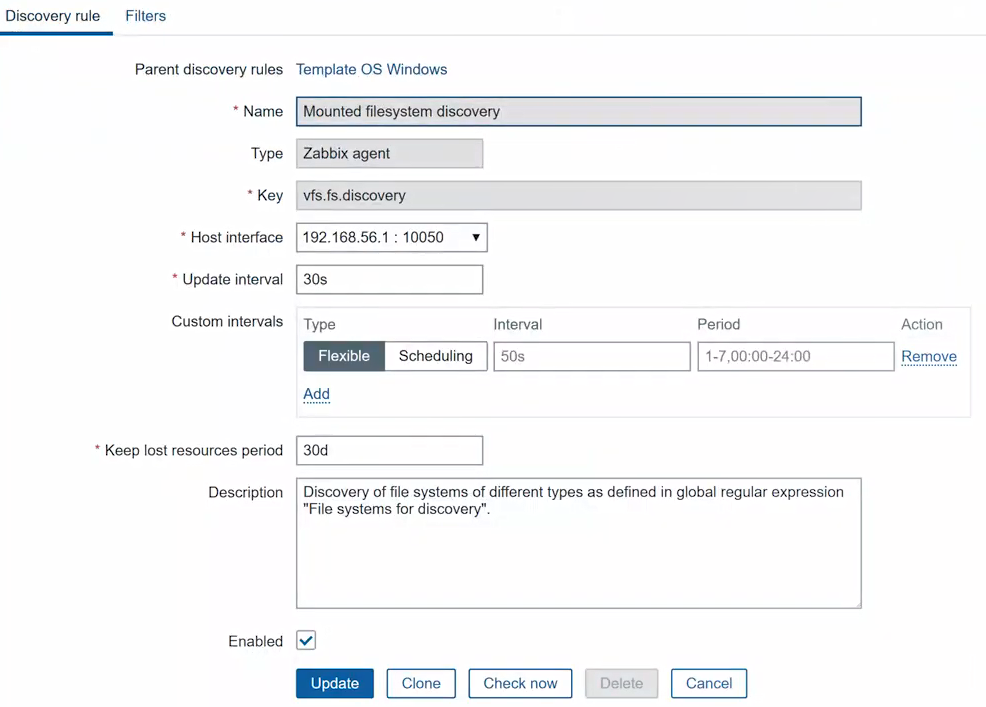
Mounted filesystem discovery
Let’s check what output is returned by this key:
zabbix_get −s 192.168.56.1 −k vfs.fs.discovery
You can see that I get JSON data, file system name, file system type, and drive type for two file systems:

This discovery covers the actual file system, the actual disks on the machine on which you run it. Based on the discovered results, it automatically creates items and triggers based on the item prototypes and trigger prototypes.
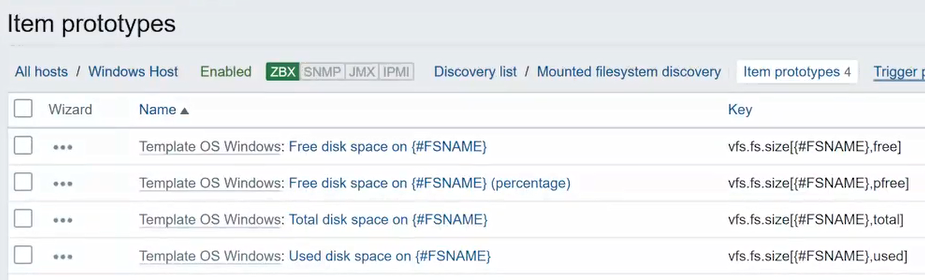
Item prototypes
So we have item prototypes for Free disk space, Free disk space (percentage), Total disk space and Used disk space. We also have one trigger prototype that will be created for each discovered disk on the Windows machine:
![]()
Trigger prototype
The part ‘last(0)}<20’ means that as soon as the last received value for free percentage is less than 20, the trigger will fire.
We can see this in the result if we go to Configuration > Hosts > Windows Hosts > Items. Orange items are automatically created by low-level discovery. In the picture below you can see the items for my two disks — free space and free space percentage.

LLD results
To see the triggers, go to Configuration > Hosts > Windows Hosts > Triggers. The orange lines are the ones created by LLD. We have triggers for when free disk space is less than 20% on volumes C and D.

LLD triggers
However, here comes the problem. Obviously, the most important disk on a Windows machine will be disk C. And usually, you don’t care much about any other disk drives. Let’s say, you want to set a trigger threshold that will specify that if free disk space is less than 20% on disk C, that’s a problem, but on any other drive you want the threshold to be 5%.
Normally, setting different trigger values is not possible. In the low-level discovery rule, the expression is pretty simple, e. g. {Windows Host:vfs.fs.size[{#FSNAME},pfree].last(0)}<20. The expression indicates the host, the item key and the parameter which is a low-level discovery macro.
![]()
All the values discovered by the low-level discovery rule — C and D — will create separate triggers, but the threshold remains untouched, it is always 20%. This is the place when user context macro support kicks in.
Threshold customization
I’ve already created a duplicate host of my Windows machine named Context Macros to use as an example, which has the same discovered items. However, let’s take a look at how I configured triggers on the Mounted filesystem discovery rule at Configuration > Hosts > Discovery rule.
I have the same item prototypes, but the trigger prototype looks absolutely different.
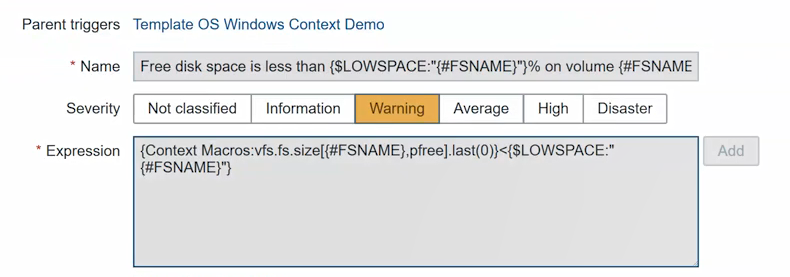
Different trigger prototype for context macros
The value, instead of 20, is {$LOWSPACE:”{#FSNAME}”}, where {$LOWSPACE} is the user macro and {#FSNAME} is the actual file system name.
I’ve also added two user macros in my Context Macros host.

These user macros will be used and evaluated each time when the discovery rule is running. The discovered disk will be compared against the macros. Based on {$LOWSPACE:”C:”}, the threshold for disk С will be 60. But, since we do not have a similar macro for disk D, its threshold will be 20 by default.
Unfortunately, the actual trigger value is not revealed in the Configuration tab. You will see the expression of the trigger exactly as in item prototypes.

Actual triggers
So, the only way to check if it actually works is making the trigger fire. This is why I specified 60 as the macro value because my drive С is less than 60% free. And right now I have a problem reported on the Global view dashboard.

Global view dashboard
In the Latest data for my Context Macros host, I can see that Free disk space on C (percentage) is 59.73%. This is why the trigger fired. But Free disk space on D (percentage) is 89.79%, and it will be a problem only when it is lower than 20%.
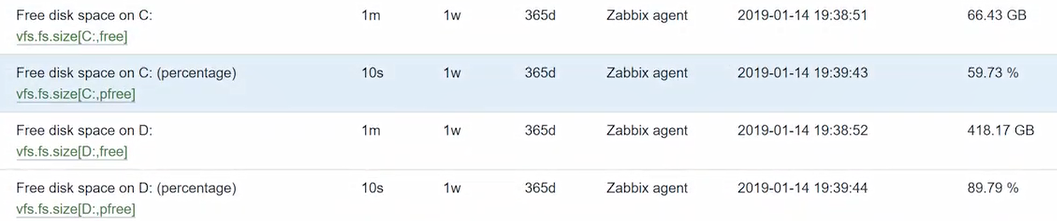
Latest data
Be careful and remember about the upstream usage of user macros (host, template, and global). Don’t mess with the place where you actually specify these macro values.
In my example, I have them inside the Context Macros host. It means that they will work only on this host. If I add these values in Template OS Windows Context Demo, they will work on all the hosts to which this template is attached.
If I add these values to the global level, they will work on all of the hosts unless they are overwritten by the same user macro names on the template level or the host level.
Also, be careful with the syntax. It is always uppercase, there is always a dollar sign at the beginning, curly brackets, and quotes where we are specifying the context support. And don’t forget to add the colon for Windows.
Conclusion
This might be quite mind-blowing. To understand it better, you should experiment and create some dummy hosts on your computer or just create some virtual machines and play with them.
You are welcome to comment and like. Thank you and see you later!


[…] can also use low‐level discovery, which was discussed in our previous post. What you can do is run a query and, based on the result, you will receive LLD macros so you can […]