Opensource ICT Solutions designed integration with Zabbix that makes it possible to monitor a big environment and use Opsgenie to centralize alerting and make the on-call scheduling for managers a lot easier. Read more and learn how to set up the integration in this post.
Contents
- What brings Opsgenie to the table in combination with Zabbix?
- How is it setup?
- Setup Opsgenie integration
- Teams, scheduling, rotations, escalations and why they are so powerful
- Conclusion
What brings Opsgenie to the table in combination with Zabbix?
When we look at this particular Zabbix instance we are working with around 400 network devices. Monitoring routers, switches and firewalls takes a lot of items and thus alerting can be tricky to setup and maintain.
In big networking environments like the one we are working with here it is important that alerting is handled with great care to make sure engineers aren’t overloaded with them. Only the highest priorities should actually be handled 24x7x365 by engineers. You do not want to overload your engineers with alerts, especially not in their personal time. A happy engineer is a happy network in this case!
Most of the alerting issues can be handled by setting up alerting in Zabbix correctly, better yet it is even still very important when setting up Opsgenie. Opsgenie will handle your centralisation, your scheduling and your alerting but it will only alert what you send to it, thus making a solid Zabbix Server still very much a requirement.
We are going to use Opsgenie as a gateway between certain alerts, engineers and even customers.
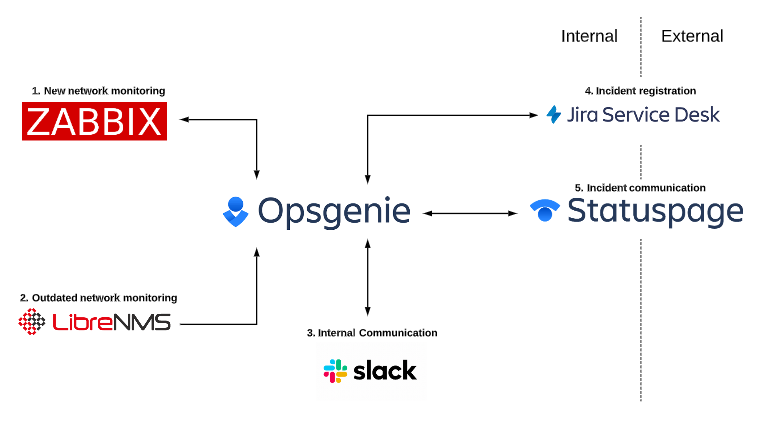
As you can see in the Diagram above, we are not only working with Zabbix and Opsgenie here. Actually, we are working in a multi-software environment with applications from different vendors. This is something you see a lot when you walk into an IT company their office all around the world and it is one of the biggest flaws when looking at monitoring.
What’s more important when we are looking at monitoring than centralization and simplification? Not a lot!
How is it setup?
So let’s break down the diagram we’ve seen in the previous chapter and focus on the Zabbix and Opsgenie integration for a while.
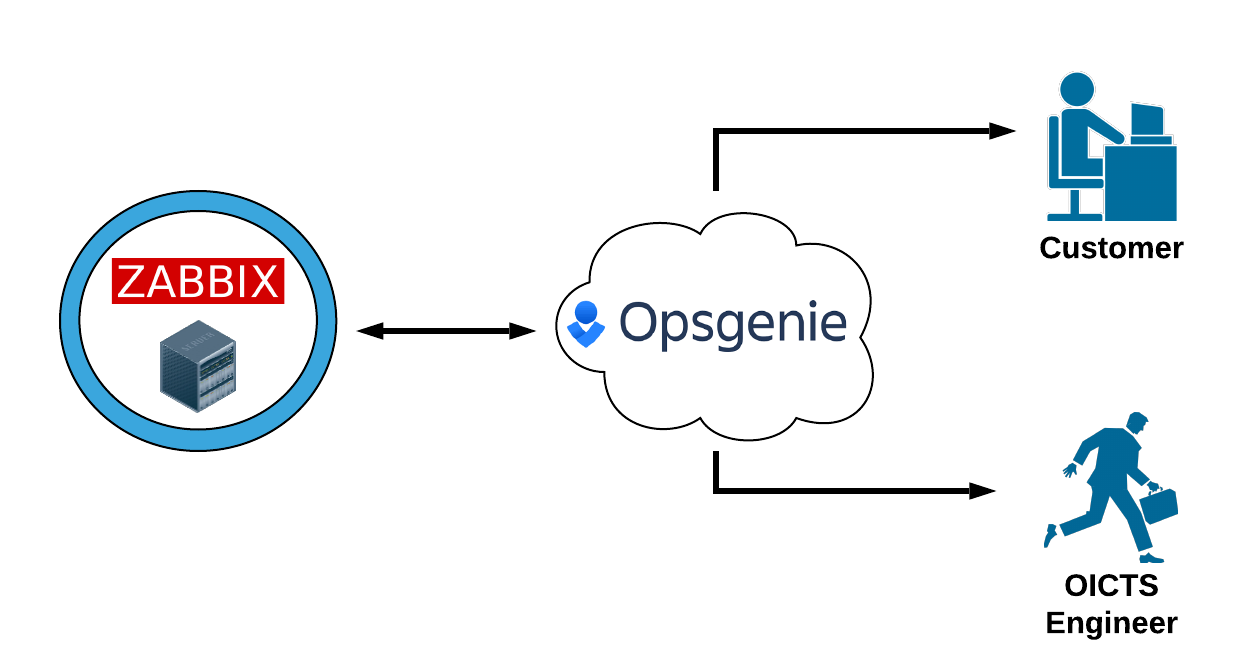
We’ve got our Zabbix setup and we want to fully integrate that with Opsgenie to start the centralisation and simplification process. We want to set this up to make sure our customers are informed and our engineers start running to fix the issue. What we need to do is the following:
- Setup Zabbix alerting to our needs
- Setup Opsgenie integrations
- Setup Opsgenie to alert our engineers
And after that we are done, only three steps in the process of which the biggest one is setting up Zabbix alerting.
Setup Zabbix alerting.
I won’t go over the complete process of setting up alerting in Zabbix, but I’ll grace over it at lightspeed so we can move on to the subject at hand ‘Opsgenie’.
Before you can get any use out of your Opsgenie installation, you need to make sure to setup alerting solid as well. This means creating the right templates for your hosts and setting the right severity on your triggers.
![]()
![]() Especially the severity is important for Opsgenie in our case, as we will need this later on when building the integration.
Especially the severity is important for Opsgenie in our case, as we will need this later on when building the integration.
We’re trying to simply our alerting by centralising it to Opsgenie, but we cannot forget that it will still be Zabbix who is sending out these alerts via triggers. Spend time and energy tweaking your templates and make a solid setup that works for your organisation.
Setup Opsgenie integration
Now for the actual integration part we finally get to start with setting up Opsgenie and Zabbix to work together. For all their different forms of integration Opsgenie provides detailed guides on how to setup the plugins. There is also an option to integrate (kind of) via email, but we’ll be using full integration via the plugins. You can find their guide here:
https://docs.opsgenie.com/docs/zabbix-plugin
Now the steps are easy:
- Configure Zabbix to Opsgenie integration
- Configure Opsgenie to Zabbix integration
Configure Zabbix to Opsgenie integration
Make sure to follow the most recent guide on the Opsgenie page, I will only go through the steps fast here to make sure you have basic understanding of the process.
You have to download and install the latest version of the plugin to you Linux hostmachine were Zabbix is running. It’s a custom plugin to make the Zabbix->Opsgenie integration possible
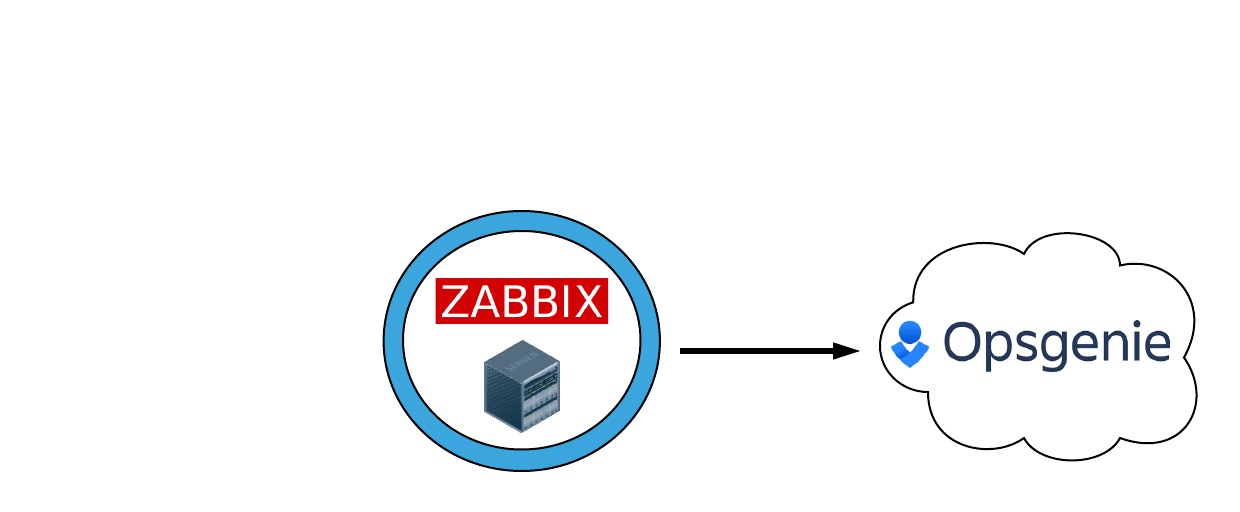
After installing the plugin setup the Opsgenie side, generating the API Key and editing “/home/opsgenie/oec/conf/config.json”
Then there is only one step left, setting up the Zabbix action to run a remote command as the following for all 3 actions:
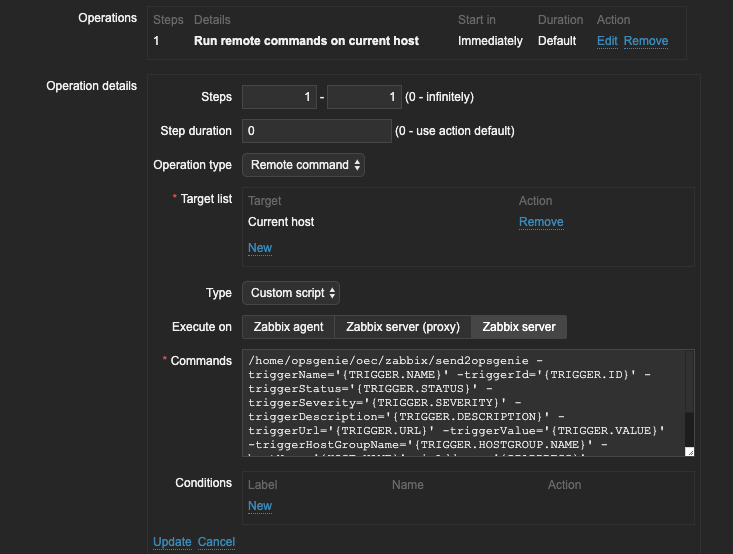
And that is all, this is how easy it is to setup Zabbix to send alerts to Opsgenie. But this is of course only one way and we want it to go both ways for maximum efficiency.
Zabbix to Opsgenie acknowledgement caveat
Update: Due to changes at the Opsgenie side, this workaround might no longer function.
One thing I did notice in my deployment is that out of the box acknowledgements in Zabbix do not acknowledge in Opsgenie
To get this to work we need to make a small adjustment to the Opsgenie GoLang script and the integration.
The Zabbix to Opsgenie integration is basically a GoLang script located at “/home/opsgenie/oec/zabbix/send2opsgenie.go”.
If we edit the file like the example below, adding “EVENT.ACK.STATUS” to the triggerStatus line we can get this to work.
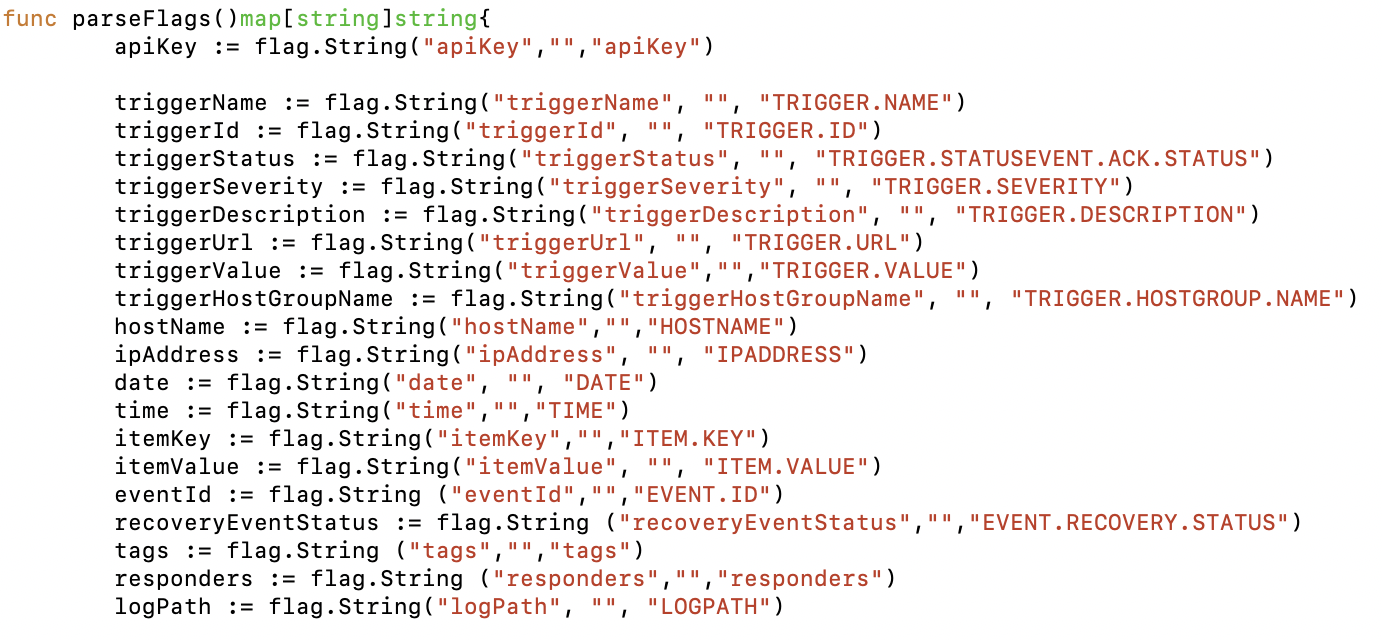
The Opsgenie team let me know there is an issue opened for this and they will look into it further. Meanwhile this is my solution.
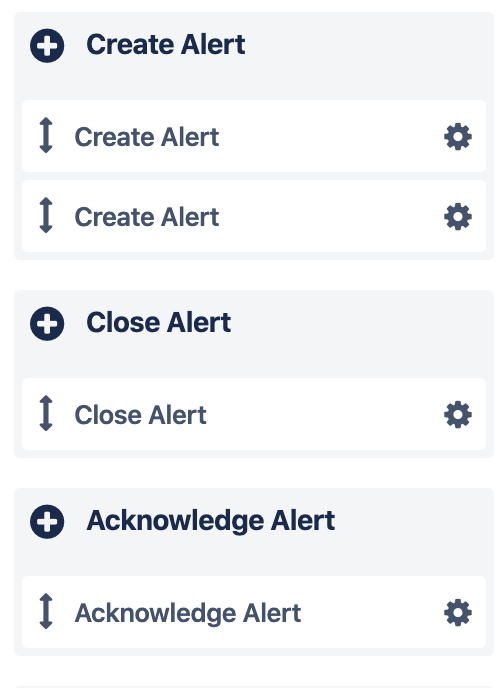
After editing that script, edit your Opsgenie integration for all three kinds of actions. Making sure to add it as follows:

Create Alert:
Trigger Status – equals – PROBLEMNo
Close Alert:
Trigger Status – equals – OKNo
or
Trigger Status – equals – OKYes
Acknowledge Alert:
Trigger Status – equals – PROBLEMYes
This will make sure that when a problem is acknowledged in Zabbix it is also acknowledged in Opsgenie, making the integration solid. Your engineers can now easily acknowledge problems in the Zabbix front-end and not worry about the schedule rotating to another engineer or a manager.

Configure Opsgenie to Zabbix integration
Now to go over the basics for setting up Opsgenie to Zabbix integration, which is fairly simple as well.
You basically use the power of Zabbix and Opsgenie scripts to make sure your actions in Opsgenie have effect in Zabbix.
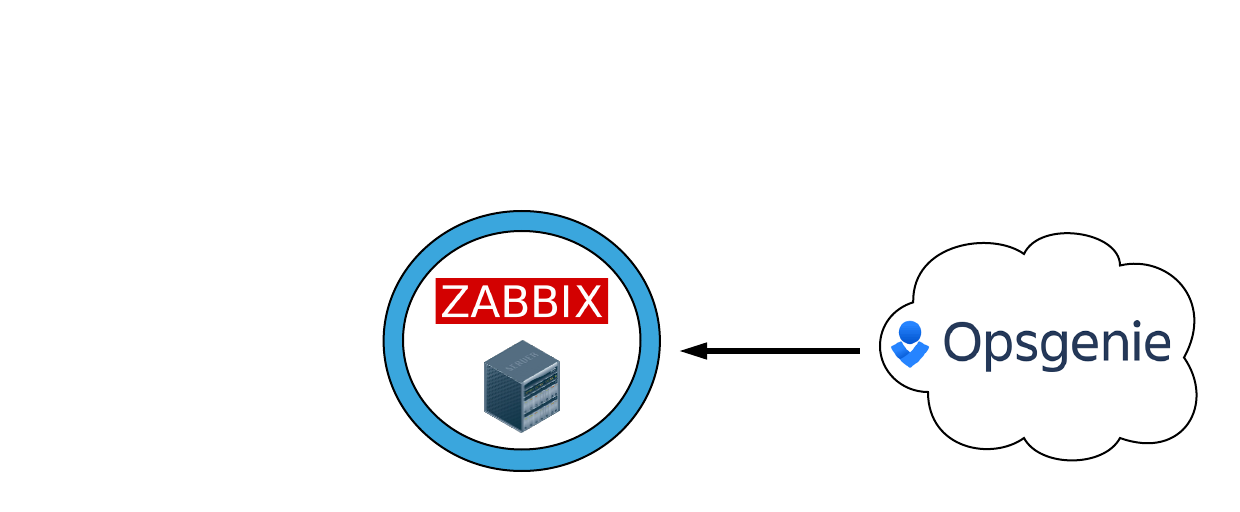
You can do this by editing /home/opsgenie/oec/conf/config.json and filling in the required information. Once again make sure to use the most up-to-date guide on https://docs.opsgenie.com/docs/zabbix-plugin.
So, remember the time were we used an SMS gateway, Slack integration, ticket tool integration and everything else you needed to make sure important Zabbix alerts ended up in the right place? If you do, forget about those times! We can now easily centralize this information via Opsgenie and make sure we only configure one pipe from Zabbix to Opsgenie and back.
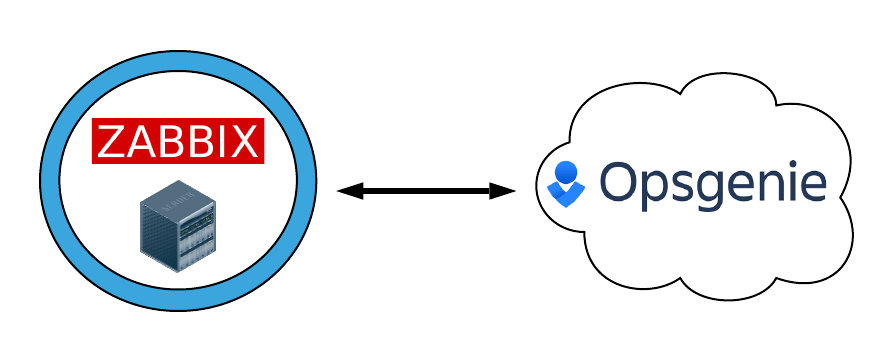
Now we can start using the power of Opsgenie to configure the rest of our configurations like for example the diagram in the first chapter.
Teams, scheduling, rotations, escalations and why they are so powerful
I want to talk about one more thing, well actually it’s 4 different powerful configurations in Opsgenie to make your life a lot easier.
If you have 24×7 schedules for your engineering teams, but you are tired of using different tools to notify users and schedule the users then Opsgenie is a possible solution.
Imagine we are working in a company with different departments (weird huh?). Let’s say we have the following:
- Networking
- Infrastructure
- ServiceDesk
- Crisis Management
All these teams can be added to Opsgenie with ease and they can all contain their own information pertaining scheduling, rotations and escalations.
This will make sure you have a distinct difference between the teams and their members. What Teams will get which notifications? What team contains which members?
Let’s say I’m working in the Networking team, for which we have just configured the Zabbix integration.
I want to have a “First Line” Engineer and a “Second Line” Engineer. If the first line doesn’t pick up the phone, we want the second line to handle the call. That’s why we define two Rotations:
In this example we want the first week to be run by Nathan Liefting (myself) and when I don’t pick up we want Brian van Baekel to pick up the call.
Adding a schedule like this in Opsgenie is easy, we simply fill out the information in the Rotation like this:
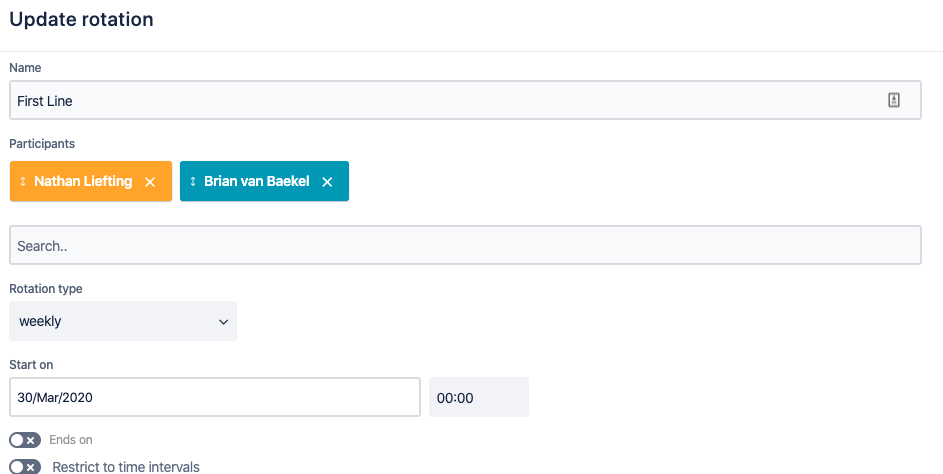
Defining how long we want a shift to be and in which order engineers will alternate.
The final result with two rotations and two engineers would look like this:

We aren’t done by adding the rotation though, we also need to define how an alert will escalate. Creating an escalation policy like the following:

We simply define how we want to run through the rotation with the first two lines and how long we want to wait for an Acknowledgement before notifying the next user. Adding to the fun we created another Team named “Crisis Managers”, notifying a manager in that team if the Networking team fails to pick up the alert.
Bulletproof right? Yes, it is! But we can actually make it more bulletproof by doing one more powerful thing. We make sure our colleagues install the Opsgenie app, which has the ability to override your phones silent setting, making sure that an engineer will not miss the alert even when the phone is silenced.
Conclusion
Opsgenie can be a very powerful all in one scheduling, centralization, integration and notification tool by providing us with easy management and basically a whole call center at our disposal.
You get the option to Text message, call or use the Opsgenie application to notify (sleeping) engineers and all by configuring one single pipeline between Zabbix and Opsgenie. Not to forget all the other tools we can send our Zabbix notifications to!
I hope you enjoyed reading this blog post and if you have any questions or need help configuring your Opsgenie/Zabbix integration feel free to contact me and my team at Opensource ICT Solutions.


 Prev Post


Ack’ing from Zabbix into OpsGenie doesn’t seem to work for me. I made all of the updates in your article and Ack’ing in Zabbix never updates OG. In fact, once I make these changes, alerts are no longer created in OG at all. Any guidance you can provide would be much appreciated. Thank you in advance!
I don’t think that section about the changes to /home/opsgenie/oec/zabbix/send2opsgenie.go actually works.
Instead I had to change the execute action command (the call to /home/opsgenie/oec/opsgenie-zabbix/send2opsgenie)
Change the parameter triggerStatus='{TRIGGER.STATUS}’ to triggerStatus='{TRIGGER.STATUS}{EVENT.ACK.STATUS}’
The make the changes in your create, close and acknowledge rules in opsgenie as above, Then it should all work as expected.
While you are at it, add -tags='{EVENT.TAGS}’ to the end of the command, then your zabbix tags will be reflected in opsgenie.
So I had a whole long wonderful comment about how to make acks in zabbix ack in OpsGenie, and it vanished. So i’m reposting it, cause thats what heros do.
(to answer someone’s question, I am using the opsgenie-zabbix-1.1.3-1.x86_64 package, and zabbix 5.2.5
So, to start, you should set up the zabbix integration in OpsGenie,as above, and install OEC on your zabbix server. This will allow the messages from OpsGenie to make it to zabbix. So that when someone Acks in OpsGenie, the Ack will flow though to zabbix.
As for the reverse. The key is changing the -triggerStatus='{TRIGGER.STATUS}’
part of the action command to -triggerStatus='{TRIGGER.STATUS}{EVENT.ACK.STATUS}’ .
You don’t need to touch the go script at all.
Lets see. Check the following (apologies if some of this is obvious)
1: in Zabbix, when configuring the action, Make sure your action is “run command on current host”. You should not be using the Opsgenie API or the Opsgenie “media”.
2: Make sure you configure commands for all 3 operations. (in particular, if you want acks in zabbix to flow to OpsGenie, you need an “update operation”)
3: My command is:
/home/opsgenie/oec/opsgenie-zabbix/send2opsgenie -triggerName='{TRIGGER.NAME}' -triggerId='{TRIGGER.ID}' -triggerStatus='{TRIGGER.STATUS}{EVENT.ACK.STATUS}' -triggerSeverity='{TRIGGER.SEVERITY}' -triggerDescription='{TRIGGER.DESCRIPTION}' -triggerUrl='{TRIGGER.URL}' -triggerValue='{TRIGGER.VALUE}' -triggerHostGroupName='{TRIGGER.HOSTGROUP.NAME}' -hostName='{HOST.NAME}' -ipAddress='{IPADDRESS}' -eventId='{EVENT.ID}' -date='{DATE}' -time='{TIME}' -itemKey='{ITEM.KEY}' -itemValue='{ITEM.VALUE}' -recoveryEventStatus='{EVENT.RECOVERY.STATUS}' -tags='{EVENT.TAGS}'If you want to be pedantic, you really only need the “-tags” option, in the original operation field, and you really only need {EVENT.ACK.STATUS} in the ‘Update operations.Tags in OG are only set on create, and acks are only an update operation. But if you use the same command in all 3 it should work.
4: In OpsGenie, in the create rule for your zabbix integration, make sure you are using the tags. ie, set the value of the “Tags” field, to {{tags}}.
5: In OpsGenie, make sure your “Create Alert” filters, your “Close Alert” filters and your “Acknowledge Alerts” filters are set with all possibilities,
Thanks Andrew for explaining your configuration! Another question, is it working for you if you want to acknowledge the alert from Opsgenie towards Zabbix?