
SNMP traps report device failure very quickly, what increases server, services, and application availability. Receiving SNMP Traps in Zabbix is easy. In just a couple of minutes, your instance will be ready to receive, process and react any incoming trap.
Watch the video now.
Contents
Introduction
Today I’m going to explain how to configure SNMP traps in Zabbix.
In this tutorial, I’m using Zabbix 4.0.2, CentOS 7, MySQL, and Zabbix agent on the localhost without a firewall or SELinux. For instructions, use Start with SNMP traps in Zabbix as a guide.
SNMP configuration
About SNMP
SNMP (Simple Network Management Protocol) is a protocol used to manage and monitor network devices like switches, routers, firewalls, load balancers, etc. Most likely you are used to SNMP agent, which is basically snmpget.
Three major versions are available — SNMPv1, SNMPv2c, and SNMPv3, which is, I think, the most secure one.
SNMP works either by polling or by traps. That is, our point A (Zabbix server or proxy) may poll data from point B (network device) over the SNMP protocol: connect to the device, poll OIDs or the MIB, get the value, and close the connection. The other way is to monitor network devices by SNMP traps. But instead of the Zabbix server connecting to the network device, it is the device that is configured to decide when and where to send SNMP traps.
What are the benefits of SNMP traps over SNMP agent? The agent polls data with an update interval. If an important metric fails between the update intervals, we won’t be able to react, and it will cost money. With SNMP traps, as soon as an event happens, the device will immediately send a trap to the Zabbix server, and you will receive a notification or a remote command will be executed.
Firewall setup
To begin with, set up the firewall. Make sure that port 162 is available on your Zabbix server.
1. Add the following line in /etc/sysconfig/iptables:
-A INPUT -p udp -m udp --dport 162 -j ACCEPT
2. And restart the firewall:
/etc/init.d/iptables restart
Trap receiver setup
1. Install additional packages net-snmp-utils, net-snmp-perl, and net-snmp:
yum install −y net-snmp-utils net-snmp-perl net-snmp
Note. The logic is the same for Debian, only the package names and perhaps the location of some of the configuration files will differ.
We will use zabbix_trap_receiver.pl as a trap receiver.
2. Download and extract Zabbix sources.
Copy the URL of the compressed archive by right-clicking the Download button, delete the last part ‘/download’, and run wget in the CLI, e.g.:
wget https://sourceforge.net/projects/zabbix/files/ZABBIX%20Latest%20Stable/4.4.0/zabbix-4.4.0.tar.gz
Extract Zabbix sources:
tar −zxvf zabbix _._._.tar.gz
Note. Replace the underscores with your Zabbix version number.
3. Copy the script from the misc folder:
cp zabbix-_._._/misc/snmptrap/zabbix_trap_receiver.pl /tmp/zabbix_trap_receiver.pl
Note. I’m using temporary folders, but, of course, you wouldn’t want to use them for production.
4. Add execution permission:
chmod +x /tmp/zabbix_trap_receiver.pl
5. Set up the trap receiver and community name:
vi /etc/snmp/snmptrapd.conf
This is the SNMP trap daemon, the main process used to receive a trap from your network device.
Once you have created the new file, add:
authCommunity execute public
perl do "/tmp/zabbix_trap_receiver.pl";
This will set the community name, which will be used for authentification, to ‘public’ and configure the script to be executed each time a trap is received.
Save with :wq and exit.
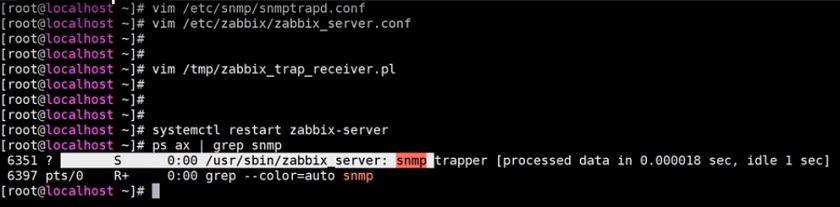
6. Enable SNMP trapper by editing the Zabbix server configuration file.
Open the configuration file and search for ‘/SNMP’.
vim /etc/zabbix/zabbix_server.conf
Edit and save with :wq:
StartSNMPTrapper=1
SNMPTrapperFile=/tmp/zabbix_traps.tmp (must be same as in zabbix_trap_receiver.pl)
This will be an internal process that reads the zabbix_traps.tmp file where the perl script writes traps that are received and translated.
Essentially, what happens is this:
- The device sends a trap to the virtual machine where it is received by the binary SnmptrapD.
- SnmptrapD executes the perl script which translates the trap to the format that is right for the Zabbix server (basically adding a header).
- After translation, the trap is saved to /tmp/zabbix_traps.tmp.
- SNMP trapper checks the file for new traps and matches them with hosts.
How does it find out the host to which the trap is actually addressed? Any trap that you receive will contain an IP address with the DNS name of the network device which sent the trap. In your front end, you must have a host with SNMP interface enabled. If the IP address of the SNMP interface matches the IP address in the trap, then the items of this host will receive this trap in Latest data.
7. Finally, restart Zabbix server processes for changes to take effect:
systemctl restart zabbix-server
Now we have an SNMP trapper process started together with the Zabbix server.
Testing
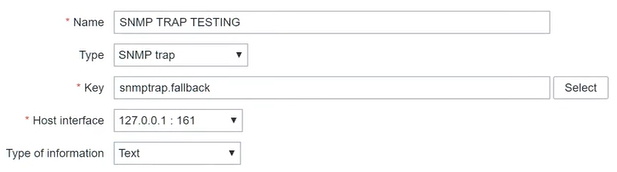
But before we start testing, we need to configure a test item on our host. I will call it ‘SNMP TRAP TESTING’. Type will always be ‘SNMP trap’.
As for the key, there are just two keys available for an ‘SNMP trap’ item: ‘snmptrap fallback’ and ‘snmptrap [regex]’.
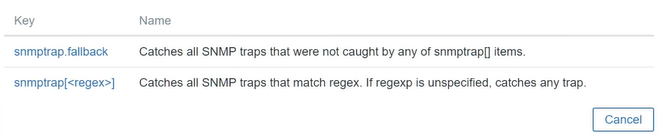
Type of information — ‘Text’.
As you can see in Monitoring > Latest data, I have the SNMP TRAP TESTING item, but there is no data for it.

Start the daemon and send a test trap:
systemctl start snmptrapd
snmptrap -v 1 -c public 127.0.0.1 '.1.3.6.1.6.3.1.1.5.4' '0.0.0.0' 6 33 '55' .1.3.6.1.6.3.1.1.5.4 s "eth0"
You can verify that the trap was processed by the script by viewing the file:
cat /tmp/zabbix_traps.tmp
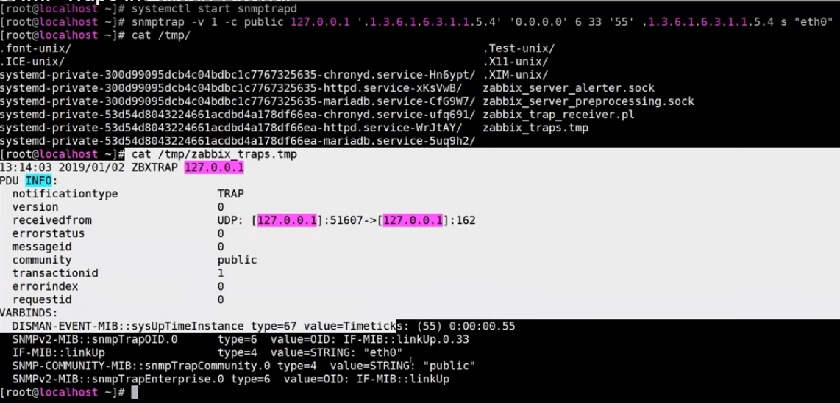
Test output
So, Zabbix SNMP trapper checks zabbix_traps.tmp and matches ZBXTRAP from 127.0.0.1 to the host with the same IP address on the SNMP interface.

Trap value in the front end
You can also create your own triggers. Sometimes you will need to use regular expressions. And sometimes you don’t need to analyze the actual text, because the presence of a new trap already means there is a problem.
Conclusion
That’s all for today on SNMP traps. You are welcome to like and comment.
Thank you for your time!
Excelent!! I tried SNMP Traps on production enviroment and its dificult to match the SET and CLEAR of the trap when yo dont have an ID o some field to correlate.
I make a correlation(previously I had to do a pre-processing of the trap to classify the fields) with some field like the hostname (from who its the trap) and the message, when this two fields match and state is CLEAR or resolved for example.
awsome tool!
Julio
Hi Dmitry, thanks for the detailed post but I need a clarification. I just downloaded the latest appliance from zabbix and trie to put in place the configuration you explained.
When I try yum -install net-snmp-perl I get the error “Unable to find a match” , it seems to be no longer available
Probably due to this when the snmptrapd starts iy display the error “embedded perl support failed to initialize” .
is there a way to avoid this ? Thank You
Thanks for this tutorial. It is worth mentioning that:
1) there’s no need to download the entire zabbix source file. The perl script is directly downloadable from zabbix git repository:
2) you may probably want to activate snmptrapd service on boot: systemctl enable snmptrapd