In this post, we’ll discuss how to secure your data sent through Zabbix from the database frontend to the database and the other way around.
Contents
I. Introduction (24:31)
II. Encryption (25:41)
III. Setup (33:22)
1. Prepare VMs (35:02)
2. Create certificate authority (36:21)
3. Signing requests (39:19)
4. Configuring MySQL server (43:13)
5.Configuring Zabbix Server (46:56)
6. Configuring Zabbix frontend (49:08)
V. Questions & Answers. (51:07)
Introduction
To be secure means to “avoid being harmed by any risk, danger, or threat.” This may relate to anything, your environment, data, or anything that should be protected from any risks possible. We will discuss one of the most critical ways of being secure — encryption.
Encryption
In the Zabbix database, data about configuration, user permissions, including information about IP addresses of hosts, or some critical metrics, is kept.
So, it makes complete sense, to use encryption to protect the data from intruders, for instance, while the data is being collected from the database and used by the server or again pushed from the server to the database. Encryption also allows to protect data from someone catching your network traffic, “sniffing the packets”, as without encryption the intruder might get some sensitive or valuable information from those
We need encryption to keep the data that is being transferred, exchanged, or stored:
-
- safe,
- secure,
- protected,
- confidential, etc.
Encryption is the process:
-
- of converting the original information, known as plaintext, into an alternative form known as ciphertext, which is unreadable to unauthorized parties. At the same time, authorized parties can decipher a ciphertext back to plaintext to access the original information;
- of denying the intelligible content to an interceptor, though it doesn’t prevent interference;
- encryption can be symmetric or asymmetric.
NOTE. Symmetric encryption basically creates a key for all the users that should or can have access to the information, and you need to share the key between all of them, and asymmetric encryption creates a pair of keys — public and private, for instance, for access to group information and to decrypt the information, respectively. These keys are exchanged automatically depending on the certificates provided.
Zabbix supports encrypted connections between Zabbix components using Transport Layer Security (TLS) protocol v.1.2 and v.1.3 (depending on the crypto library).
NOTE. TLS 1.3 protocol is faster saving around 30 percent of the time needed to TLS 1.2 to actually make a handshake. In addition, TLS 1.3 can remember authentications and handshakes made, so it can save you even more time starting from the second or the third handshake. Still, the TLS version depends on the crypto library installed on your system.
In Zabbix, symmetric and asymmetric or certificate-based and pre-shared key-based encryption is supported.
Basically, all connections between Zabbix components can be encrypted.
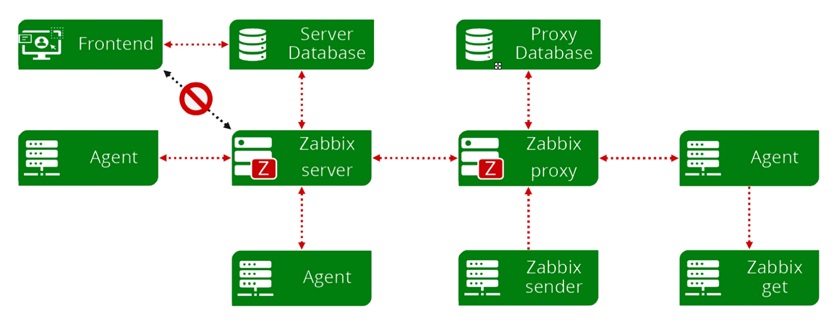 Zabbix and encryption
NOTE. Zabbix creates two separate forms of connections server–database connection and front-end–database connection. For instance, symmetric encryption can be used between the proxy database and Zabbix proxy, and encryption certificates do not need to be the same between the Zabbix Server and the server database or between proxy database and Zabbix proxy.
Encryption example
This post is mostly focused on the encrypted connection between database, front-end, and server, as encrypted connection with agents or proxies you can be asymmetric and is configured easily and fast.
1. Generate the PSK key and save it to a file.
# openssl rand -hex 32 > /etc/zabbix/keys/agent.psk
# chmod 400 /etc/zabbix/keys/agent.psk
# chown zabbix:zabbix /etc/zabbix/keys
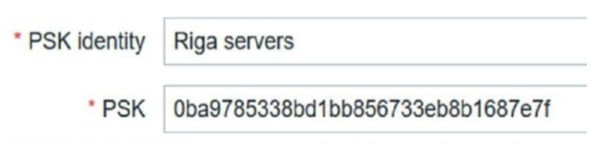
2. Update agent configuration.
# TLSAccept=psk
# TLSPSKIdentity=Riga servers
# TLSPSKFile=/etc/zabbix/keys/agent.psk
3. Restart Zabbix Agent.
# systemctl restart zabbix-agent
4. Update frontend.
 Updating frontend
NOTE. You can also update the frontend first, and then restart the Zabbix agent.
Setup
To encrypt your connections as in this guide, you’ll need:
-
- Zabbix 5.0 (as encryption of the connection between the database and the server is a new feature added in Zabbix 5.0),
- CentOS 8 (*2 VMs),
- MySQL 8.
NOTE. Two VMs are used for demonstration.
Prepare VMs
1. Make a clean installation of CentOS 8, decide which is for DB and which for Zabbix and edit hostnames of VMs (separate for the database and for the Zabbix installation, in our example).
#vi /etc/hostname
2. Name accordingly, for instance:
3. Update the host files on both VMs.
#vi /etc/hosts

Create a certificate authority
1. On the future Zabbix server, check where the configuration file openssl.cnfis located.
#find / -iname openssl.cnf
![]() By default
By default
NOTE. Here, self-signed certificates are used. That’s an option especially if you use such setup in an internal network. If you use, for instance, Let’s encrypt, you would need to use certbot to reissue certificates every couple of months. With self-signed certificates, you can create a certificate valid for several years. Still, it is recommended to reissue certificates at least once a year for security reasons.
2. Find the CA location.
#cat /etc/pki/tls/openssl.cnf| grep dir
![]()
3. Create a subdirectory in the location.
# mkdir /etc/pki/CA/private
4. Create a pair of keys and sign them (self-sign).
# openssl req -new -x509 -keyout /etc/pki/CA/private/cakey.pem -out /etc/pki/CA/cacert.pem -days 3652 -newkey rsa:4096
NOTE. Here, we use X.509 standard to create a certificate — to add the data, which will be used to validate the certificate. We should also specify the location, where the keys will be kept, the number of days during which the keys will remain valid, and the encryption itself — RSA 4096.
5. You might be prompted to create a password and fill in the information about the certificate owner.
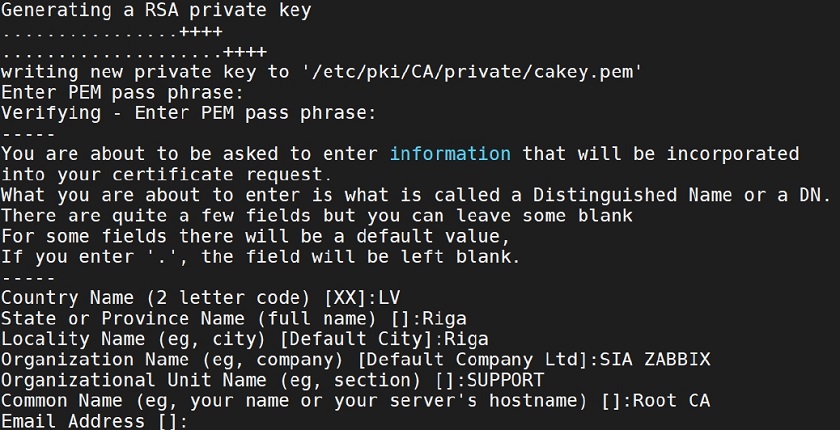 Filling in information about the certificate owner
NOTE. Make sure the information you provide here is accurate and easy to remember.
Signing requests
1. To make things a bit easier and less confusing, you can edit the openssl.cnf.
# vi /etc/pki/tls/openssl.cnf
2. Change the default organization values.
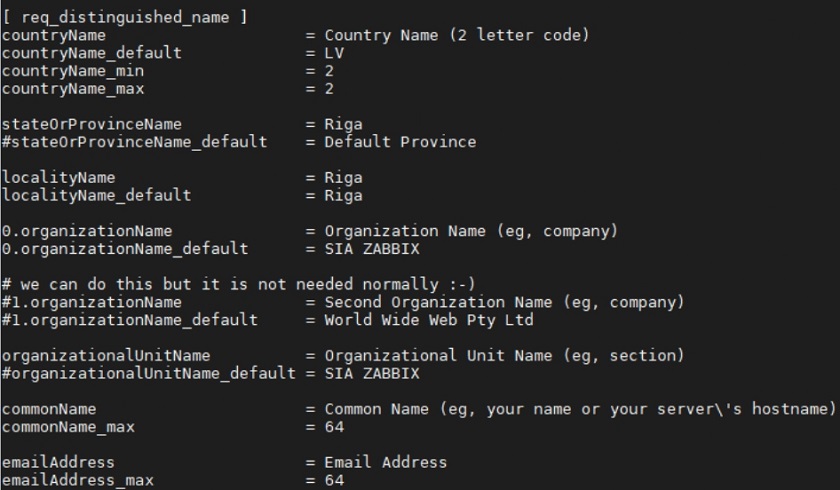 Changing the default organization values
3. Make a directory for signed requests (you can use -p to create subdirectories).
# mkdir -p /etc/pki/CA/requests
4. Create a directory for new certificates.
# mkdir -p /etc/pki/CA/newcerts
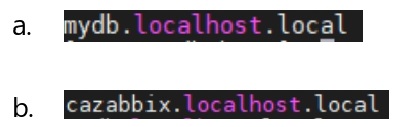
5. Create a certificate signing request for the Zabbix/CA server, with the common name cazabbix.localhost.local (the one you added in the hosts file, as it will be used for validation).
# openssl req -new -keyout /etc/pki/CA/private/zaca_key.pem -out /etc/pki/CA/requests/zaca_req.pem -newkey rsa:2048
6. Create another signing request, but for the DB server, common name mydb.localhost.local (the one you added in the hosts file).
# openssl req -new -keyout /etc/pki/CA/private/pdb_key.pem -out /etc/pki/CA/requests/pdb_req.pem -newkey rsa:2048
7. Create the index.txt and serial files needed to openssl to keep track of the certificates signed.
# touch /etc/pki/CA/index.txt
# echo 01 > /etc/pki/CA/serial
8. Create a signed certificate for Zabbix/CA (answer ‘y‘ (yes) when prompted).
# openssl ca -policy policy_anything -days 365 -out /etc/pki/CA/certs/zaca_crt.pem -infiles /etc/pki/CA/requests/zaca_req.pem
 Creating signed certificate for Zabbix/CA
9. Create a signed certificate for DB (answer ‘y‘ (yes) when prompted).
# openssl ca -policy policy_anything -days 365 -out /etc/pki/CA/certs/pdb_crt.pem -infiles /etc/pki/CA/requests/pdb_req.pem
 Creating signed certificate for DB
Configuring MySQL server
1. Install MySQL 8.
#sudo dnf install mysql-server
2. Start MySQL.
# systemctl start mysqld
3. Run the security script (make it all ‘y‘ (yes)).
# mysql_secure_installation
4. Create a directory for certificates.
# mkdir -p /var/lib/mysql/pki
5. Check the firewall, to see if the port for MySQL is opened.
# firewall-cmd --permanent--zone=trusted --add-source=192.0.2.10/32
# firewall-cmd --permanent--zone=trusted --add-port=3306/tcp
# firewall-cmd --reload
6. Copy the certificate files from Zabbix/CA server to the directory created (the key that will be used to encrypt and decrypt the data, the certificate, and the valid signed certificate).
# scp [email protected]:/etc/pki/CA/private/pdb_nopass_key.pem /var/lib/mysql/pki/server.key
# scp [email protected]:/etc/pki/CA/certs/pdb_crt.pem /var/lib/mysql/pki/server.crt
# scp [email protected]:/etc/pki/CA/cecert.pem /var/lib/mysql/pki/ca.crt
7. Update permissions to allow MySQL to actually read the files.
# chown -R mysql. /var/lib/mysql/pki
8. Update MySQL configuration file
# vi /etc/my.cnf.d/mysql-server.cnf
by adding the lines:
[mysqld]
ssl-ca=/var/lib/mysql/pki/ca.crt
ssl-cert=/var/lib/mysql/pki/server.crt
ssl-key=/var/lib/mysql/pki/server.key
9. Restart MySQL.
# systemctl restart mysqld
10. Login to MySQL.
# mysql-u root -p
11. Verify the settings.
mysql> show variables like'%ssl%';
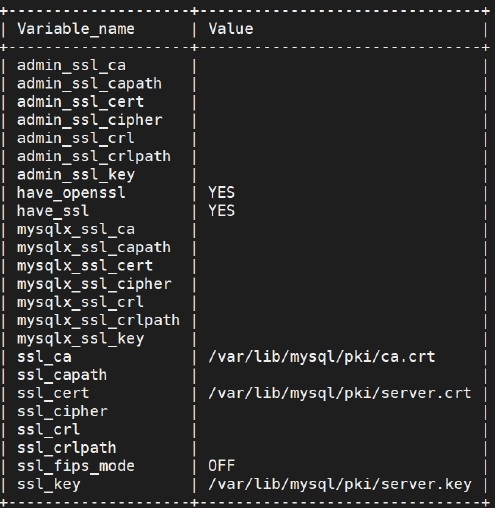 Verifying settings
12. Create a user for Zabbix and Zabbix DB.
mysql> create user zabbix@IP identified with mysql_native_password BY 'password’;
mysql> create database zabbix character set utf8 collate utf8_bin;
NOTE. Using MySQL native password is quite critical, if you use MySQL newer than 8.0.3, since in later versions an updated encryption protocol is used, so you can get an error message about unsupported ecnryption.
13. Restrict Zabbix user to Zabbix DB.
mysql> grant all privileges on zabbix.* to zabbix@IP;
14. Restrict it to require SSL.
mysql> alter user‘zabb'@'%' requiressl;
15. Check if the configuration is applied.
mysql> select user,host,ssl_type from mysql.user;
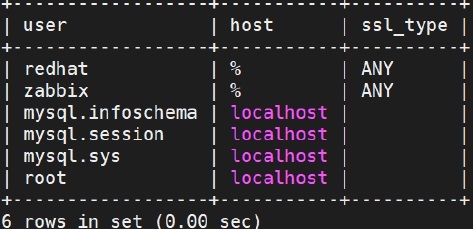 Checking if configuration is applied
Configuring Zabbix Server
1. Install the Zabbix repository on the Zabbix/CA server.
# rpm -Uvh https://repo.zabbix.com/zabbix/5.0/rhel/8/x86_64/zabbix-release-5.0-1.el8.noarch.rpm
# dnf clean all
2. Install the Zabbix Server, frontend, and agent.
# dnf install zabbix-server-mysql zabbix-web-mysql zabbix-apache-conf zabbix-agent
3. On DB server run, transfer initial schema and data.
# scp root@IP:/usr/share/doc/zabbix-server-mysql*/create.sql.gz /home
4. On the DB server import initial schema and data into the Zabbix DB.
# zcat/home/create.sql.gz | mysql -uroot-p zabbix
5. Verify that all tables are in place.
mysql> use zabbix;
mysql> show tables;
![]()
6. Make the Zabbix Server SSL directory.
# mkdir –p /var/lib/zabbix/ssl/
NOTE. If you don’t have directories in between the first one and the last one, make sure you use -p to create all of it.
7. Copy certificate files.
# cp /etc/pki/CA/cacert.pem /var/lib/zabbix/ssl/
# cp /etc/pki/CA/certs/zaca_crt.pem /var/lib/zabbix/ssl/server.zabbix.crt
# cp /etc/pki/CA/private/zaca_nopass_key.pem /var/lib/zabbix/ssl/server.zabbix.key
8. Update permissions.
# chown -R zabbix/var/lib/zabbix/ssl/
# chmod 400 /var/lib/zabbix/ssl/cacert.pem
# chmod 400 /var/lib/zabbix/ssl/server.zabbix.crt
# chmod 400 /var/lib/zabbix/ssl/server.zabbix.key
9. Update the Zabbix Server configuration file.
# vi /etc/zabbix/zabbix_server.conf
10. Update the DB access parameters.
DBHost=mydb.localhost.local
DBName=zabbix
DBUser=zabbix
DBPassword=zabbix
11. Update SSL related parameters.
DBTLSConnect=verify_full
DBTLSCAFile=/var/lib/zabbix/ssl/cacert.pem
DBTLSCertFile=/var/lib/zabbix/ssl/server.zabbix.crt
DBTLSKeyFile=/var/lib/zabbix/ssl/server.zabbix.key
NOTE. There are different options available, for instance, verify_ca, which are less strict, but also less secure.
Configuring Zabbix frontend
1. Make Apache SSL directory on Zabbix/CA server.
# mkdir -p /etc/httpd/ssl/
NOTE. Use -p if certificate authority is still the same machine, otherwise, use scp as for the DB server.
2. Copy certificate files.
# cp /etc/pki/CA/cacert.pem /etc/httpd/ssl/
# cp /etc/pki/CA/certs/zfca_crt.pem /etc/httpd/ssl/server.crt
# cp /etc/pki/CA/private/zfca_nopass_key.pem /etc/httpd/ssl/server.key
3. Update permissions.
# chown -R apache /etc/httpd/ssl/
# chmod 400 /etc/httpd/ssl/cacert.pem
# chmod 400 /etc/httpd/ssl/server.crt
# chmod 400 /etc/httpd/ssl/server.key
4. Configure the time zone.
vi /etc/php-fpm.d/zabbix.conf
![]()
5. Start Zabbix processes.
# systemctl restart zabbix-server zabbix-agent httpd php-fpm
# systemctl enable zabbix-server zabbix-agent httpd php-fpm
6. Go to your front-end address.
# http://IP/zabbix
7. Add the DB name, username, password, and enable TLS encryption option.
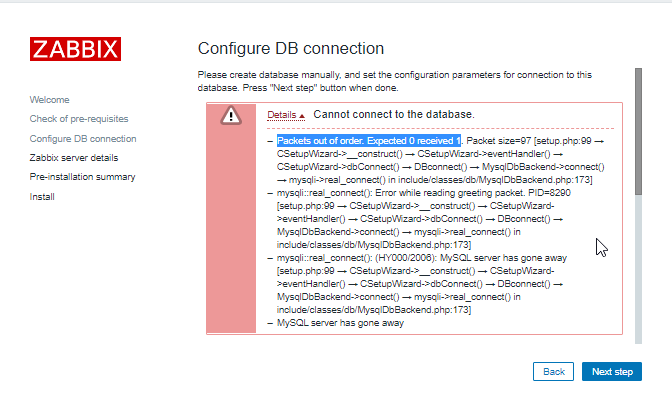
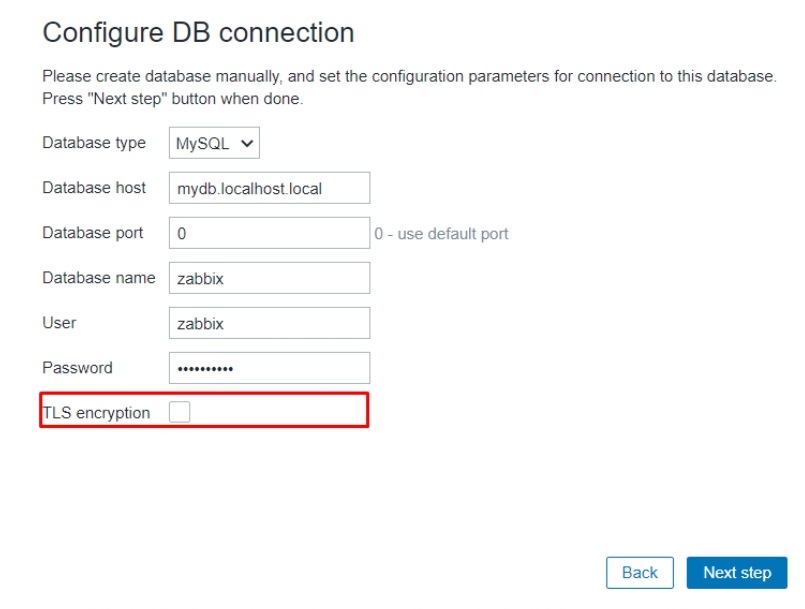 Configuring DB connection
8. Add the path to certificate files.
/etc/httpd/ssl/cacert.pem
/etc/httpd/ssl/server.crt
/etc/httpd/ssl/server.key
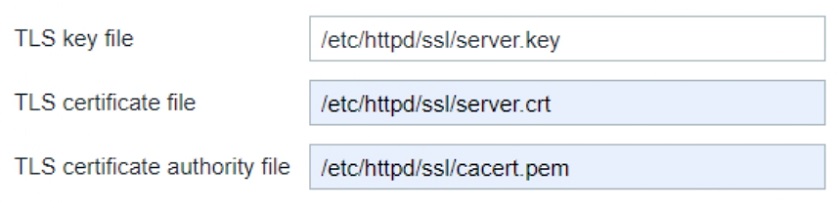 Adding the path to certificate files
Now you are ready to finish the installation.
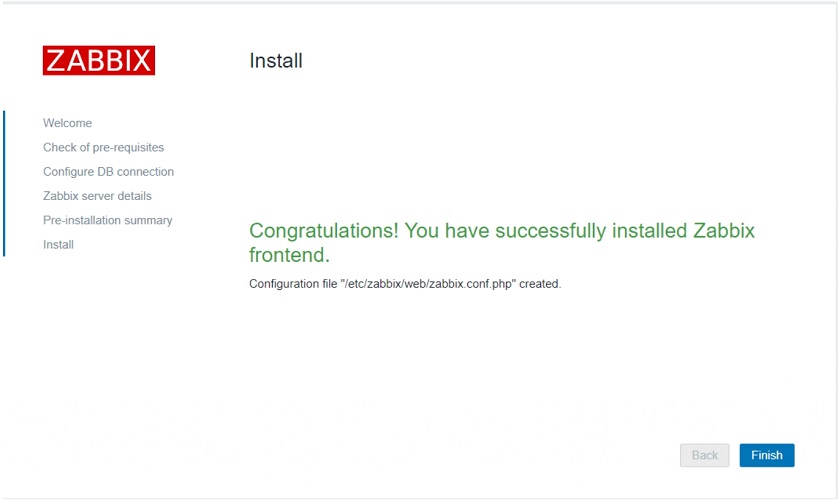 Finishing installation
With everything installed and configured, you can now keep your secrets.
Questions & Answers.
Question. Is there any effect of encryption on history or configuration syncers performance?
Answer. It should be as minor as possible.
Question. Is there an input/output computational processing increase?
Answer. You might see the CPU load increase.
Question. Is it possible to use encryption with the Oracle database?
Answer.At the moment only encrypted connections to MySQL and PostgreSQL databases is supported
Question. Is it possible to apply this procedure on an already-installed server or should it be set up initially when a fresh Zabbix instance is installed?
Answer. It is possible to configure encryption on an already installed server, but note, you’ll need to restart your MySQL and Zabbix instances in the process. You can delete the frontend configuration file to make it easier, or, of course update it manually.


It works just to MariaDB and Zabbix Server.
But is not working when I’m trying to connect to the database during the Frontend installation page.
mysqli::real_connect(): This stream does not support SSL/crypto