


Learn how to extend Zabbix agent functionality by adding your own checks that can be both – dynamic and static.
Watch the video now.
Contents
1. Introduction (0:13)
2. Zabbix agent (1:01)
3. User parameters (2:44)
3.1. Creating user parameters (4:45)
3.2. Adding new items (8:37)
3.3. Results (13:33)
4. Conclusion (15:23)
Introduction
The topic for today is user parameters in the Zabbix agent. Earlier we talked about how you can install the Zabbix server and Zabbix proxy. I have the same training virtual machine with CentOS 7, and SELinux and firewall are disabled because we are learning Zabbix.
So what is the user parameter and why should we use it in the context of the Zabbix agent?
Zabbix agent
You know that the Zabbix agent is a utility that is widely used to monitor local resources and applications in any Zabbix infrastructure. This is definitely the most popular monitoring tool simply because the Zabbix agent is a super lightweight software that consumes just a couple of MBs and does not burden the CPU.
We have RPM packages for the most popular Linux versions. It is also possible to easily install the Zabbix agent on any Windows machine.
What are the benefits of the Zabbix agent? The Zabbix agent has a lot of metrics that you can monitor from the box. This means that it is not required to invent something new. You don’t need to write custom scripts or figure out complex monitoring scenarios. All you need to do is spend two minutes of your time to install the Zabbix agent on the machine, then open the documentation.
In Configuration > Items > Item type > Zabbix agent, you will find all available monitoring items supported from the box that you can use without any additional configuration. Simply go to the front end, create a host for your Zabbix agent, create a new item, and make the one that you need with the help of documentation. You can monitor service state or free disk space, network interfaces, memory, and many other things from the box, or do some discovery.
User parameters
What is a user parameter? Sometimes you might need to monitor something on a Windows or Linux machine that is not very common, not the disk space or CPU load, but a specific application. And you know that you can get the desired metric easily with just a couple of commands in the CLI.
However, you cannot find the item in the documentation for that, and you need to somehow teach Zabbix to execute that small command or a bit more complex script and received value from the script or the command line as a value inside Zabbix.
Today we’ll actually talk about how to do that. We will also discuss the possible differences between what I would call a static user parameter and a dynamic user parameter.
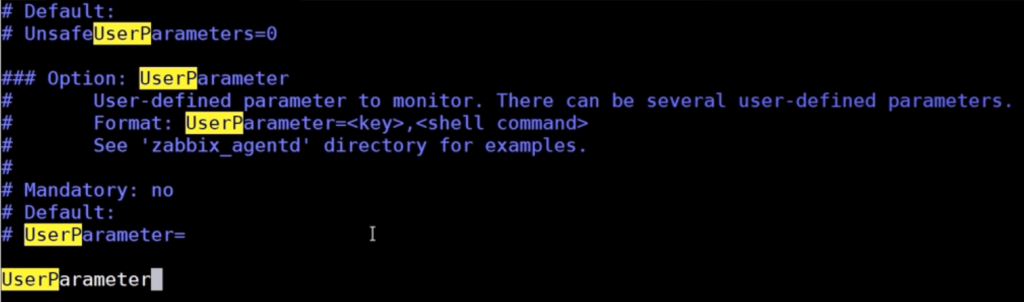
In the CLI, we need to open the configuration file of the Zabbix agent that by default is stored here:
vim /etc/zabbix/zabbix_agentd.conf
Search for UserParameter to create your own small or a larger item to collect some kind of specific data.

Creating user parameters
You can run a command in the CLI which returns information about the service, e.g. the copyright, revision, and also version — 4.0.5:
zabbix_server −V
A similar script can be run for the agent:
zabbix_agentd −V
Let’s try to create a user parameter to collect the major version of our binary, which is 4.0.5.
First, edit Zabbix agent configuration file:
vim /etc/zabbix/zabbix_agentd.conf
Creating a new item
We can leave the default value as it is and write a new line. I’ll write ‘UserParameter=’ which is the key that you’ll have to use in the front end. It must be unique and must follow the key syntax that you can check in our official documentation. And you need to remember it.
UserParameter=static,/usr/sbin/zabbix_agentd −V
When I create an item inside the front end with ‘Zabbix agent’ as Type and ‘static’ as Key, I will receive the same value as when executing this command.
Let’s make another user parameter. In the next line, I add ‘UserParameter’ with ‘dynamic’ as key, and then in the brackets, which we use in the front end to specify different parameters, we need to write *, then a comma and then the command that will be executed. The last part will depend on what we specify in the front end as item parameters. I will specify ‘$1’ which means the first parameter from my front end from the item configuration.
UserParameter=dynamic[*],/usr/sbin/$1 −V
You can save the new parameters with ‘:wq’.
I’ll run the third parameter to show you that you need to be careful with user parameters:
UserParameter=timeout,sleep 10;echo "test"

So we have three user parameters. Remember that each time you make some changes to any Zabbix configuration file, Zabbix agent, a server or a proxy, etc., you always need to restart the process on the server itself, but only the process to which you’ve changed the configuration file. In our case, I use the following command:
systemctl restart zabbix-agent
Now we can actually go to the front end. In Configuration > Hosts I’ve added a new host which is called UserParameters with my localhost agent.
Adding new items
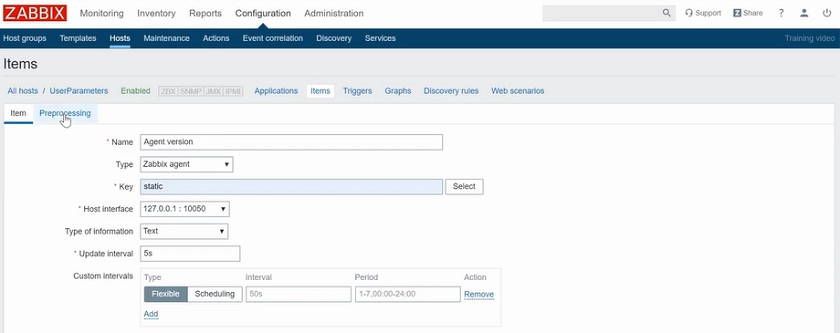
Let’s create new items in Configuration > Hosts > UserParameters > Items > Create Item.
We select ‘Agent version’ for Name, ‘Zabbix agent’ for Type, and ‘static’ for Key.
In the Type of information, you can specify ‘Numeric (float)’ because we will be extracting the actual 4.0 value from all that bunch of text. But since it is Zabbix 4.0, Zabbix will show it simply as ‘4’. Instead, we might be using ‘Text’. And I’ll set the Update interval of 5 seconds to make it work quicker.
Creating a new user parameter
As can be seen in the CLI, the command ‘zabbix_server −V’ displays a lot of information, while we need to extract only the information about the version. This means that we need to add a preprocessing step in Configuration > Hosts > UserParameters > Items > Preprocessing > Preprocessing steps.
In my case, I’ll select ‘Regular expression’ for Name. To select the Parameter value, let’s check what lines we have in the CLI. We have ‘zabbix_server (Zabbix) 4.0.5’.
So in the pattern, it will be ‘zabbix_.* ([0–9].[0–9])’, where * means there can be anything and [0–9] interval means a place for any number. And we want to display the first one as follows:
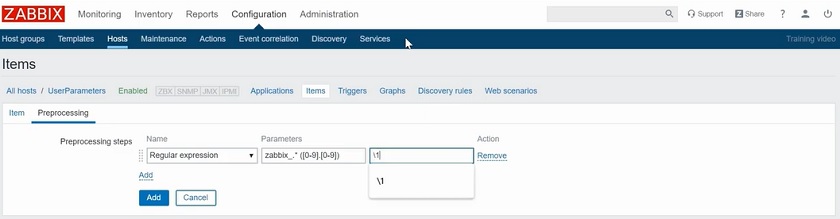
Preprocessing step
Click Add to add this new item. Now you can check the information about the version by clicking the Agent version in Configuration > Hosts > Items.

Agent version
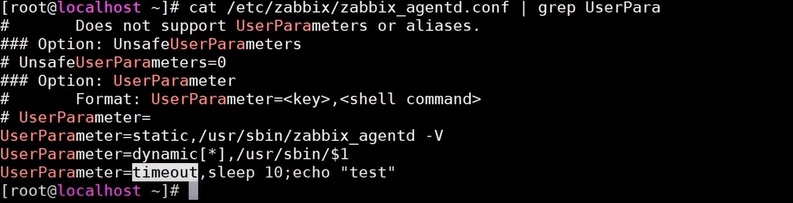
This is the static item, while we have also created a dynamic one. To check the user parameters, you can run:
cat/etc/zabbix/zabbix_agentd.conf | grep UserPara
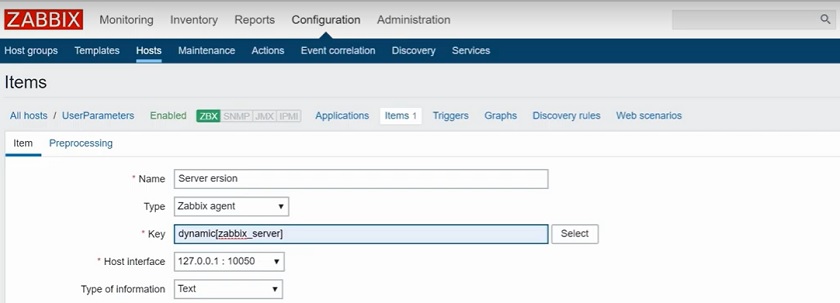
So let us Clone the one that we’ve just created and change some values.
Here we will have ‘Server version’ for Name, the same ‘Zabbix agent’ for Type, but the Key is ‘dynamic’.
Item cloning
In the parameter, we specify the binary name that we want to use instead of ‘$1’:
UserParameter=dynamic[*],/usr/sbin/$1 −V
As for the preprocessing, the Name and Parameter remain the same, as well as the first capturing rule.
Let’s add another item by clicking Clone. This one should have ‘Timeout example’ for Name and ‘Zabbix agent’ for Type. And we type ‘timeout’ for Key from our last user parameter:
Timeout user parameter
Preprocessing won’t actually matter here, so we won’t make any changes in the Preprocessing tab. I’ll just add this item with the same 5-second Update interval.
Then I’ll run the following command in the CLI simply to reload all the changes that we’ve just made in the front end and save us some time.
zabbix_server −R config_cach_reload
Note. If anything does not work properly, for example, an item is not supported because the regular expression does not match, you can run these commands to check for mistakes:
zabbix_get −s 127.0.0.1 −k dynamic[zabbix_server]
zabbix_get −s 127.0.0.1 −k static
Make corrections in the vim file, then run ‘:wq’ to save changes, if any, and restart the agent:
systemctl restart zabbix-agent
Results
In Monitoring > Latest data, I can check the results by specifying the hostname, ticking off Show details and clicking Apply.

UserParameter latest data
We have three items. We have Agent version and Server version with the Last value of ‘4.0’. Remember that we are actually getting multiple lines of random text, but the preprocessing function helps us to filter for the version number.
The last item Timeout example is not supported. The error message reads “Timeout while executing a shell script”. Remember that in all the Zabbix processes there is a timeout parameter. It means that any custom user parameter that you create and that will be running for more than the timeout parameter will not be supported in the Zabbix front end.
So when you are creating your own custom checks, you need to make sure that those are running fast enough. If you have some custom scripts that are running for a longer period, you need to figure out another way to execute it and gather a metric as a value.
In the next videos we’ll definitely talk about it, and about other options to use UNIX scripts together with the Zabbix sender utility to monitor user-specific applications.
Conclusion
This was a quick insight into the Zabbix agent and Zabbix user parameters. If you have any additional questions about this topic or maybe some wishes for the next topics, you are welcome to comment and make suggestions.


how would you use the userparameter to collect some data from a container agent’s host docker?