The ability to define and execute scripts on different Zabbix components in different scenarios can be extremely powerful. There are many different use cases where we can execute these scripts – to remediate an issue, forward our alerts to an external system, and much more. In this post, we will cover one of the lesser-known use cases – creating a control panel of sorts in which we can execute different scripts directly from our frontend.
Configuration cache
Let’s use two very popular Zabbix runtime commands for our use case – ‘zabbix_server -R config_cache_reload’ and ‘zabbix_proxy -R config_cache_reload’. These commands can be used to force the Zabbix server and Zabbix proxy components to load the configuration changes on demand.
First, let’s discuss how these commands work:
It all starts with the configuration cache frequency, which is configured for the central Zabbix server. Have a look at the output:
grep CacheUpdateFrequency= /etc/zabbix/zabbix_server.conf
And on the Zabbix proxy side, there is a similar setting. Let’s take a look:
grep ConfigFrequency= /etc/zabbix/zabbix_proxy.conf
With a stock installation we have ‘CacheUpdateFrequency=60‘ for ‘zabbix-server‘ and we have ‘ConfigFrequency=3600‘ for ‘zabbix-proxy‘. This parameter represents how fast the Zabbix component will pick up the configuration changes that we have made in the GUI.
Apart from the frequency, we have also another variable which is: how long it actually takes to run one configuration sync cycle. To find the precise time value, we can use this command:
ps auxww | egrep -o "[s]ynced.*sec"
The output will produce a line like:
synced configuration in 14.295782 sec, idle 60 sec
This means that it takes approximately 14 seconds to load the configuration cache from the database. Then there is a break for the next 60 seconds. After that, the process repeats.
When the monitoring infrastructure gets big, we might need to start using larger values for ‘CacheUpdateFrequency‘ and ‘ConfigFrequency‘. By reducing the configuration reload frequency, we can offload our database. The best possible configuration performance-wise is to install ‘CacheUpdateFrequency=3600‘ in ‘zabbix_server.conf‘ and use ‘ConfigFrequency=3600‘ (it’s the default value) in ‘zabbix_proxy.conf‘.
Some repercussions arise with such a configuration. When we use values that are this large, there will be a delay of one hour until newly created entities are monitored or changes are applied to the existing entities.
Setting up the scripts
I would like to introduce a way we can force the configuration to be reloaded via GUI.
Some prerequisites must be configured:
1) Make sure the ‘Zabbix server‘ host belongs to the “Zabbix servers” host group.
2) On the server where service ‘zabbix-server‘ runs, install a new sudoers rule:
cd /etc/sudoers.d
echo 'zabbix ALL=(ALL) NOPASSWD: /usr/sbin/zabbix_server -R config_cache_reload' | sudo tee zabbix_server_config_cache_reload
chmod 0440 zabbix_server_config_cache_reload
The sudoers file is required because out of the box the service ‘zabbix-server‘ runs with user ‘zabbix‘ which does not have access to interact with the local system.
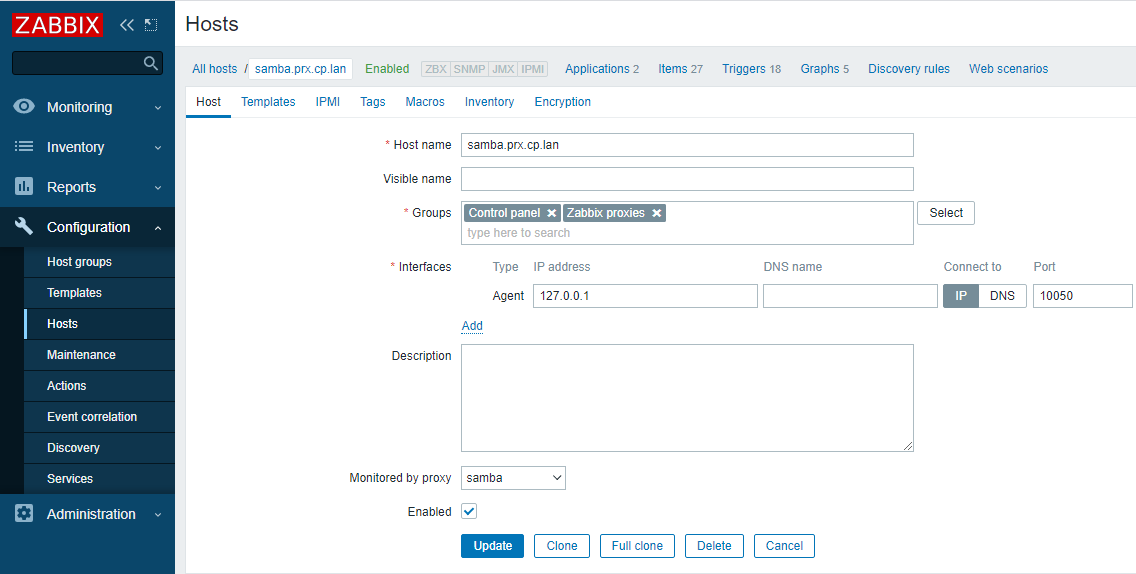
3) We will also create Zabbix hosts representing our Zabbix proxies. These hosts must belong to the ‘Zabbix proxies’ host group.
Notice that in the screenshot the host ‘127.0.0.1′ is using ‘Monitored by proxy‘. This is extremely important since we do not care about the agent interface in the use case with proxies – the interface can contain an arbitrary address/DNS name. What we care about is the ‘Monitored by proxy’ field. Our command will be executed on the proxy that we select here.
4) On the server where service ‘zabbix-proxy‘ runs, install a new sudoers rule:
cd /etc/sudoers.d
echo 'zabbix ALL=(ALL) NOPASSWD: /usr/sbin/zabbix_proxy -R config_cache_reload' | sudo tee zabbix_proxy_config_cache_reload
chmod 0440 zabbix_proxy_config_cache_reload
5) Make the following changes in the ‘/etc/zabbix/zabbix_proxy.conf‘ proxy configuration file: ‘EnableRemoteCommands=1‘. Restart the ‘zabbix-proxy’ service afterwards.
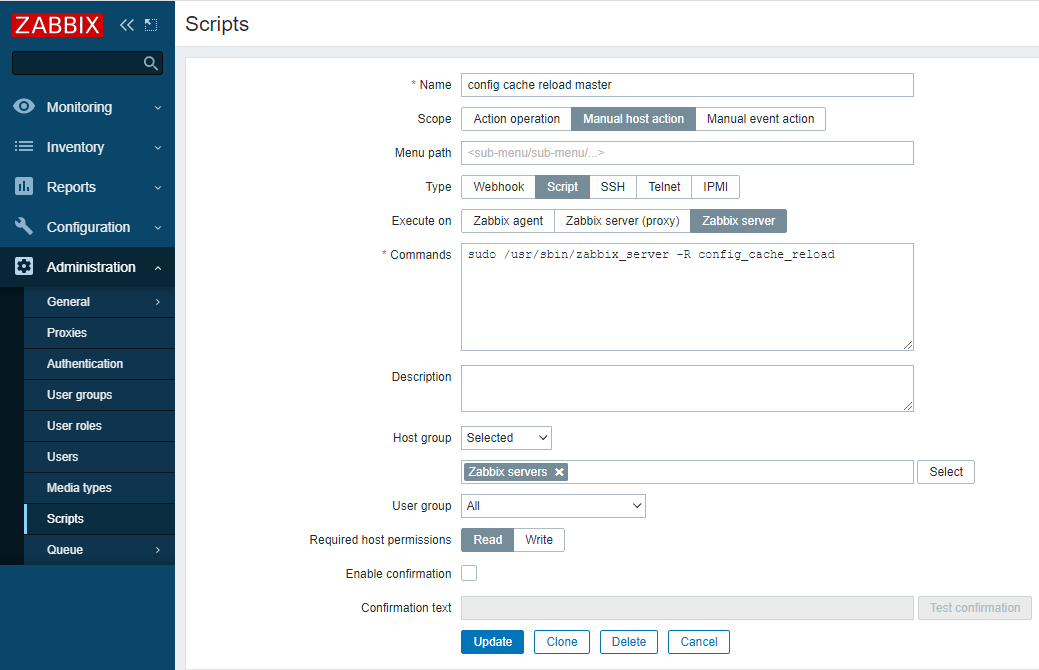
6) Open ‘Administration’ => ‘Scripts’ and define the following commands:
For the ‘Zabbix servers’ host group:
sudo /usr/sbin/zabbix_server -R config_cache_reload
Since this is a custom command that we will execute, the type of the script will be ‘Script’. The first script will be executed on the Zabbix server – we are forcing the central Zabbix server to reload its configuration cache. In this example, all users with at least ‘Read’ access to the Zabbix server host will be able to execute the script. You can limit this as per your internal Zabbix policies.
Below you can see how it should look:
For the ‘Zabbix proxies’ host group:
sudo /usr/sbin/zabbix_proxy -R config_cache_reload
The only thing that we change for the proxy script is the ‘Command’ and ‘Execute on’ parameters, since now the command will be executed on the Zabbix proxy which is monitoring the target host:
Frontend as a control panel
I prefer to add an additional host group “Control panel” which contains the central Zabbix server and all Zabbix proxies.
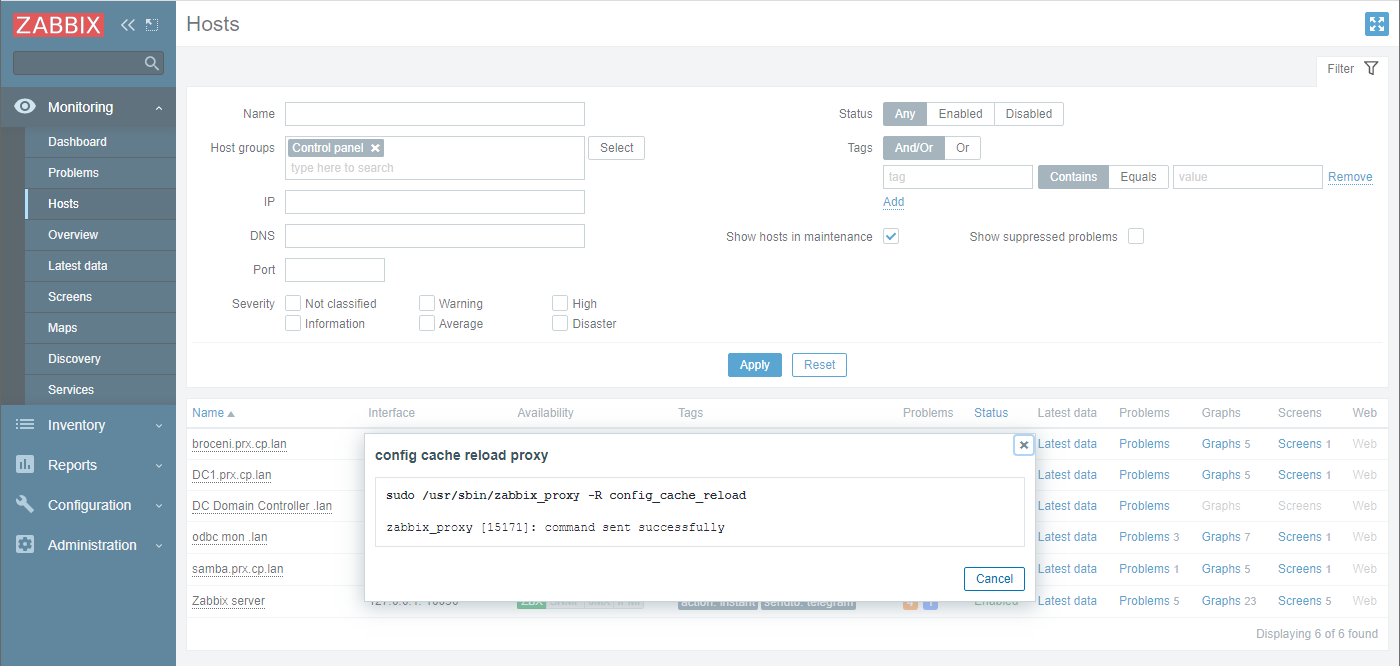
Now when we need to reload our configuration cache, we can open ‘Monitoring’ => ‘Hosts‘ and filter out host group ‘Control panel’. Then click on the proxy host in question and select ‘config cache reload proxy’:

It takes 5 seconds to complete and then we will see the result of script execution. In this case – ‘command sent successfully’:

By the way, we can bookmark this page too 😉
With this approach, you can create ‘Control panel’ host groups and scripts for different types of tasks that you can execute directly from the Zabbix frontend! This allows us to use our Zabbix frontend not just for configuration and data overview, but also as a control panel of sorts for our hosts.
If you have any questions, comments, or wish to share your use cases for using scripts in the frontend – leave us a comment! Your use case could be the one to inspire many other Zabbix community members to give it a try.


 Prev Post


