


Depending on your requirements, monitoring SNMP metrics can turn into quite a troublesome task. What if no out-of-the-box templates are available for my device? How can I find OID’s for my metrics and test them? What If I wish to avoid any kind of performance impact on my SNMP device during the testing period?
For this reason, it’s quite important to define and understand all of the available approaches which we can use to find the available SNMP metrics, create a viable SNMP template and thoroughly test it before deploying it. In this article, we will look at some of the more common tools that you can use to help you with SNMP template creation. We will also touch upon some of the potential problems that can arise when creating templates for more complex SNMP devices and how to avoid these troublesome scenarios.
Contents
I. Monitoring SNMP Agents with Zabbix (0:33)
II. Conclusion (15:13)
III. Questions & Answers (16:23)
Monitoring SNMP Agents with Zabbix
How can you monitor SNMP agents with Zabbix? You can use:
- plenty of templates, both pre-built and available out of the box, and community ones;
- create items based on your vendor documentation or snmpwalk results; or
- create your own low-level discovery rules based on your vendor documentation to discover SNMP entities.
Monitoring SNMP Agents with Zabbix
Most of the time, people use built-in and community templates. However, if you have a more exotic set of entities in your environment, such as networking devices, storage devices, etc., this just isn’t enough. Instead, you can build custom SNMP templates, which is what we’ll walk you through in this post because it can be quite tricky.
Building custom SNMP templates
First off, vendor documentation is your best friend (if available). Without vendor documentation, it can take you quite a bit more time create a proper SNMP template. If the vendor documentation is robust, and has a list of the OIDs and their description, it will be of huge help in your endeavour.
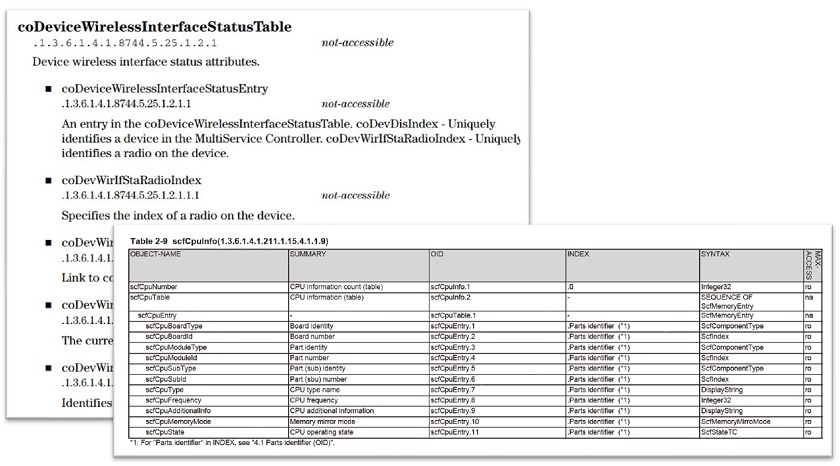
Examples from vendor documentation.
We definitely recommend getting in touch with your hardware vendor to find out if they can provide SNMP documentation if it’s not already publicly available.
Don’t worry if you don’t have that type of documentation, since you still have a couple of options:
- We can check for vendor-specific MIB files. Then we can download these MIB files, plug them into any MIB browser, and search for the metrics we’re looking for. This will require some extra effort, since it still takes longer than using proper vendor documentation, but it’s a good way out of that situation. The MIB files should usually be available either on a public download page, or can be requested by getting in touch with your vendor.
The problem is that some vendors, instead of sending a specific set of MIBs, tend to just give you 20-100 MIB files, and you have to go through each of them in the MIB browser, which can take a long time. Thankfully, you can find a MIB browser with a search function and just search by metric name: fan speed, power line, temperature, and so on.
- Out-of-the-box SNMP templates can also be used with general-purpose MIBs.
Creating a test environment for the template
Before pushing our template out to production we might want to test a template we’ve built. How would we go about that? This could get quite tricky.
- Misconfigured templates could cause a spike in SNMP requests on your device.
- Sometimes, the device is not directly accessible during development.
So, a customer may ask us to build a template, for instance, for a switch, a power supply or any other device that supports SNMP. Usually, customers don’t want to give us direct access to their devices due to security concerns, which is a reasonable approach.
How do we proceed then? We can build a template, but we can’t test it, and we don’t know how the device behaves in real life. After all, when it goes live, it could provide unexpected results due to dynamic indexes, configuration changes or other unexpected device specific behavior..
The way to work around this problem is by using snmpsim, which is available on GitHub. snmpsim is a useful and easy-to-install tool. This can essentially simulate your device based on the output of the snmpwalk from your device.

SNMP Simulator
Preparing the proper tools
To simulate an SNMP device, we need to have the right tools first:
- CentOS 8.
- Zabbix 5.2, our latest and greatest version.
- Zabbix documentation (SNMP discovery page), so that we don’t make any mistakes when writing our own SNMP discovery keys, OIDs, etc., and also to have the correct syntax at hand.
- SNMPSIM software.
- snmpwalk command output from our device.
- Vendor documentation, if we can get it, which still pairs very nicely with the SNMPSIM.
- Device MIB files, in case the vendor documentation covers SNMP metrics only partially.
Perform the snmpwalk
- So first we run an snmpwalk either from the root of the SNMP tree – .1 or a restricted snmpwalk starting from a specific subtree, depending on what you need. In this case, we ran it on the root of the SNMP tree.
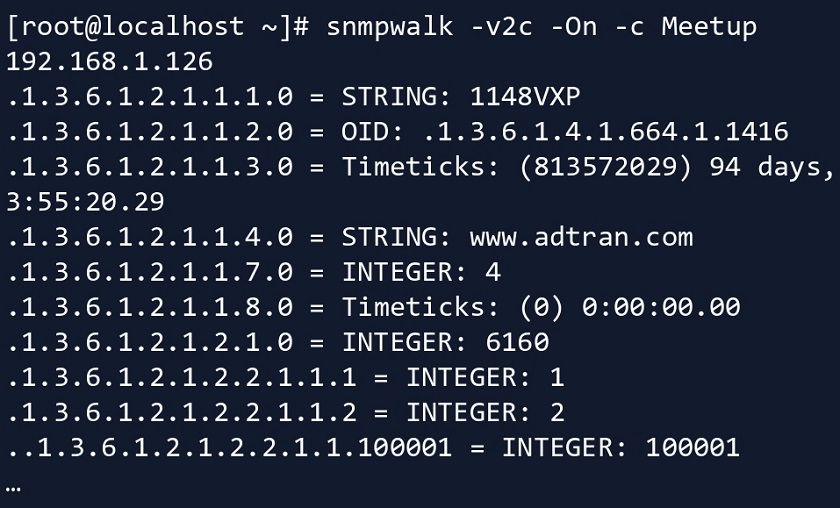
Running snmpwalk on a device
- We then store the result in a separate file. In this case, we end up with a pretty large file.
Installing SNMPSIM
Then, we proceed to set up snmpsim. We have a couple of prerequisites here.
- First, we need to install python (python3 in this case).
yum install python3
- Then we use pip (package installer for Python) to install snmpsim.
pip3 install snmpsim
- Note that snmpsim won’t run under the elevated user permissions, meaning we wouldn’t able to execute it as our root user. This is essential if you care about security and in most cases you should. To circumvent this we create a new user group and a user account.
groupadd snmpd
useradd -g snmpd snmpd
- Then we create a directory under that user to place our snmpwalk or MIB file there.
mkdir -p /usr/share/snmpsim/data
Run snmpsim
- After that’s done, we run snmpsim and pass the listen IP/Port. To execute it, we have specified the endpoint: which IP address, which interface, and which port this snmpsim instance should listen on.
snmpsimd.py --agent-udpv4-endpoint=192.168.1.126:1024
- You have to be careful if you’re running snmpsim for the first time, as here the snmpwalk file name becomes the community name.
Configuring /usr/share/snmpsim/data/192.168.1.126.raw.snmpwalk controller
SNMPv1/2c community name: 192.168.1.126.raw
SNMPv3 Context Name: 6bdad8c3906f65190f7c5f4674434a6c or 192.168.1.126.raw
NOTE. The file name ‘192.168.1.126.raw’ will be the community name.
NOTE. In this case, some parameters are set for SNMPv3 to simulate a SNMPv3 device.

Testing snmpsim
- Now that we have started snmpsim with this snmpwalk file imported, we can run snmpwalk on the simulated device, with the community being defined by the file name.
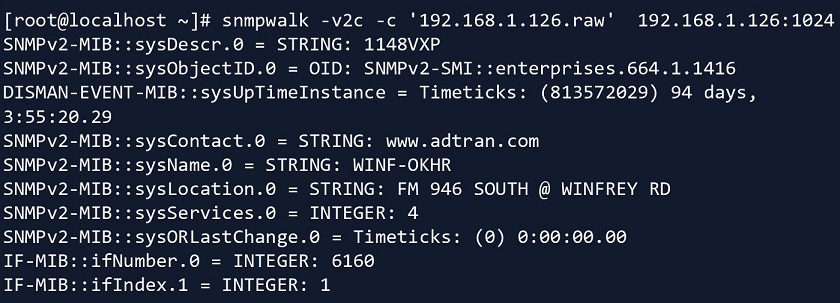
- We specify the proper community, IP, and port.
And now we can run snmpwalk on this device. In real life, the customer or your network admin will give you an snmpwalk file from the original device. Then, for testing purposes, you plug it into snmpsim, and from there you can simulate Zabbix SNMP discovery, SNMP polling, etc. This keeps the device from getting performance issues from constantly being bombarded by tests, SNMP requests, and so on.
Testing snmpsim from Zabbix
Now, we know that snmpwalk and snmpget are working fine, we can finally test it from the Zabbix side.
- We create a host in Zabbix, select the SNMP version, IP address, port (be careful as the custom port is used here), and community (where the community is the snmpwalk file name).
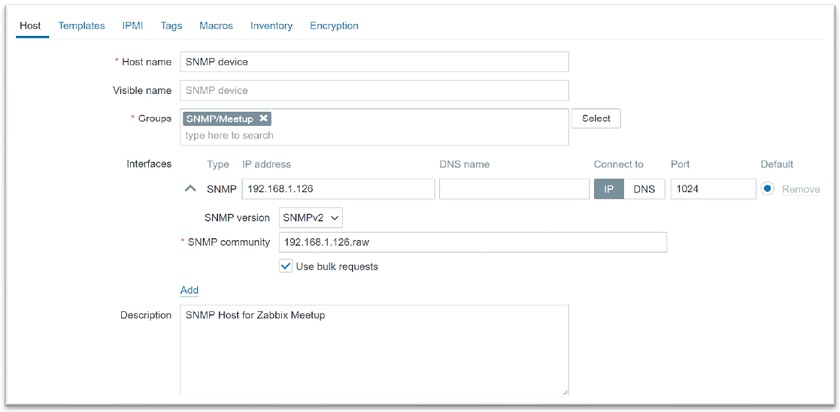
Creating a host in Zabbix
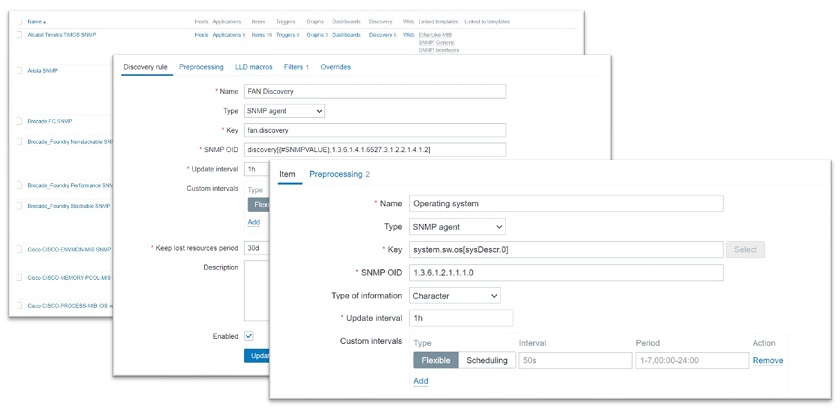
- Then we create an item and specify the SNMP OID.

At this point, the item actually becomes enabled and you can get the data from the simulated device.
NOTE. We’re going to see only static data here based on the output of snmpwalk, so we’ll keep receiving the same value over and over again. Still, this means that the OID with the specified index works.
Getting the numeric OID form
Our long-term stance is that numeric values are better than textual representations. But how can we get this numeric OID value if the snmpwalk output is textual?
- In snmpwalk, the output is textual (‘InOctets‘ (incoming octets) in this case).
IF-MIB::ifHCInOctets.103007 = Counter64: 7566464822
IF-MIB::ifHCInOctets.103008 = Counter64: 48097542881
IF-MIB::ifHCInOctets.103009 = Counter64: 75748849150
IF-MIB::ifHCInOctets.103010 = Counter64: 25963616931
- So, we use snmptranslate on this textual representation.
[root@localhost ~]# snmptranslate -On -IR ifHCInOctets
.1.3.6.1.2.1.31.1.1.1.6
- Then we add the index (103007, but it will depend on the port number) to the end of the OID.

And that’s how you can go from textual representation to numeric representation by using snmptranslate. Of course, you need to have the specific MIB that you’re using snmptranslate on imported to your OS, otherwise, it won’t be able to do the translation.
Creating SNMP Agent LLD rule
Creating an item is simple and straightforward: just open the documentation and follow the steps in there. But what about creating a low-level discovery rule? Here again, things get a bit tricky and we need to delve a bit deeper.
- To begin with, we create an LLD rule.
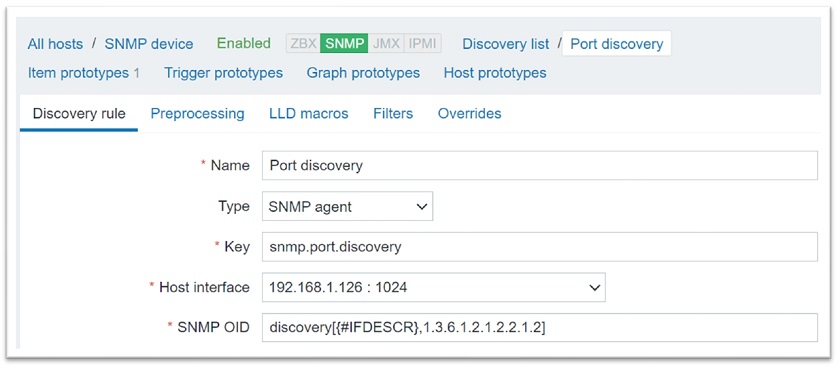
Here, we have created a discovery rule to discover all the indexes on this OID — 1.3.6.1.2.1.2.2.1.2 (IFDescr). Of course, this means that we will discover all the available port descriptions.
- Next, we create an item prototype for incoming traffic.
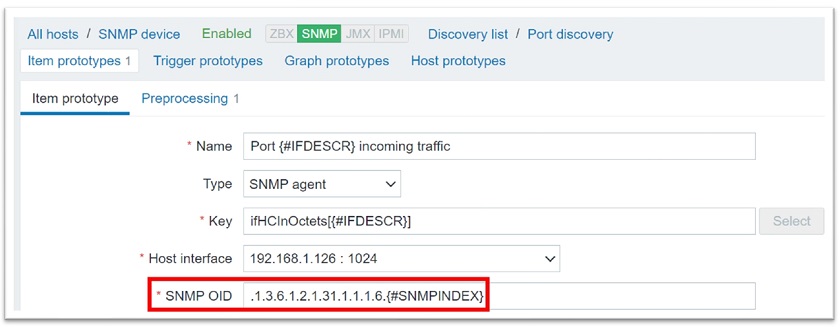
The item prototype will be populated with all the discovered indexes from the discovery rule (the discovered index {#SNMPINDEX} will be added at the end of the OID (ifHCInOctets)). The description will be plugged into the name and into the key.
‘No Such Instance currently exists at this OID‘ error
We got the Low level discovery running, but we also get the error message that no such instance currently exists at this OID. You may have encountered this error if you have worked with SNMP discovery before.

The ‘No Such Instance currently exists at this OID‘ error
This error is caused by the fact that we have more indexes on {#IFDESCR}, the OID we’re discovering on, than on the OID that we are populating and creating items based on. This means that it tries to create an item with an OID and an index at the end while we don’t have an OID instance (an OID with one or more discovered indexes at the end) for it.
So how do we work around this? Well, this error is fixed by filtering out unnecessary Indexes by {#IFDESCR}.
To do this, we need to open the snmpwalk file to find out which indexes we have incoming octets for. Once we have a list of indexes, we can filter the unnecessary ones out. In this case, we can filter by ‘IfDescr‘. Here, we’re filtering out interface types that we don’t want to create items from prototypes for, since these items won’t have instances (indexes) on this OID.
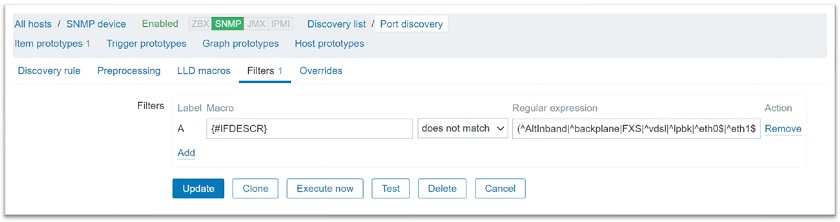
Filtering unnecessary indexes out
With Low level discovery filtering is always your friend and can save you lots of headaches. Take a look at the snmpwalk output and figure out what OID instances you are trying to create that don’t exist in reality, and filter them out.
LLD entity filtering
There is a set of common filters that we should use in case of SNMP discovery to filter by specific entities, for instance, by interface types.
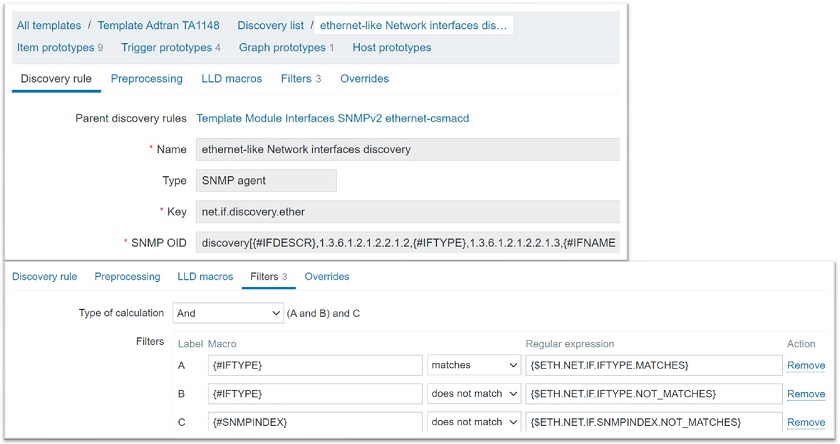
Discovering additional OID’s (IFTYPE)
In this case, the discovery itself will be a bit more advanced – we will be discovering not only the interface descriptions, but also their types. You can set up your discovery to only discover specific interface types or names, or even to filter out some specific indexes that might cause problems.
‘No value received for macro‘ error
After the filters have been implemented, you may receive an error message on the discovery rule itself — ‘Cannot apply accurately apply filter: no value received for macro “{IfDescr}”‘.
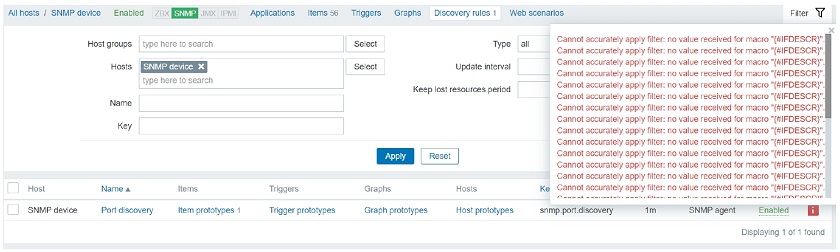
Discovering multiple attributes – {#IFNAME}, {#IFTYPE}, {#IFDESCR}
What does that mean? Zabbix tries to apply filters on these three macros: {#IFNAME}, {#IFTYPE}, and {#IFDESCR}.
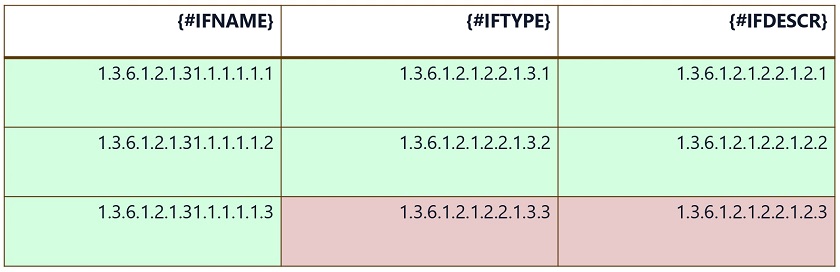
Here, Index .3 doesn’t exist for {#IFTYPE} and {#IFDESCR}. Still, Zabbix tries to apply filters to these non-existing indexes. The error message means that no value is received for {#IFTYPE} and {#IFDESCR} on these elements.
We have to be really careful here. This is why we need to make our discovery rules more modular. This may be caused by specific interface types not having interface type indexes or interface description indexes.
So, how can we work around this problem?
Modular templates and LLD rules
- We need to create more modular discovery rules or even resort to using separate templates for separate interface types.
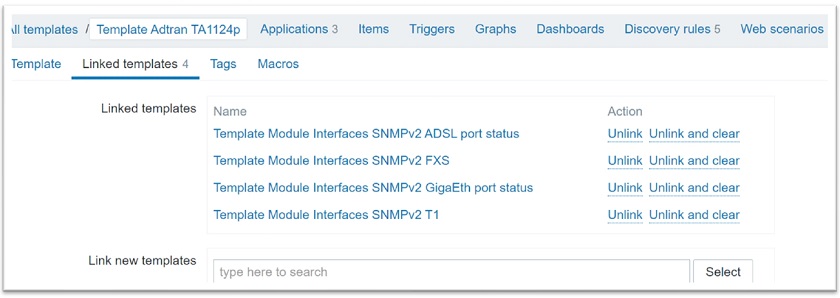
Modular discovery rules
Here, we have a parent template that has four children templates linked.
- Each discovery rule is created for a specific interface type. Each of the interface types — ADSL, FXS, GigaEth, and T1 — uses its own set of very granular filters. In each of these templates we have set up a filter in such a way, that the low level discovery rules won’t ever attempt to apply filters on indexes that don’t exist.
- This lets you link child templates for specific entity types to the parent template and unlink them as needed, and easily enable and disable specific discovery rules.
- You can also enable/disable discovery rules on the host level.
The idea is to not use a single discovery rule for everything, especially if it causes errors on items or on the discovery rule itself. Be more granular, take a look at the snmpwalk and compare your indexes by what you are trying to filter.
Conclusion
We definitely recommend taking a look at the examples and error messages above as they are quite common. If you see them, do an analysis of snmpwalk from your device. Usually, it’s quite simple to resolve once you take a look at the snmpwalk and start comparing what OIDs and OID indexes your device provides. Some devices provide proper indexes for every OID and this won’t be an issue at all, but other devices don’t, so be careful.
Hopefully, this post will help you simulate an SNMP device on your own VM and create low-level discovery rules with ease. After all, these examples were created on a simulated version of a real device.
Questions & Answers
Question. Why not use a textual representation for the OID name in that template, since it’s more user friendly?
Answer. Let’s say we’re monitoring our SNMP devices using a proxy, which we call Proxy A. Proxy A has all of the necessary MIBs and we can use textual representations, since we can only use them if we have the proper MIBs imported. Then, we decide to do some load balancing, or just need to move our host to a different proxy that we’ll call Proxy B. So, we move them to a different proxy, and all of a sudden, these textual representations aren’t supported anymore.
This happened because we forgot to move and import our MIB files to Proxy B. Perhaps this procedure was done a couple of years ago, and our new admin doesn’t really know how to do it. So, it will take extra time to figure the problem out.
This is why we recommend using numeric representations. That way, you won’t forget to migrate the MIBs when you migrate a host from one proxy to another. Numeric representations will always work. They’re a bit more complex at a glance, but that’s why we have the item key, where you can provide the description of the metric that the OID serves.


In the advanced filtering sample you are showing (the one where you filter based also on type etc..) you are using I’m assuming macros for the values which you would then define in the template, is my assumption correct?
If yes then the periods which seem like creates a logical path, is it indeed a path or it’s just a descriptive macro name?