


Zabbix Agent 2 is a promising platform that gives Zabbix more capabilities for data collection. Written in the powerful Go language, this new agent provides more options for plugin developers. More than that, it is less complicated than C Loadable modules, so creating plugins is now much more accessible for everyone.
At Zabbix Summit 2019, besides introducing Zabbix 4.4, we also presented Zabbix Agent 2. What makes it different from its predecessor is that now developers can write Zabbix plugins in Go. A lot of people were asking, “Hey, how do we do that? What would such a plugin look like? Where can we find examples and documentation?”
I’ll answer these and a few other questions in this article. We’ll go through them step by step, but if you want to get down to business, you can go straight to this part.
So…
Why did we create a new Zabbix agent?
If you ever tried or wanted to write a plugin for the first Zabbix Agent, you might have noticed that there are quite a few limitations.
A plugin for the first agent might be launched as several separate processes, so the developer didn’t have enough control over it. Using persistent connections, saving the states of monitored components between checks, and receiving SNMP traps was either difficult or impossible to implement.
Zabbix Agent 2 has a completely different architecture. It is written from scratch in Go, with some reused code in C from the first Zabbix Agent, so developing plugins became much easier, in comparison to developing them in C. With this new agent (let’s refer to it as the Go Agent) implementing the features listed above is much more convenient. Moreover, the Go Agent is backwards-compatible with the classic Zabbix Agent in terms of the protocol, configuration and metrics.
These are the new capabilities exclusive to the Go Agent:
- agent and plugin configurations in one config file,
- out-of-the-box concurrent checks,
- full control over collecting and exporting data,
- plugin support on Windows platforms,
- timeout for every individual plugin.
The new agent is available in Zabbix 4.4 as an experimental feature and will be production-ready when Zabbix 5.0 launches.
Agent Architecture
Before developing our first plugin let’s uncover how it all works. Keep in mind that the following information is for Zabbix 4.4. Given that the Go Agent is an experimental feature, some of it might be inapplicable by the time Zabbix 5.0 launches.
The main three components of the agent are ServerConnector, ServerListener, and Scheduler.
ServerConnector manages communication with the server (receiving configuration/exporting data), item configuration, and history cache. There is one Connector per active server.
ServerListener accepts passive check requests from the server and then sends them to Scheduler. For now that’s all it does but it might get more functions in the future.
Scheduler manages the task queue according to the schedule and concurrency settings. The Go Agent launches a single Scheduler to manage tasks (plugins) in accordance with the schedule defined by item settings.
We can look at the inner structure of the agent in terms of active and passive checks (bulk passive checks are coming soon). Keep in mind that we differentiate between these two types only to demonstrate how the agent works, because both technically share the same components.
The schemes below illustrate component interaction for each check type. Sorry for the picture quality, I’m not exactly a pro at PlantUML ¯\(ツ)/¯
Active Checks
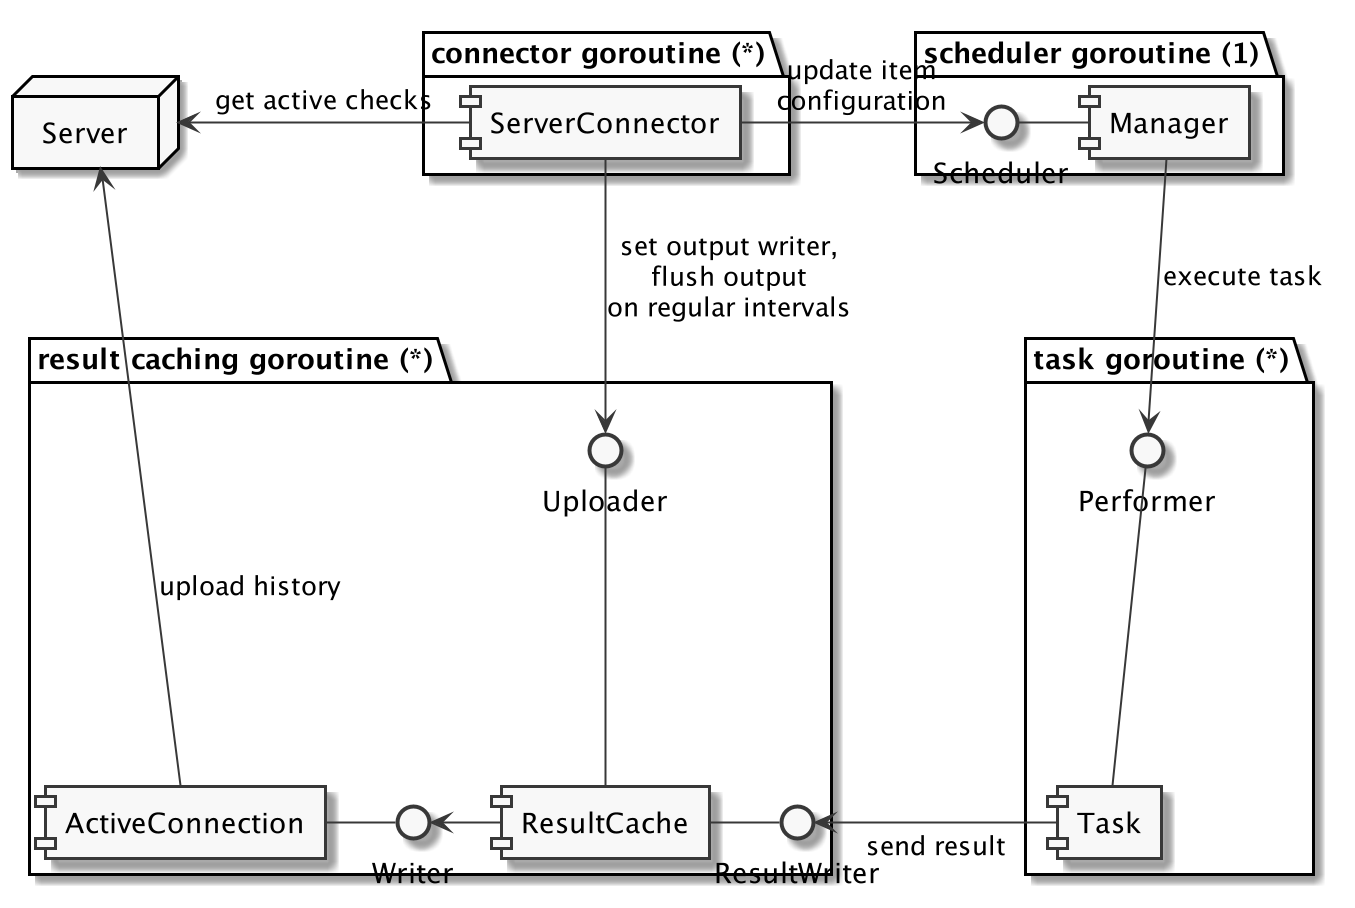
For each active server we create ServerConnector and ResultCache, both launched in its own goroutine.
Passive Checks
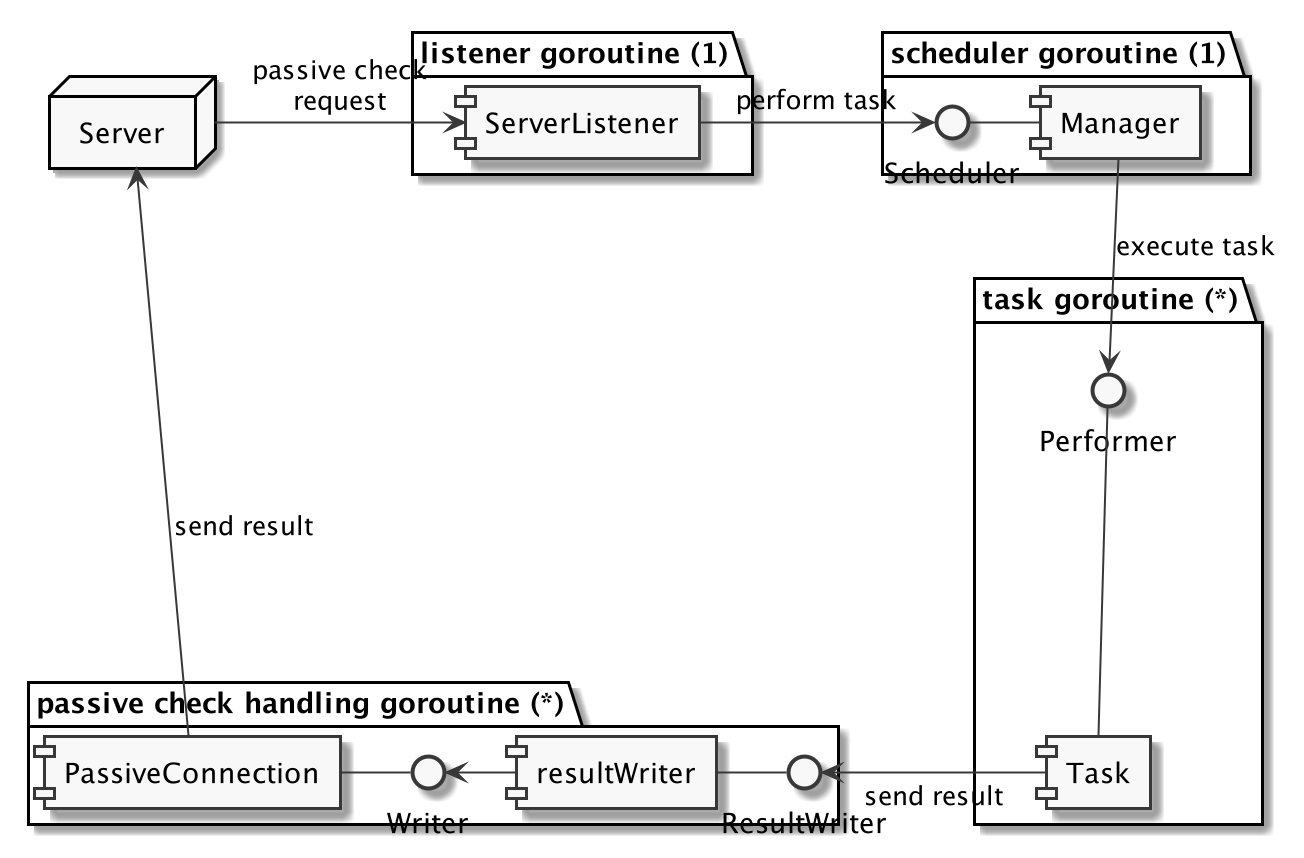 Classic passive checks also use Scheduler to manage tasks. However, it receives item configurations from ServerListener instead of ServerConnector. Moreover, the results aren’t cached but sent directly to ResultWriter, which sends requested data to the server.
Configuration Processing
After receiving item configuration from Zabbix server, ServerConnector updates its own data and creates a specific updateRequest for each plugin that provides corresponding metrics. The requests are sent to Scheduler through a channel, then Scheduler creates tasks and puts them in the queue. As such the plugin will start these tasks when it has completed all the previous ones assigned to it.
Scheduler and Tasks
The Agent interacts with plugins through a two-tier task queue:
- each plugin has a task queue;
- Scheduler has an active plugin queue.
This ensures better concurrency. When due to concurrency limits a task can’t be executed, the corresponding plugin leaves the Scheduler queue (but the task remains in the plugin queue) and is put back only if the next task can be completed.
Tasks that are all completed within one second run in the following order:
- configuratorTask,
- starterTask,
- collectorTask,
- watcherTask,
- exporterTask (directExporterTask),
- stopperTask.
There is also a task called taskBase that contains a link to the plugin, planned completion time, and other technical data that depends on the type of a task.
exporterTask
ExporterTask is used for active checks (and will be used for the upcoming bulk passive checks as well). This task refers to an item that must be regularly polled. Scheduler calls the Export() function of the Exporter interface in a separate goroutine and writes the result in ResultWriter.
directExporterTask
directExporterTask is used for passive checks. The difference between it and exporterTask is that in case of polling a metric and not getting the result (null value), the task will be put in the queue again and Scheduler will try to run it again in one second. This process will repeat until either polling succeeds or timeout occurs. Another difference is that directExporterTask doesn’t allow for returning several values.
watcherTask
WatcherTask contains a list of metrics (requests) to monitor. Scheduler calls the Watch() function of the Watcher interface and passes the request list as parameters.
collectorTask
Scheduler calls the Collect()
function of the Collector interface every few seconds, the exact interval is specified with Period().
starterTask
Scheduler calls the Start() function of the Runner interface when a plugin is activated.
stopperTask
Scheduler calls the Stop() function of the Runner interface when a plugin is stopped.
configuratorTask
Scheduler calls the Configure() function of the Configurator interface, passing it a structure with global agent options and a structure with specific plugin options as parameters.
Interfaces
All in all, there are five interfaces available: Exporter, Watcher, Collector, Runner, and Configurator.
Exporter and Watcher define how data flows between components: Exporter uses the pull model, while Watcher uses the push model.
plugin.Exporter
type Exporter interface {

Export(key string, params []string, context ContextProvider) (result interface{}, err error)

}
Exporter is a very simple interface that polls metrics and returns a value, several values, an error, or nothing at all. It accepts a preparsed key, its parameters and context, which is enough for most plugins. Keep in mind that it is the only interface that allows for concurrent access. With other interfaces any other method can’t be executed until a plugin completes its task, so take that into account if your plugin requires concurrent access: you should ensure that every thread can access shared data. Thankfully, Go provides you with many options: mutexes, channels, atomic counters, sync.Map, and other synchronization primitives. Also, don’t forget about Race Detector to find race conditions.
The Export() function has a limit of 100 concurrent calls per plugin. If needed, you can decrease this limit for each separate plugin by using the
plugin.Base.SetCapacity() function.
func (b *Base) SetCapacity(capacity int)
You can also set the capacity in the corresponding parameter in the configuration file. For example:
Plugins..Capacity=1
plugin.Watcher
type Watcher interface {
Watch(requests []*Request, context ContextProvider)
}
With Watcher you can implement a metric polling process without using Scheduler. This may be useful for plugins that use trapping and need complete control over gathering and exporting data. This interface is mostly used to wait for data and upon receiving it send the results to the server. With it we can, for example, implement log monitoring or create a plugin that subscribes to events from an external source and waits to receive data.
plugin.Collector
type Collector interface {
Collect() error
Period() int
}
Collector is used for plugins that need to collect data regularly. However, it can’t return data, so you’ll need Exporter for that.
The main use case for this interface is when we need to collect data often and store it in cache until Zabbix server requests it.
Collector has two functions:
- Collect() implements the logic of data collection;
- Period() sets the time period for data collection.
This interface can be used to directly collect CPU and HDD data with the agent.
plugin.Runner
type Runner interface {
    Start()
    Stop()
}
Runner provides a way to perform initialization when a plugin is activated (the Start() function) and deinitialization when it is stopped (the Stop() function).
With this interface a plugin can, for example, start or stop a background thread, release unused resources, close connections, etc.
Plugin activation and deactivation depends on whether there are any metrics ready to be processed. In active checks, when Zabbix server or Zabbix proxy sends configuration updates, Scheduler receives new tasks. A plugin is activated if there is a task assigned to it and is stopped, if the updated configuration doesn’t contain any requests for it. In passive checks a plugin is activated when it receives a request from the server and is stopped after 24 hours from the last request.
plugin.Configurator
type Configurator interface {

    Configure(globalOptions *GlobalOptions, privateOptions interface{})

    Validate(privateOptions interface{}) error

}
Configurator serves for configuring plugins.
It has two functions:
- Configure() loads configuration parameters in a structure defined by the developer.
- Validate() checks the configuration file for errors. If it finds any, the agent won’t start and we’ll get an error notification.
We also don’t need to do anything to read or parse the configuration file, because the agent takes care of it.
Configuration parameters of the Go Agent mostly coincide with those of the classic Zabbix agent, although there are a few exceptions.
Plugin types
Plugins can be either external or internal. Internal plugins export internal agent data. They are included in the internal/agent package and have the plugin_ prefix in their names. An example of an internal plugin is the plugin that processes User Parameters.
All other plugins, including those that collect standard metrics (from CPU, hard drives, network, memory, etc), are external plugins. Our plugins will also belong to this type and have access to the same capabilities. External plugins are located in the go/plugins directory, each in its own subdirectory.
Hello, world!
A plugin is simply a Go package with one or several interfaces that define its logic. Here is an example of a basic plugin:
package packageName
import "zabbix.com/pkg/plugin"
type Plugin struct {
    plugin.Base
}
var impl Plugin
func (p *Plugin) Export(key string, params []string, ctx plugin.ContextProvider) (res interface{}, err error) {
    // Write your code here
    return
}
func init() {
    plugin.RegisterMetrics(&impl, "PluginName", "key", "Description.")
}
This isn’t any more complicated than a bash or python script, is it? Now let’s add some code that will do something useful.
We’ll practice by writing a plugin that shows us the weather for a city whose name we’ll pass to it as a parameter.
In order to do that, first of all, let’s download Zabbix agent source code.
$ git clone https://git.zabbix.com/scm/zbx/zabbix.git --depth 1 zabbix-agent2
$ cd zabbix-agent2
# You can work in the master branch but I recommend creating a separate branch based on one of the stable branches
$ git checkout -b feature/myplugin release/4.4
Let’s create a directory called src/go/plugins/weather and then an empty file in it, called weather.go that will contain our code.
Next, let’s import a built-in package called zabbix.com/pkg/plugin.
package weather
import  "zabbix.com/pkg/plugin"
Then we define our structure and include the Base structure from the plugin package in it. We’ll need it later.
type Plugin struct {
    plugin.Base
}
var impl Plugin
Now let’s write the code that retrieves and processes the data. We just need to:
- send a GET request to a weather provider API (thanks, wttr.in!);
- read the result;
- resolve errors;
- and return the result.
Exporter is just the thing for that.
func (p *Plugin) Export(key string, params []string, ctx plugin.ContextProvider) (result interface{}, err error) {
    if len(params) != 1 {
        return nil, errors.New("Wrong parameters.")
    }

    // https://github.com/chubin/wttr.in
    res, err := p.httpClient.Get(fmt.Sprintf("https://wttr.in/~%s?format=%%t", params[0]))
    if err != nil {
        return nil, err
    }

    temp, err := ioutil.ReadAll(res.Body)
    _ = res.Body.Close()
    if err != nil {
        return nil, err
    }

    return string(temp)[0 : len(temp)-4], nil
}
Next step is to register the metrics to let the agent know about them, so that it could pass them to our plugin for processing.
We’ll use the plugin.RegisterMetrics() function.
// impl refers to the plugin implementation
// name is the name of our plugin
// params are metrics and their descriptions (key1, descr1, key2, descr2, keyN, descrN...)
func RegisterMetrics(impl Accessor, name string, params ...string)
Let’s call it from the init() function (so it is executed when the agent starts.)
func init() {
  plugin.RegisterMetrics(&impl, "Weather", "weather.temp", "Returns Celsius temperature.")
}
With one call to this function we can register several metrics as well.
package plugins
import (
  _ "zabbix.com/plugins/kernel"
  _ "zabbix.com/plugins/log"
// ...
  _ "zabbix.com/plugins/weather"
)
At the moment only three platforms are supported (Linux, Darwin, and Windows), but we will probably add more in the future.
Finally, to let the agent know about our plugin, so that it would be added during compilation, we must include it in the import list, in the src/go/plugins/plugins_<platform>.go files.
Building our plugin
If you haven’t installed Go yet, you should do it now.
We need Go version 1.13 or higher.
To build the agent with our plugin included, we just add the –enable-agent2 option to the configuration and run the make command.
$ cd <zabbix-source>
$ ./bootstrap.sh; ./configure --enable-agent2 --enable-static; make
Then we’ll start the agent and check how our new plugin works. We’ll pass it moscow as the parameter and look at the result.
$ <zabbix-source>/src/go/bin/zabbix_agent2 -t weather.temp[moscow]
+1
You only have to build the agent once. During further plugin development we can use the go run command to quickly check how our code is working.
$ go run <zabbix-source>/src/go/cmd/zabbix_agent2/zabbix_agent2.go
Logging
If your plugin requires logging, you can use functions from the zabbix.com/pkg/log package: Tracef(), Debugf(), Warningf(), Infof(), Errf(), Critf(). Our Plugin structure has identical functions, which are simply wrappers for the functions listed above. The only difference is that they add a [<PluginName>] prefix to messages.
Plugin configuration
The Go Agent allows us to configure plugins in the Agent configuration file by using the Plugins parameter. Unlike the other agent parameters, it is not a key/value type of parameter. It is a separate section where you can describe specific parameters for each plugin. It basically looks like this: Plugins.<PluginName>.<Parameter>=<Value>. There are several rules for this parameter:
- it is recommended to capitalize the names of your plugins;
- the parameter should be capitalized;
- special characters are not allowed;
- nesting isn’t limited by a maximum level;
- the number of parameters is not limited.
You can use Configurator to pass the parameters to your plugin. To give you an example, we’ll add to our plugin a parameter called Timeout. It will define the maximum time for an HTTP request.
Let’s say we want the time range to be between 1 and 30 seconds. Also it will be optional and by default equal to the global agent timeout.
Now we can create a structure that describes our configuration.
type PluginOptions struct {
    // Timeout is the maximum time for waiting when a request has to be done. Default value equals the global timeout.
    Timeout int `conf:"optional,range=1:30"`
}
You can see that we defined this parameter as optional and set the acceptable time range by using metadata in the conf tag. The agent can use this data when it reads the configuration file.
Metadata has the following format: [name=<name>,][optional,][range=<range>,][default=<default value>], where:
- <name> is the name of the parameter (if the name of the parameter in the configuration file differs from the name of the corresponding structure field);
- optional — include this attribute if you need to define the parameter as optional;
- <range> is the acceptable time range, you can also set minimum and maximum values as <min>:<max>;
- <default value> are default values for the parameter, they are always the last attribute.
Now let’s expand our Plugin structure by adding a field to store the configuration. Also we’ll add http.Client that we are going to set timeout for.
type Plugin struct {
    plugin.Base
    options PluginOptions
    httpClient http.Client
}
Then we will implement Configurator. As you know, it has two methods, Configure() and Validate().
func (p *Plugin) Configure(global *plugin.GlobalOptions, privateOptions interface{}) {
    if err := conf.Unmarshal(privateOptions, &p.options); err != nil {
        p.Errf("cannot unmarshal configuration options: %s", err)
    }

    // Set default value
    if p.options.Timeout == 0 {
        p.options.Timeout = global.Timeout
    }

    p.httpClient = http.Client{Timeout: time.Duration(p.options.Timeout) * time.Second}
}

func (p *Plugin) Validate(privateOptions interface{}) error {
    // Nothing to validate
    return nil
}
By calling the conf.Unmarshal() function we can load the plugin parameters in the structure we created.
Now we will replace http.Get by p.httpClient.Get.
res, err := p.httpClient.Get(fmt.Sprintf("https://wttr.in/~%s?format=%%t", params[0]))
if err != nil {
    if err.(*url.Error).Timeout() {
        return nil, errors.New("Request timeout.")
    }
    return nil, err
}
We can finally add our parameter to the configuration file of the agent:
Plugins.Weather.Timeout=1
Now, if the timeout is exceeded, our plugin will return an error.
But what if we enter an invalid value and start the agent? You can try it yourself and see that the agent still will start without a hitch. In this case timeout will have the default value — equal to the global timeout.
You’ll see a warning in the logs only for the first time the plugin is referred to (when it is activated and Validate() and Configure() are called.)
That’s not exactly what we want. A better scenario would be if the agent crashed when the configuration is invalid. To achieve that, we’ll refine the Validate() part, so that this method would be called for all plugins that implement it, when the agent starts.
func (p *Plugin) Validate(privateOptions interface{}) error {
    var opts PluginOptions
    return conf.Unmarshal(privateOptions, &opts)
}
Now, if we enter an invalid value for a parameter and try to start the agent, we’ll get something like this: “cannot create scheduling manager: invalid plugin Weather configuration: Cannot assign configuration: invalid parameter Plugins.Weather.Timeout at line 411: value out of range.”
Future versions of the agent will allow you to reconfigure plugins on the fly. Validate() and Configure() will be called upon receiving the corresponding runtime command and your plugin will be able to react to them and update its settings. Be careful with creating goroutines directly from Configure(): reconfiguration may cause starting more and more instances of those goroutines. It might be better to start and stop them through the Start() and Stop() methods of the Runner interface.
The full source code can be found here: https://github.com/VadimIpatov/zabbix-weather-plugin
Something more complicated
We learned how to write plugins that use Exporter. It is indeed very simple. Now let’s try to create a plugin that makes use of Collector and Runner.
Let’s not bother with simply theoretical cases and go for something actually useful instead. For example, a plugin that measures how long HTTP requests take and then calculates percentiles based on the gathered data.
For starters we’ll arrange how data will be collected by using the net/http/httptrace package (it was introduced in Go 1.7).
type timeSample struct {
    DnsLookup         float64 `json:"dnsLookup"`
    Connect           float64 `json:"connect"`
    TlsHandshake      float64 `json:"tlsHandshake"`
    FirstResponseByte float64 `json:"firstResponseByte"`
    Rtt               float64 `json:"rtt"`
}
func (p *Plugin) measureTime(url string) (timeSample, error) {
    var (
        sample                            timeSample
        start, connect, dns, tlsHandshake time.Time
    )

    req, _ := http.NewRequest("GET", url, nil)

    trace := &httptrace.ClientTrace{
        DNSStart: func(_ httptrace.DNSStartInfo) {
            dns = time.Now()
        },
        DNSDone: func(_ httptrace.DNSDoneInfo) {
            sample.DnsLookup = float64(time.Since(dns) / time.Millisecond)
        },

        ConnectStart: func(_, _ string) {
            connect = time.Now()
        },
        ConnectDone: func(net, addr string, err error) {
            if err != nil {
                p.Errf("unable to connect to host %s: %s", addr, err.Error())
            }
            sample.Connect = float64(time.Since(connect) / time.Millisecond)
        },

        GotFirstResponseByte: func() {
            sample.FirstResponseByte = float64(time.Since(start) / time.Millisecond)
        },

        TLSHandshakeStart: func() {
            tlsHandshake = time.Now()
        },
        TLSHandshakeDone: func(_ tls.ConnectionState, _ error) {
            sample.TlsHandshake = float64(time.Since(tlsHandshake) / time.Millisecond)
        },
    }
    ctx, cancel := context.WithTimeout(req.Context(), time.Duration(p.options.Timeout)*time.Second)
    defer cancel()
    req = req.WithContext(httptrace.WithClientTrace(ctx, trace))

    start = time.Now()
    if _, err := http.DefaultTransport.RoundTrip(req); err != nil {
        return timeSample{}, err
    }
    sample.Rtt = float64(time.Since(start) / time.Millisecond)

    return sample, nil
}
If we want to calculate percentiles, we need to store the data somewhere. That’s why we’ll use a circular buffer. To make our lives easier, we will take a premade solution that you can find here — github.com/VadimIpatov/gcircularqueue. It might be not the most effective way of doing it, but it will keep our code readable. We can once again take advantage of open source and the rich Go ecosystem, this time to calculate percentiles: here I’m using github.com/montanaflynn/stats. Now we can define structures that will store data.
type Plugin struct {
    plugin.Base
    urls map[string]*urlUnit
    sync.Mutex
    options Options
}

type urlUnit struct {
    url      string
    history  *gcircularqueue.CircularQueue
    accessed time.Time // last access time
    modified time.Time // data collect time
}
To initialize and clear resources we will use the Start() and Stop() methods from the Runner interface.
func (p *Plugin) Start() {
    p.urls = make(map[string]*urlUnit)
}

func (p *Plugin) Stop() {
    p.urls = nil
}
We will use Collector to collect data.
func (p *Plugin) Collect() (err error) {
    now := time.Now()
    p.Lock()
    for key, url := range p.urls {
        if now.Sub(url.accessed) > maxInactivityPeriod {
            p.Debugf("removed expired url %s", url.url)
            delete(p.urls, key)
            continue
        }
        res, err := p.measureTime(url.url)
        if err != nil {
            p.Errf(err.Error())
            continue
        }
        url.history.Push(res)
        if url.history.IsFull() {
            _ = url.history.Shift()
        }
        url.modified = now
    }
    p.Unlock()

    return
}

func (p *Plugin) Period() int {
    return p.options.Interval
}
Here we use a cycle to go through a URL list (which we need to populate), call the p.measureTime(url.url) method for each URL, and store the result in the buffer. To tie data for every URL to the time of the request, we store the latter in url.modified.
We also delete URLs that haven’t been requested for a while.
As you remember, Collector can’t export data, so we’ll need to use Exporter.
func (p *Plugin) Export(key string, params []string, ctx plugin.ContextProvider) (result interface{}, err error) {
    if len(params) != 1 {
        return nil, errors.New("Wrong parameters.")
    }

    url, err := parseURL(params[0])
    if err != nil {
        return nil, err
    }

    switch key {
    case keyHttpTraceStats:
        if _, ok := p.urls[url]; !ok {
            p.urls[url] = &urlUnit{
                url:     url,
                history: gcircularqueue.NewCircularQueue(maxHistory),
            }
        }
        p.Lock()
        defer p.Unlock()
        p.urls[url].accessed = time.Now()
        if p.urls[url].history.Len() < minStatRange {
            // no data gathered yet
            return
        }

        data := prepareData(p.urls[url].history.Elements())

        jsonRes, err := json.Marshal(stat{
            // Median: timeSample{...},
            // P75:    timeSample{...},
            // P95:    timeSample{...},
            P99: timeSample{
                DnsLookup:         percentile(data[metricDnsLookup], p99),
                Connect:           percentile(data[metricConnect], p99),
                TlsHandshake:      percentile(data[metricTlsHandshake], p99),
                FirstResponseByte: percentile(data[metricFirstResponseByte], p99),
                Rtt:               percentile(data[metricRtt], p99),
            },
        })
        if err != nil {
            p.Errf(err.Error())
            return nil, errors.New("Cannot marshal JSON.")
        }
        value := string(jsonRes)
        return plugin.Result{
            Value: &value,
            Ts:    p.urls[url].modified,
        }, nil

    default:
        return nil, plugin.UnsupportedMetricError
    }
}
Here you can see that we use mutexes in Collect() and Export(), because they both must have access to shared data.
This is what our plugin will return (the output has been formatted to make it more readable):
$ zabbix_get -s zabbix.local -k "httptrace.stats[yoursite.com]"
{
    "median": {
        "dnsLookup": 13,
        "connect": 28,
        "tlsHandshake": 56,
        "firstResponseByte": 126.5,
        "rtt": 126.5
    },
    "p75": {
        "dnsLookup": 20,
        "connect": 31,
        "tlsHandshake": 60,
        "firstResponseByte": 138.5,
        "rtt": 138.5
    },
    "p95": {
        "dnsLookup": 22.5,
        "connect": 35,
        "tlsHandshake": 78.5,
        "firstResponseByte": 159.5,
        "rtt": 159.5
    },
    "p99": {
        "dnsLookup": 50,
        "connect": 51.5,
        "tlsHandshake": 125.5,
        "firstResponseByte": 266.5,
        "rtt": 266.5
    }
}
The full source code can be found here: https://github.com/VadimIpatov/zabbix-httptrace-plugin.
How to monitor monitoring
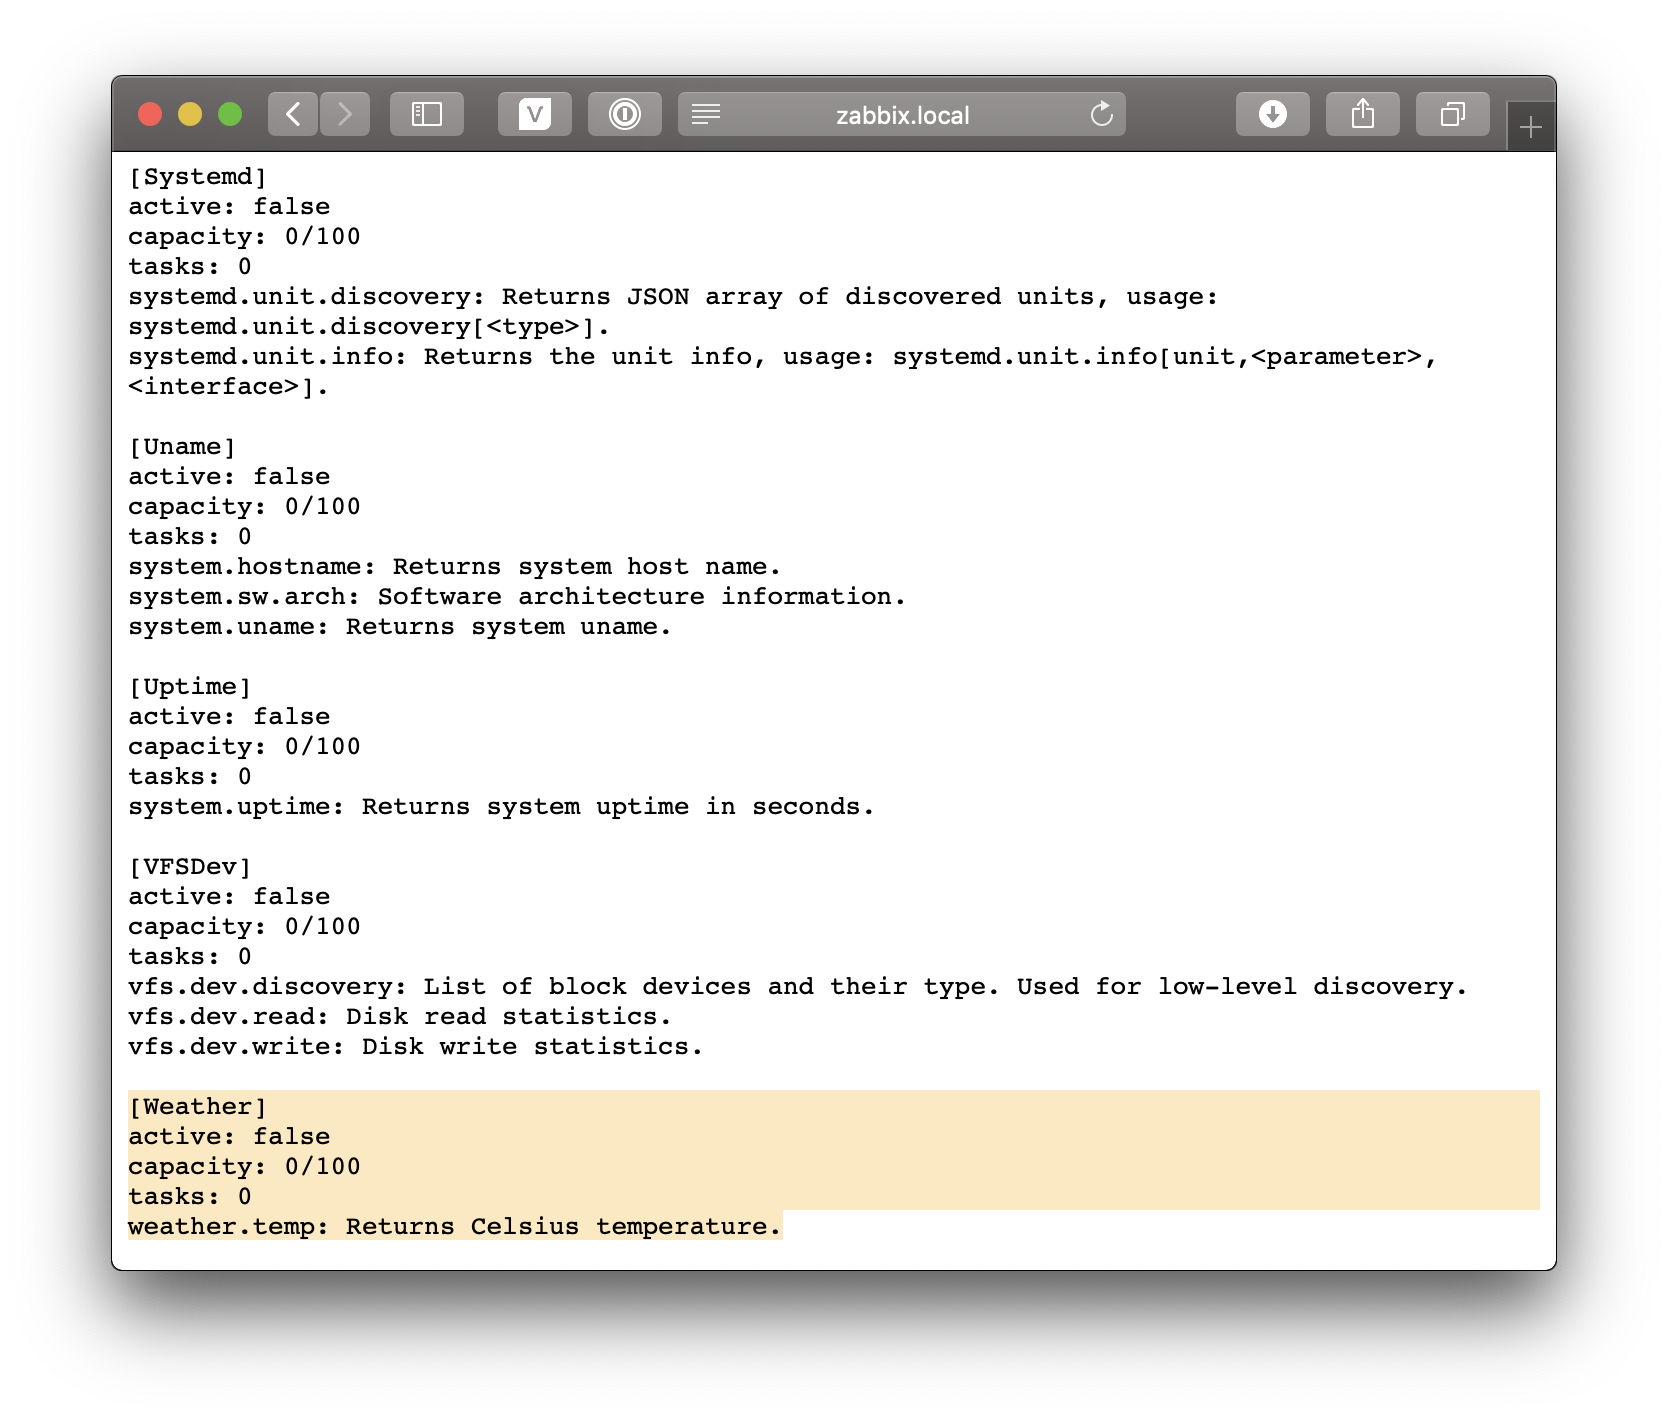
In case you need it, the agent has a metrics command, which is a runtime command that shows the state of every created plugin and its workload.
Using it is very simple:
$ zabbix_agent2 -R metrics
...
[Weather]
active: true
capacity: 0/100
tasks: 0
weather.temp: Returns Celsius temperature.
...
You can also get this information through HTTP. Set the StatusPort= parameter in the agent configuration file, restart the agent, and use the browser to access the following address:
http://<ZabbixAgentHost>:<Port>/status.
What’s next?
We are planning to make further improvements to our agent. Here is what we may add in the future:
- building loadable plugins as dynamic libraries (in order not to rebuild the whole agent every time);
- updating the agent configuration in runtime (without restarting the agent);
- more useful plugins from the Zabbix team. For example, soon we’ll be implementing Docker and Mysql monitoring.
I want more!
If you’d like to go deeper, you can take a look at these useful resources:
- Templates guidelines — here we’ve collected the best practices and recommendations on creating quality templates;
- An official guide to making and managing great templates — this is a presentation from the previous Zabbix Summit on the same topic;
- Magic of the new zabbix agent — this is a presentation of Zabbix Agent 2;
- Official documentation for Zabbix Agent 2;
- You can also find more code examples in Zabbix Agent 2 source code (this is our repository: git.zabbix.com). There you can see how standard checks are implemented;
- Source code for the Weather plugin;
- Source code for the HttpTrace plugin;
- Writing watcher Zabbix Agent2 MQTT plugin in Go — this is a good example of using the Watcher interface;
- if you are not familiar with Go, check out The Little Go Book by Karl Seguin and don’t forget about the official tour of the Go programming language ʕ☉Ѡ☉ʔ
Stay tuned!
The post is translated from the habr.com article.


Thanks for this tutorial! Well, I’m only at the Hello World but even I as a zabbix newbie could understand how it works.
I have a question though but I don’t know if I should ask here :
I want to build the weather plugin but the ./bootstrap.sh gives me this output :
“`~/Documents/zabbix/plugin_tuto/zabbix-agent2$ ./bootstrap.sh
./bootstrap.sh: 27: ./bootstrap.sh: aclocal: not found
./bootstrap.sh: 28: ./bootstrap.sh: autoconf: not found
./bootstrap.sh: 29: ./bootstrap.sh: autoheader: not found
./bootstrap.sh: 30: ./bootstrap.sh: automake: not found
./bootstrap.sh: 31: ./bootstrap.sh: automake: not found
“`
I tried to look into the bootstrap.sh, the Makefile, etc…, but couldn’t find what’s wrong :/
Info : test machine on ubuntu 18.04, Go installed (& tested)