


Learn how to deploy the Zabbix agent on a large number of hosts using the auto registration feature and save your time on manual work.
Watch the video now.
Contents
- Deployment (00:48)
- Front end (14:58)
- Notes (21:09)
- Conclusion (24:02)
Deployment
Installation
First of all, the task of deploying the agent on a host is not really Zabbix-related. It is not possible to do it using the front end or a Zabbix server or zabbix.com. It is related to configuration management tools, which, however, depend on the software used by a company. If a company mostly relies on Windows machines then deployment can be executed through Active Directory or SCCM. In a cloud environment like AWS, it is possible to deploy the Zabbix agent through the cloud platform. For Linux, you can use Chef, Puppet or Ansible. In general, there is a wide choice of management tools to use.
For example, to install the Zabbix agent on Windows you need to:
- Copy-paste the folder that contains the agent default configuration file.
- Change the configuration file.
- Execute in the CMD:
.../.../zabbix_agentd --config ../../zabbix_agentd.conf --install
After this command, you will have a Zabbix service added to your Windows machine services. All in all, you should use the available tools to deploy the Zabbix agent package, folder or archive and execute the command to install the Zabbix agent.
On a Linux machine, you can use one of the following commands:
yum install zabbix-agent
apt-get install zabbix-agent
If not all of your machines have access to the Internet, just copy the RPM and install it locally without the Internet connection:
rpm -ivh zabbix-agent.rpm
The next step is to add hosts running the Zabbix agent to the front end. There is no need to introduce super complex API scripts, etc. because there is a built-in functionality called Zabbix agent active registration. It is used to automatically add a host to the Zabbix front end.

Actions tab
Go to Configuration > Actions. This is the same tab that is used to configure triggers but sometimes users do not notice that it can also be used for auto registration.
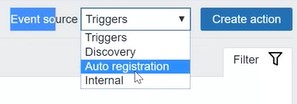
There is a drop-down menu where you can switch the event source from Triggers to Auto registration.
Hostname
Go back to the CLI. To successfully perform active registration, it is necessary to make small changes in the Zabbix agent configuration file. Open zabbix_agentd.conf:
vim /etc/zabbix/zabbix_agentd.conf
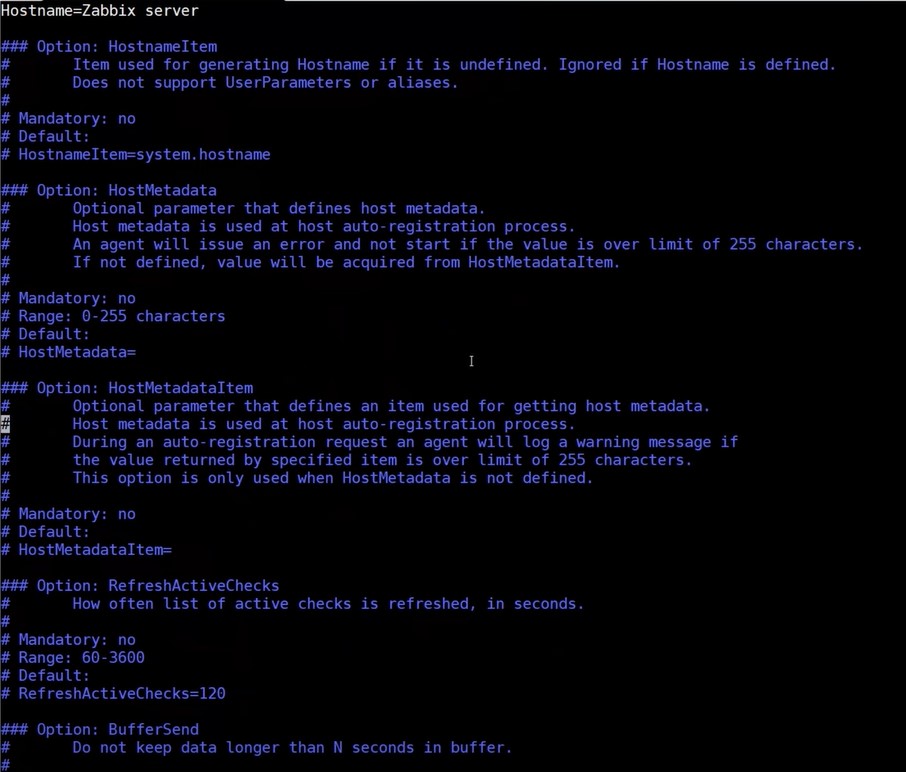
Zabbix agent configuration file
Inside the file, there is the parameter called Server which is the IP or DNS name of your Zabbix server or proxy. The agent will accept communication only from this IP or DNS name, and the direction of communication is always from the server to the agent. But in case of active registration, we need to change the ServerActive parameter which is the IP or DNS name of the proxy or the server to which the agent will connect, which implies that the agent connects to the server/proxy.
Speaking about firewall rules, passive agent checks run on port 10050/TCP. However, we need active agent checks which run on 10051/TCP (the listening port of the server/proxy). Make sure to configure the firewall to let the agent communicate with the Zabbix server/proxy on this port.
In my case, ServerActive is assigned the localhost address (in my case, it is 127.0.0.1).
Two other important parameters are Hostname and HostnameItem. You can add any string after the Hostname and when the agent performs active agent registration it will use the specified text as the name of the host in the front end. But when deploying a large number of hosts, a unique hostname is required for each host. There is no need to edit the Hostname parameter for each agent installation manually or via a script. Instead, use HostnameItem. Let’s check what the default hostname looks like:
zabbix_get -s 127.0.0.1 -k system.hostname
localhost.localdomain will be used as the hostname in the Zabbix front end when the agent performs active registration. Since normally the hostnames differ on all of the computers, when you deploy a Zabbix agent on your 200 hosts you will have one static entry: hostnameItem=system.hostname. But the actual extracted hostname will be different on each of the machines, which is the result that we need.
Metadata
There are also HostMetadata and HostMetadataItem parameters.
HostMetadata is quite straightforward, it is the parameter that defines the metadata of the host, which means information about the host that later will be used in the front end. If we define only HostMetadata in the agent configuration file and then deploy it on 200 virtual machines, we will be getting the same metadata on each of those machines, which will make it impossible to properly filter the machines and decide what to do with them. Instead, leave the default HostMetadata and work with HostMetadataItem, which is similar to HostnameItem. Specify an item that will extract data from the server and the extracted data will be used as a value for the host metadata.
To demonstrate, I will go to the configuration file and create a custom check that is not found in Zabbix by default:
UserParameter=release,cat /etc/redhat-release
Now I need to restart the Zabbix agent and then check for the parameter:
zabbix_get -s 127.0.0.1 -k release
![]()
Custom parameter
The command will return the value. What you can see in the picture above is not exactly the best result because the initial idea was to create a check that can return either ‘Linux’ or ‘Windows’.
Let’s assume that we have 200 hosts where we need to deploy Zabbix agent but some of those machines are Windows versions so we would create a user parameter with a script that would tell us if this machine is a Linux or a Windows machine. To do this, we would need to add a new user parameter as above, go to HostMetadataItem and add release.
![]()
Front end
Once the agent is configured in the CLI, it is time for the front end.
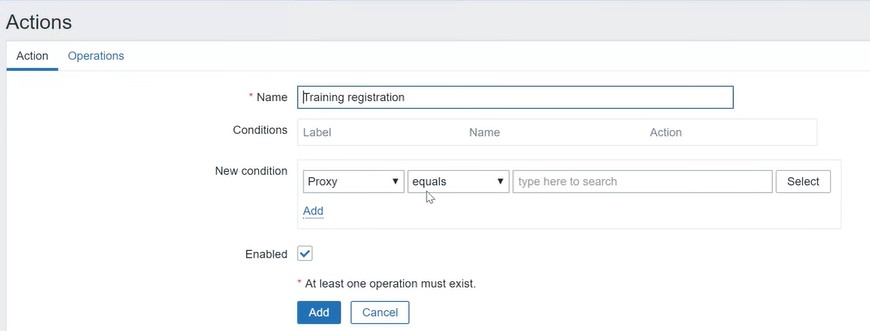
Go to Configuration > Actions > Event source > Auto registration > Create action.
Only three conditions are available:
- proxy;
- host metadata;
- hostname.
Proxy can be used if auto registration is performed in the architecture where the Zabbix agent reports to the proxy and the proxy reports to the server. But in my case, the agent reports directly to the server, so I’m going to use the Host metadata condition specifying either ‘contains’ or ‘does not contain’.
As you can remember, in this case, the host metadata will be CentOS Linux release 7.6.1810.
Let’s specify in the condition that the host metadata must contain ‘Linux’.

Go to Actions > Operations. If the condition is met, an operation will be performed. For example, it is possible to notify administrators that a new Zabbix agent is installed on the server with a specific hostname, IP address, etc. so they can add it manually, but we want to automate the process. Instead of ‘Send message’, select ‘Add to host group’.
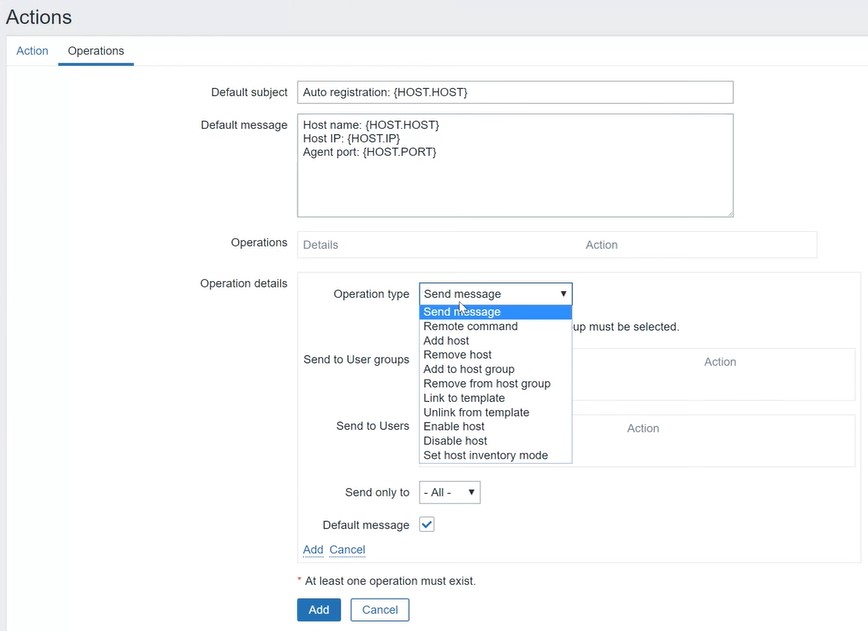
As you see, there are two options — Add host or Add to host group. Obviously, we are most likely to, first, add a host, second, add it to the host group. But in Zabbix, if you use the Add to host group operation type, it will also automatically create a host. So I specify that I want to add a new host to the Linux servers host group.

If the Host metadata contains Linux condition is true, Zabbix will automatically create a new host using the passed information as a hostname and add that host to the Linux servers host group.
But if we also want to start the monitoring immediately, templates should be added too. For this purpose, simply add a new operation Link to the template and name it accordingly.
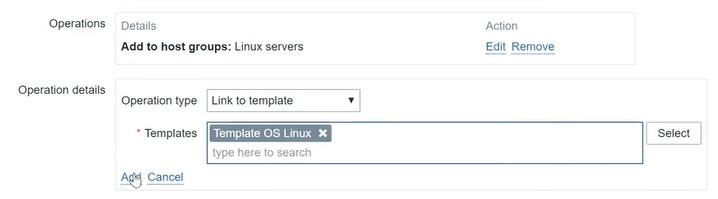
When the condition is true, Zabbix will automatically create a host and start monitoring, as well as notify administrators if this operation type is added.
I now have a new host in the front end named localhost.localdomain because the condition is true. The new host has been added to the Linux servers group as well as the Discovered hosts group, and the template has been assigned.
![]()
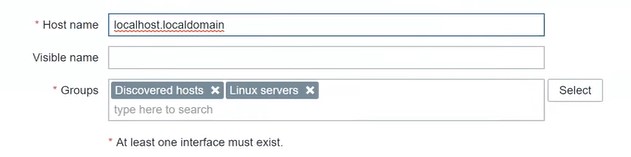
Host configuration in the front end
Notes
Zabbix supports the execution of multiple actions. Still, some things should be kept in mind, and one of the most important ones is that it is impossible to have two items with the same key on the same host. If you have two actions with two different templates or even more and there is a chance that both of those templates might be added to the same host, make sure that these templates don’t contain duplicate item keys. Otherwise, only one of the actions will be executed and the second won’t.
Another thing is that active registration is dynamic so I’ve added as many dynamic parameters to my agent configuration file as I could. I use HostnameItem and HostMetadataItem instead of static Hostname and HostMetadata. The former are reevaluated every two minutes by default and the values are sent to the Zabbix server. If there are changes, for example, the hostname is changed and it doesn’t match action 1 anymore but matches action 2, then all of the changes will also be made to the host automatically.
Conclusion
That’s all I wanted to say about active agent registration. The only restriction is that to perform it you must have an agent and active checks must be supported, so there must be communication from the agent to the server. In this case, you could use network discovery, but this is a topic for another post.


Hi !!! And nice article !!!
but one question, i’m using one zabbix server on VPS, and i install proxy on my many clients. But i have same windows server name (ex: AD, TSE, EXCHANGE) how auto registrater with same name’s server with different proxy ?
I don’t know if I was clear !!! I have:
client (proxy) A: AD, TSE, Exchange
Client (proxy) B: AD, TSE, Exchange
Client (proxy) C: AD, TSE, Exchange
How can I self register it’s 9 servers with the same names?
Can you also show how to autoregister JMX interface?
In the example, isn’t it better to use `zabbix_agentd -t system.hostname` because `zabbix_get` is normally not installed?
Can you give an example where you enable JMX interface for autodetected host also?