Understand how to utilize Zabbix API, automate daily processes, and integrate with other solutions.
Watch the video now.
Contents
- Introduction (00:00)
- About API (04:15)
- PyZabbix (15:17)
- Zabbix gnomes (18:27)
- API with curl (25:16)
- Other features (37:19)
Introduction
In this post, I will give you a general overview of the possibilities and benefits of Zabbix API with examples. You’ll understand how to perform integration and optimization to take advantage of Zabbix API and Zabbix itself.
Here are some useful resources that you will need:
- Zabbix wiki (About API libraries);
- Zabbix documentation;
- Python Zabbix API;
- Zabbix gnomes (ready-to-use scripts).
About API
API is an application programming interface and one of the methods used to configure Zabbix.
As you know, there is the Zabbix server, the database, and the front end. The Zabbix server and the front end are connected to the database. When the Zabbix server collects information from a PC or another device, the data is processed by the server binary process and written inside the database. Each time you open the front end and create a new host, the information about it is also written to the database.
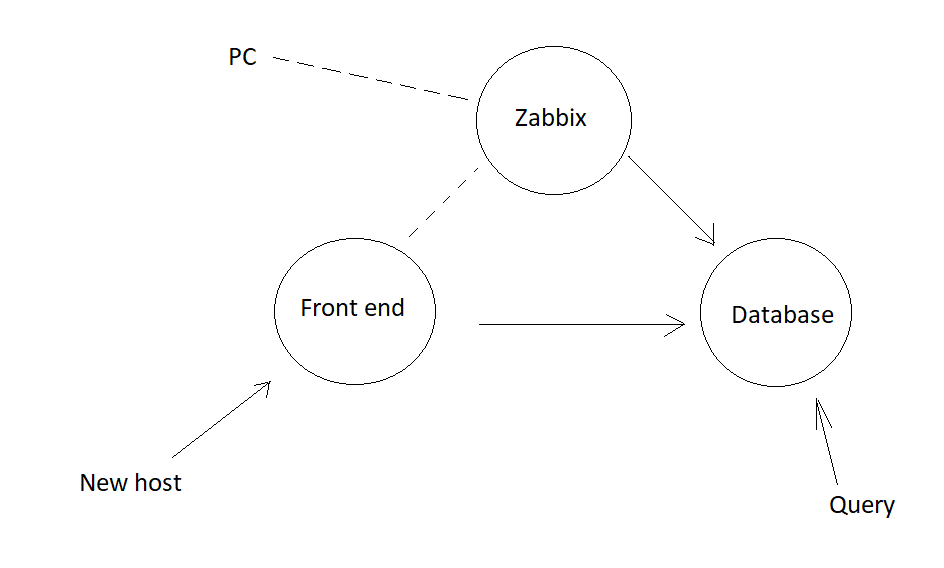 Zabbix communication process
Note. The dashed line represents the minor communication between the front end and the server.
You can add or change any configuration in the front end. The bad news is that you have to do all of it manually, which takes a lot of time and human resources, and it is definitely not an optimal way to perform this task.
In my previous post about inventory collection, I mentioned that if you want to update all of the existing hosts to change the inventory mode, there are two ways to do that:
- database query;
- Zabbix API.
Direct database query updates the tables based on conditions and changes the default inventory mode on the host. It works, however, inexperienced users may find it easier to use Zabbix API instead.
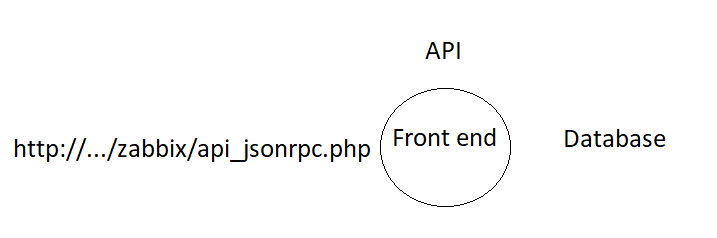
Zabbix API
Each time you use API, you connect to the api_jsonrpc.php file. This page and the front end itself with all PHP files already knows what a specific API call means. For example, the front end will know that it is required to fill in mandatory fields when you use the host.create API method. host.create can be used to specify interfaces, groups, tags, etc..
There are four types of host interfaces which are represented by numerals in API:
- agent = 1;
- SNMP = 2;
- JMX = 3;
- IPMI = 4.
{
    "jsonrpc": "2.0",
    "method": "host.create",
    "params": {
        "host": "Linux server",
        "interfaces": [
            {
                "type": 1,
                "main": 1,
                "useip": 1,
                "ip": "192.168.3.1",
                "dns": "",
                "port": "10050"
            }
        ],
...
In this example, you can see that the value of type is 1, which means we are going to use the agent interface. See here for the disambiguation of other properties, such as main, useip, dns, etc.
When I pass the information about the values, Zabbix automatically recognizes what I want to use, so there is no need to select anything manually in the front end.
Then there are the host groups, which are mandatory in the creation of hosts.
"groups": [
            {
                "groupid": "50"
            }
        ],
...
You can also add template IDs, user macros, and inventory modes.
While it could be faster to create a single new host directly in the front end, normally APIs are used to create a large number of hosts. The programming language (Python, Bash, etc.) allows you to run different functions before executing the call.
For example, let’s say you are obtaining information from an internal CSV document with an inventory of the computers in your environment (hostname, IP address, operating system, etc.). You can use this data as variables for the required fields and create any amount of hosts with unique values automatically in a loop. However, it requires some knowledge of programming languages.
PyZabbix
Now, let’s dig deeper into Python. On zabbix.wiki you can find the API libraries for Python, as well as for Ruby, Crystal, Java and other programming languages.
PyZabbix is a Python module used for working with Zabbix API. I will explain the PyZabbix installation process because it’s not available on the server by default.
For a fresh installation, you need to install pip first. Basically, there are two options:
- EPEL repo, or
- curl.
Execute one of the following commands:
1) EPEL repo ---> yum install python-pip
2) curl "https://bootstrap.pypa.io/get-pip.py" -o "get-pip.py"
python get-pip.py
pip install pyzabbix
In the end, you should be able to use Python scripts and Zabbix gnomes.
Zabbix gnomes
From this page, you can clone Zabbix gnomes, also known as the most common Python scripts used inside Zabbix. Zabbix gnomes provide a simple solution for users who have just started with Zabbix API and are not sure about the required parameters.
Examples of commands:
zabbix_sender -k $ITEMKEY -o $ITEMVALUE -s $HOSTNAME -z $(zhproxyfinder.py $HOSTNAME)

./zhtmpllinker.py -t "Template App Apache" "Template App MySQL" "Template OS Linux" -G "LAMP Servers"

./zhtmplunlink.py -G "Webservers" -t "Template App MySQL"
Let’s say I am a beginner and don’t know what to do with the scripts. If I run zhostfinder.py without any arguments, it will fail because there isn’t any information specified yet.

However, it is possible to find the main options there:
- -A = get all;
- -S = search;
- -h = help.
It is important to authenticate with a username and password to use API, for example, to change the configuration. The credentials are the same as for the users in your front end. I would also recommend you to create a separate user for Zabbix API.
Remember that API respects the permissions of the user. If you create a new user for API scripts and do not provide the permissions to the host groups, don’t be surprised if you end up not being able to get any information.
You also need to point your API calls to the URL of the api_jsonrpc.php file.
For example, zhost.finder allows you to perform the following operations:
- Find the output of all servers inside Zabbix:
./zhostfinder.py. -A -u Admin -p zabbix -a http://localhost/zabbix/api_jsonrpc.php
 Output 1
If I create a new server, add it to the host group, and execute zhostfinder.py, this line will return three hosts.
- Find a certain pattern among other hosts:
./zhostfinder.py. -S MySQL -u Admin -p zabbix -a http://localhost/zabbix/api_jsonrpc.php
It is also possible to create something with Zabbix gnomes, for example, a host group:
zgcreate.py -u Admin -p zabbix -a http://192.168.56.101/zabbix/api_isonrpc.php HostGroupName
To create several host groups:
zgcreate.py -u Admin -p zabbix -a http://192.168.56.101/zabbix/api_isonrpc.php Testing1 Testing2 Testing3
You can do it manually in the CLI, but you can also use scripts to create new host groups dynamically. It can also help to add new hosts to newly created groups and link some templates using Python.
API with curl
It is also possible to test API methods without any programming languages, using just curl. It is an HTTP(S) request to the front end which posts the information and specifies the execution of the API call.
For the user.login method, I got the API data from Zabbix documentation and specified the curl. This method allows us to log in to the API and generate an authentication token.
curl -H "Content-type: application/json-rpc" -X POST http://localhost/zabbix/api_jsonrpc.php -d'
{
    "jsonrpc": "2.0",
    "method": "user.login",
    "params": {
        "user": "Admin",
        "password": "zabbix"
    },
    "id": 1
}'
Copy-paste it in the CLI. The result is a token, a session ID of the authenticated user. I will use this session ID in the next calls.
The host.get method allows you to retrieve information about a host (Zabbix and Linux in this case). In this example, I filter data by host and by name and use the token and session ID.
curl -H "Content-type: application/json-rpc" -X POST http://localhost/zabbix/api_jsonrpc.php -d'
{
    "jsonrpc": "2.0",
    "method": "host.get",
    "params": {
      "filter": {
      "host": [
        "Zabbix server",
        "Linux server"
      ]
   }
},
    "auth": "token",
    "id": 1
}'
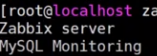
If I want to use another host, e.g. my MySQL Monitoring host, I have to add a new parameter.
In the output, you will see more detailed information such as:
- whether the host is disabled,
- whether there are error messages,
- whether the host is monitored,
- whether it is under maintenance, etc.
You can use filters on specific fields (e.g. host id) to get smaller output. For example, I want to filter my requests for the Zabbix server only and authenticate with the session ID.
curl -H "Content-type: application/json-rpc" -X POST http://127.0.0.1/zabbix/api_jsonrpc.php -d'
{
    "jsonrpc": "2.0",
    "method": "host.get",
    "params": {
       "output": ["hostid"],
       "selectGroups": "extend",
       "filter": {
          "host": [
          "Zabbix server"
       ]
    }
},
    "auth": "token",
    "id": 2
}'
As a result, I have information about the host ID and some additional information.

The curl can also be used to create hosts. To do this, check the documentation first. There you will find several examples of host.create commands.
For my purposes, I have to adjust the copy-pasted example and add the curl line, punctuation and modify the session ID. I also changed the name of the new host to YouTube Tutorial and added a new group ID and template ID.
curl -H "Content-type: application/json-rpc" -X POST http://localhost/zabbix/api_jsonrpc.php -d'
{
    "jsonrpc": "2.0",
    "method": "host.create",
    "params": {
        "host": "YouTube Tutorial",
        "interfaces": [
            {
                "type": 1,
                "main": 1,
                "useip": 1,
                "ip": "192.168.3.1",
                "dns": "",
                "port": "10050"
            }
        ],
        "groups": [
            {
                "groupid": "50"
            }
        ],
        "tags": [
            {
                "tag": "Host name",
                "value": "Linux server"
            }
        ],
        "templates": [
            {
                "templateid": "20045"
            }
        ],
        "macros": [
            {
                "macro": "{$USER_ID}",
                "value": "123321"
            },
            {
                "macro": "{$USER_LOCATION}",
                "value": "0:0:0",
                "description": "latitude, longitude and altitude coordinates"
            }
        ],
        "inventory_mode": 0,
        "inventory": {
            "macaddress_a": "01234",
            "macaddress_b": "56768"
        }
    },
    "auth": "token",
    "id": 1
}'
If I open the front end and go to Configuration > Hosts, I will find a new host named YouTube Tutorial with the template, interface, port, macro, user ID, etc. as specified above.
Other features
Zabbix API functions are not limited to getting information and creating new hosts.
host.update allows you to change the configuration of the existing host, for example, to set the interface from the agent to SNMP. You can also delete configurations or get the history out of Zabbix through API.
API is better than direct queries if you are not an expert in databases. The Zabbix front end has all supported API methods and queries written and optimized by the Zabbix developers for proper performance, so you do not have to worry about making any mistakes.
API also facilitates automation and integration. In large companies monitored by Zabbix with multiple front end users and admins, hosts, items, and triggers, it is impossible to control the actions of all employees. One of them could accidentally change just a single value in the configuration, but it would be enough to block monitoring. Finally, the mistake would be found and fixed, but how can you be sure it will not happen again?
One of the options is to change the policy of the company and allow the changes in the templates, items, triggers, and thresholds only through the centralized template storage (for example, item or trigger storage). If someone makes any changes in the front end, the global script with API and configuration import will overwrite all the events that happened in the front end with all the values and the parameters, which will be saved in the centralized template storage.
Another important feature is related to the ticketing system. In the case of one-way integration between Zabbix and the ticketing system, the information is parsed from Zabbix to the service and then it is lost. When an event happens, an alert is sent to the ticketing system, creating a ticket with an ID. When the alert is sent, it is not visible in the front end. The ticket is created, but you do not know if any actions were taken to fix it. The ticket ID is unknown because it was lost after the alert was sent.
In this case, you can use Zabbix API to establish two-way integration. Now when the service creates a ticket, an API call is performed using the ticket ID (or event ID) as a variable. The problem.ack API method is applied. The user will find a notification about a new ticket and go to the front end to acknowledge the problem. You can see the progress, check if your coworkers already reacted to the ticket, what the problem is or what is required to fix it.
Generally, 90% of the success in Zabbix API is based on your script-making skills, knowledge of the Zabbix documentation and supported API methods (there are more than 230 of them). 99% of actions in the front end or in the database can be performed with API.