With calculated items, you can create calculations based on other items. The values will be periodically calculated based on an arithmetical expression and done by the Zabbix server – nothing is performed on Zabbix agents or proxies.
Watch the video now.
Contents
I. Introduction (0:02)
II. Calculated items (0:52)
Introduction
In this post, I’m going to tell you about calculated items, which allow doing calculations from the already retrieved values, as well as if the agent or device does not expose a specific view of the data.
I have Zabbix 4.4 (or you can use any previous version), and CLI of the CentOS 7, but 99% of the time we’ll need only the Zabbix frontend and documentation on calculated items.
Calculated items
We already know many items, such as Zabbix agent, SNMP checks, SSH, Telnet, external scripts, user parameters — different methods to get data from data sources.
In some cases, we need to do some calculations with already collected data. So, we get the data from our host, store it in the database, and then use it to receive some aggregated data.
For the sake of demonstration, I will create a calculated item on the Zabbix server. First of all, go to Configuration > Hosts > Host > Items.

‘net.if’ key
Under the ‘net.if‘ key, I have two items created based on my network discovery rules that are calculating incoming and outgoing traffic on my virtual machine.
![]()
Items calculating traffic
In this post, I’ll create a calculated item that will measure the total traffic on my virtual machine.
To do that, in Configuration > Hosts > Host > Items click Create item.
NOTE. The best practice is to create a new item inside the template or do that as an item prototype on the low-level discovery rule.
Calculated item parameters
1. You start creating a regular item. Choose any name for it.
2. Select the Type defining how you will be collecting the data — ‘Calculated‘.
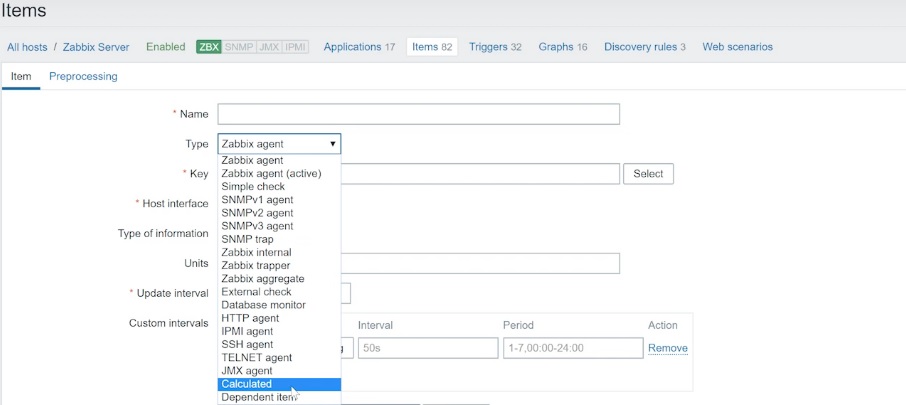
‘Calculated’ type
NOTE. It’s important to remember that calculated check operates with already collected data, and is processed only by the Zabbix server. Zabbix agent or Zabbix proxy is not involved, and no connection to any remote host is required. The calculated check operates with the data collected by some other items and stored inside the database.
3. Key might be the first frustrating thing for beginners. As you know, the key defines what data you will get. For example, ‘net.if.in‘ is for incoming traffic, ‘net.if.out‘ — for outgoing traffic.
In calculated items, the key is just a placeholder. It is still mandatory and you do have to use it, but you can use any key as long as it follows the syntax of Zabbix keys.
4. Formula —the most important thing in calculated items. There is no such field in the Zabbix agent or SNMP. Here you write what values you will get, from which items, hosts, what you will do with the values, and how you’ll do that.
You can copy the required Formula syntax from the documentation. We’ll need sum of two functions:
last("net.if.in[eth0,bytes]")+last("net.if.out[eth0,bytes]")
We cannot use this as it is, and need to copy-paste the items in Configuration > Hosts > Host > Items with the ‘net.if‘ key: ‘net.if.in[“enp0s8”]‘ and ‘net.if.out[“enp0s8”]‘:
last(net.if.in["enp0s8"])+last(net.if.out["enp0s8"])
NOTE. Remember that the key must be exactly the same in the calculated item formula as on the host. If the item on the host has quotes, the calculated items should also have quotes, as they won’t work otherwise.
This works as trigger function ‘.last()‘ which takes the last received value of an item.
NOTE. You can also use the function average:
avg("Zabbix Server:zabbix[wcache,values]",600)
Then after the comma, you need to specify the period for which average is to be calculated. In our example, we can specify average, say, for five minutes, plus the last received value of this item:
avg(net.if.in["enp0s8"]",600)+last(net.if.out["enp0s8"])
With ‘last‘ you specify only one value, and there is no need to specify the second parameter, as the time period for which you want to do the calculation.
After we have done the formula, we have a couple of other parameters.
5. Type of information should be the same as for the respective item on the host. In our example, — ‘Numeric (unsigned)‘.
6. Units — ‘bps‘ (bits per second) in our example, and we can copy/paste this. Unit field does not change the data already stored in the database. The field is used only for visualization in the frontend.
7. Update interval can be 20 seconds.
8. In Configuration > Hosts > Host > Items > Preprocessing there are two preprocessing rules: Change per second and Custom multiplier of 8 as we are receiving data as bits and need to calculate it as bytes.
We don’t need to specify these in Preprocessing parameters for the calculated item. They are applied to our original items and are already saved in the database, that is they are already applied to the data that we use inside our calculated item.
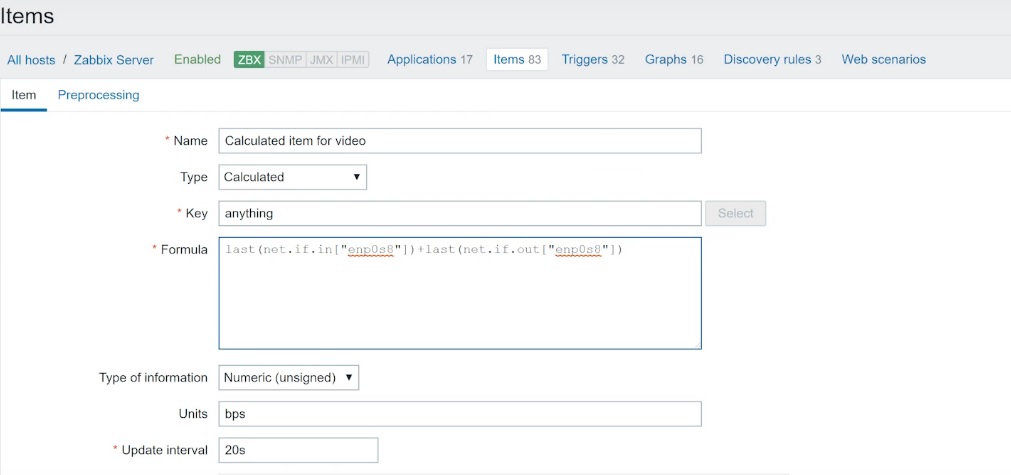
Calculated item parameters
Now we can Add the calculated item. You will see Item added message.
To make everything faster, in the CLI we can force zabbix_server -R config_cache_reload.
![]()
Reload command in the CLI
Calculated item check
In Configuration > Hosts > Host > Items, we can search for the calculated item and press Check now.
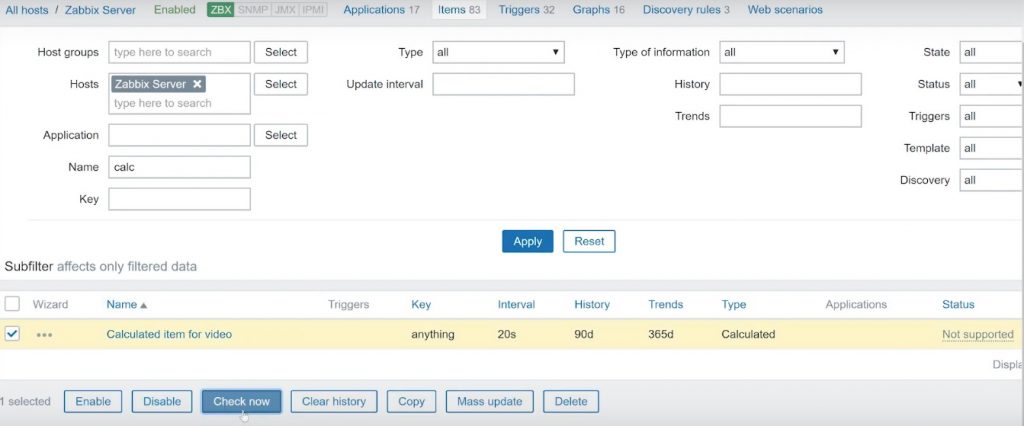
Checking the calculated item created
Then we can check the latest data in Monitoring > Latest data to see if the calculated item is enabled.

Calculated item enabled
If you have made a mistake somewhere, an error message will be displayed that the item is not supported.
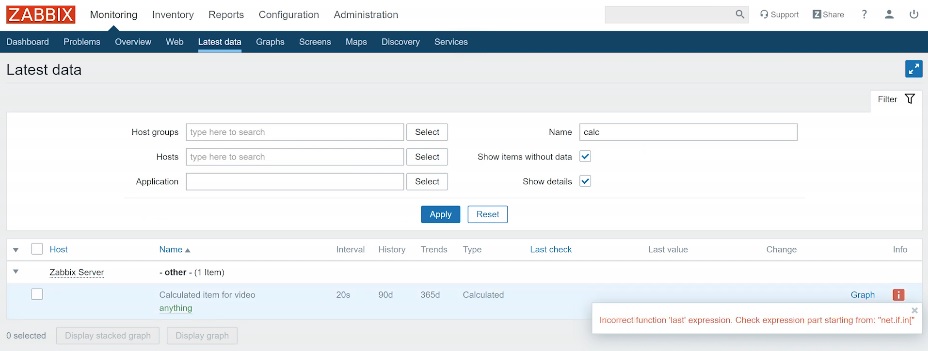
‘Item not supported’ message
Update and custom intervals
Go Monitoring > Latest data check the calculated item and click anything to filter out our items to see the results.
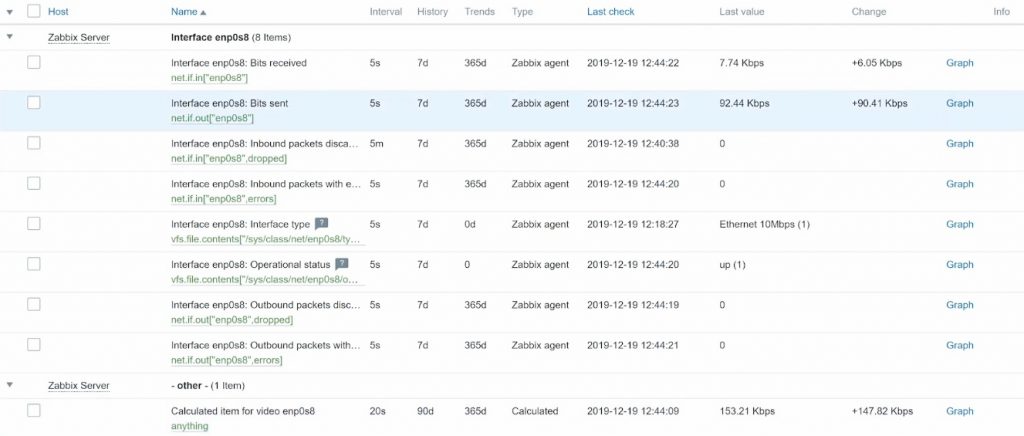
Regular and calculated items results
Here we have bits sent, bits received, and their total. The results do not match. The problem is in the update interval.
For example, ‘net.if.in‘ and ‘net.if.out‘ keys on our regular item have an update interval of 5 seconds. We normally expect that each of these keys goes in cycles and gets a new value every five seconds. But the calculated item has an update interval of 20 seconds, which is the time to wait since the last check.
Very often when your object intervals differ at a moment the calculated item is initiated, the calculated item will gather the last received value of ‘net.if.in‘, but will get one value before of ‘net.if.out‘ as it hasn’t arrived yet. That’s why our total does not match.
It’s not an issue as you miss just one iteration and, in general, the data is correct though it looks wrong in the frontend.
If you want to avoid this discrepancy, instead of update intervals you need to use custom intervals inside the calculated item and inside your regular items for ‘net.if.in‘ and ‘net.if.out‘ because custom intervals are clock-based, and so are more precise than just Update interval.

Custom intervals
If you still want to use Update intervals, I recommend waiting for some time. Remember, the triggers will work fine, but checking the Latest data may be confusing.
That’s all for today on calculated items. You are welcome to like, comment, and subscribe.


 Prev Post




Lets say I have a calculated item much like what you are showing but I want to discard or zero out the result if it is negative. Can pre-processing do that? Are there other ways? As I am checking multiple items I was unsure how pre-processing would be able to handle that.
i created a calculated ITEM (A/B) but i noticed when i dont have a value in the a & b items the calculated still working
i want to stop it when i don’t have a value
{
“data”: [
{
“STATE”: “completed”,
“RESULT”: “failed”,
“CREATED_DATE”: “2024-12-11T19:38:55.1537677Z”,
“FINISHED_DATE”: “2024-12-18T10:47:16.2303285Z”,
“DURATION_TIME”: “6d 15h 8m 21s”,
“ID”: 24,
“NAME”: “20241211.1”
},
{
“STATE”: “completed”,
“RESULT”: “failed”,
“CREATED_DATE”: “2024-12-10T10:00:46.3256556Z”,
“FINISHED_DATE”: “2024-12-10T10:01:12.432953Z”,
“DURATION_TIME”: “26s”,
“ID”: 13,
“NAME”: “20241210.5”
},
{
“STATE”: “completed”,
“RESULT”: “failed”,
“CREATED_DATE”: “2024-12-10T09:58:25.683788Z”,
“FINISHED_DATE”: “2024-12-10T09:58:54.9541732Z”,
“DURATION_TIME”: “29s”,
“ID”: 9,
“NAME”: “20241210.4”
},
{
“STATE”: “completed”,
“RESULT”: “failed”,
“CREATED_DATE”: “2024-12-10T09:29:38.5937401Z”,
“FINISHED_DATE”: “2024-12-10T09:30:26.0767382Z”,
“DURATION_TIME”: “47s”,
“ID”: 5,
“NAME”: “20241210.3”
},
{
“STATE”: “completed”,
“RESULT”: “failed”,
“CREATED_DATE”: “2024-12-10T09:29:29.7042421Z”,
“FINISHED_DATE”: “2024-12-10T09:30:01.3293812Z”,
“DURATION_TIME”: “31s”,
“ID”: 4,
“NAME”: “20241210.2”
},
{
“STATE”: “completed”,
“RESULT”: “failed”,
“CREATED_DATE”: “2024-12-10T09:18:01.9701705Z”,
“FINISHED_DATE”: “2024-12-10T09:18:05.1812153Z”,
“DURATION_TIME”: “3s”,
“ID”: 3,
“NAME”: “20241210.1”
}
]
}
I have raw data coming from JavaScript, and I want to extract each block as an individual value for a Zabbix item. How can I achieve this?